2023 TELECASTER BUILD
This page contains some notes I took in the process of building a Telecaster from spare parts, in 2023, as well as the thought process I went through to design it. I documented it to have a record, but it can be informative to anyone wishing to take the plunge and put together a first solid-body electric guitar.
1 PLAYING JAZZ ON A TELECASTER
1.1 What Is a Jazz Guitar?
"A Jazz guitar is any guitar you play Jazz on". In practice, Jazz guitarists essentially play archtop hollowbody instruments fitted with a neck humbucker pickup, and mounted with heavy flat-wound strings. Musicians usually are indeed very conservative (probably even more so in Rock). They are drawn to the sounds of their idols. Yet, it is very difficult to accurately reproduce an electric guitar sound, because there are so many factors at play:
- the player;
- the strings;
- the contact points of the strings: bridge, nut and frets;
- the guitar construction (neck joint, body hollowness, woods, scale-length, etc.; those are surprisingly the least important, unless an acoustic pickup is blended with the magnetic one);
- the type of pickups and their settings (position, height, pots and caps);
- the potential presence of effect pedals;
- the amp, including the amp speaker and the mic used to record the amp.
This could thus become a never-ending chase for vintage instruments. So, asking oneself what type of guitar one should play is not irrelevant.
1.1.1 Do You Need an Archtop to Play Jazz?
For the sake of the discussion, let's restrain ourselves to the golden age of Jazz guitar (essentially the 60s), where players such as Jimmy RANEY, Barney KESSEL, Jim HALL, Tal FARLOW, Herb ELLIS, Wes MONTGOMERY, Grant GREEN, Joe PASS, George BENSON and Pat MARTINO were at their peak. All these players played archtop guitars. The question is: was it a deliberate choice or the influence of a tradition? We will never know, for many of them, but these options are not exclusive. The common points of the sound of these players are the following.
- A clean tone,
- that is not distorted and compressed by the amp. Distortion can be heard occasionally on many famous records, but it was probably not deliberate. This quality is solely dictated by the amp headroom. A clean sound is necessary to play complex chords without harmonic clutter. People playing with heavy saturation mainly play power chords.
- A warm tone,
- that is with tamed highs. This is probably the most obvious departure from the traditional Fender tone, and probably why Jazz guitar players rarely adopted Teles and Jazzmasters, at first. Piercing the wall of sound is not as important as for Rockers. Highs are thus less needed, and are perceived more stridently, with an upright bass and a piano comping, than in a Rock context. This is why, one can go for a warm tone, with lush mids and lows.
- A fat tone,
- with a moderate pick attack. This is an important quality, as Jazz requires playing a lot of notes to properly outline each chord change. A sharp attack would result in very choppy-sounding phrases. However, a fat tone can result in a loss of articulation that can be heard in the trills played by Barney KESSEL or Grant GREEN (it is a matter of taste). Wes MONTGOMERY, George BENSON and Pat MARTINO, among others, compensated this lack of articulation with a staccato style, adding at the same time a very dynamic quality to their playing.
- A weak sustain,
- compared to solid-bodies, resulting from the string vibration being efficiently redistributed to the top. This is a limitation that I imagine these players would have chosen to overcome, if they had the technical ability to do so at the time. To compensate this instrumental deficiency, archtop players tend to repeat long-held melody notes instead of sustaining them.
- A weak dynamics,
- that is a rather naturally compressed sound, with a narrow amplitude between the quietest and loudest notes. It comes both from the hollowbody construction of the guitar, the top being easily overpowered by hard strumming, and from the humbucker design, which intrinsically compresses the sound, much more than single coils. Yet, great solos have climax. Great players compensate the lack of dynamics by increasing the number of notes per bar, or by increasing the number of notes played at the same time, such as Wes, starting with single notes, then playing octaves and finishing with block chords. However, Julian LAGE demonstrates on a daily basis that a truly dynamic playing, hard to obtain with an archtop, can make a Jazz guitar solo epic.
- Prone to feedback.
- This can be heard on many live albums. They tried to cope with it in different ways: the early Pat MARTINO famously stuffed a blanket in his Gibson Johnny SMITH (was it still a hollowbody, then?); George BENSON, who is used to play large venues, closes the f-holes of his Ibanez hollowbody with tape.
- Played at low volume.
- Typical Jazz gigs are played in small rooms, at low volume. The drums and the winds are rarely amplified. Jazzers tend to favor amp combos, rather than a separate head and cabinet, because they do not need very powerful rigs. A consequence of playing an archtop at low-volume is that the acoustic sound of the instrument can be heard. The fact is that the acoustic sound of a guitar mounted with electric strings (nickel or chrome) is not great. Archtops sound best acoustically with bronze strings. It would thus be more practical to not hear the acoustic sound of the instrument at low amp volume. At least, it should be an option, and we could choose to blend the magnetic pickup sound with the acoustic sound from a transducer, such as what Pat METHENY does. An acoustically-silent guitar is also an asset to practice at night.
In any case, the next generation implicitly answered the archtop question. Jazz guitar players who were at the forefront in the 80s and the 90s, all played semi-hollow or solid-body guitars:
- John McLAUGHLIN plays a variety of solid-body guitars, including several PRSs, a Les Paul, a Strat and a ES345 (semi-hollow), as well as his famous double-neck SG, in the Mahavishnu Orchestra (one of his former students, Jimmy PAGE, got the idea from him).
- Pat METHENY mainly plays archtops, but also solid bodies, such as his Roland GR-300, which is one of his most recognizable sounds.
- When John SCOFIELD is not playing his semi-hollow ES-335-ish Ibanez, he plays a Tele.
- Mike STERN's Yamaha Pacifica is the replica of a Tele.
- Bill FRISELL is mainly a Tele player.
- John ABERCROMBIE played mostly a semi-hollow guitar, and various solid-body instruments (both Teles and Les Pauls).
- Kurt ROSENWRINKEL plays a variety of guitars including some Les-Paul-looking objects.
- The second Pat MARTINO (after his brain surgery) played Les-Paul-type guitars, including his latest signature model by Benedetto.
The sound of some of these players is a clear departure from the golden age. Yet, they still play with a Jazz spirit: all can improvise and smoke on standards and be-bop tunes; they can swing; their musical ideas are infused with blues.
1.1.2 Do You Need A Humbucker to Play Jazz?
Now, there is also the issue of the type of pickup. It might actually be the most important one. A magnetic pickup is indeed only sensitive to the string vibration. Any vibration propagating into the wood is lost. In that sense, the wood impacts the magnetic pickup sound only in what it subtracts to the string vibration. Therefore, the higher the quality of the guitar will be (dense woods without cracks, well-fitted neck joint, no wobbly parts, etc.), the lower the impact of the wood species and overall design will be on the electric sound. The tonewood debate is artificially fueled by guitar companies who need to justify selling new models. The answer to the tonewood question is easy: it has an impact on the electric sound, but it is quite minor. The choice of the pickup is overwhelmingly more important.
All players before 1957 (the commercial release of the first humbuckers by Gibson) were de facto single coil players. Even after Seth LOVER's breakthrough, many great Jazz guitarists stuck with single coils.
- CC:
- Charlie CHRISTIAN and Barney KESSEL, and quite recently, Pat METHENY.
- P90:
- Grant GREEN, Jim HALL and early Kenny BURRELL, Herb ELLIS and Jimmy RANEY.
- Dynasonic:
- Julian LAGE.
- Telecaster neck:
- Ed BICKHERT (at the beginning, before, changing for a neck humbucker), Bill FRISELL (sometimes), Julian LAGE (before changing for a Dynasonic in a P90 casing).
- Telecaster bridge:
- Julian LAGE during his 2019 European tour.
The issues of single coil pickups are well known:
- they are noisy;
- they can be thin sounding;
- they can be bright, although some P90s can be very warm;
- they are more articulate, so the pick attack is heard more prominently and slurring requires a better control.
Single coils however have several major advantages over humbuckers.
- They have a more distinct personality (i.e. they have a more perceivable resonance frequency). Many people agree that they actually sound better.
- They usually are more dynamic. Small inflections in the finger pression on the string or in the attack will be heard more clearly.
- They are more versatile, as it is quite easy to shape the sound of a P90 to sound like a humbucker (fattening the tone at the amp, EQing out the highs, and adding compression), whereas it is more challenging to obtain a single coil sound with a humbucker (some pedals propose it, though).
1.1.3 Telecaster Jazz Guitarists
From this review, it appears that there is a case to be made that a solid-body guitar, mounted with single coil pickups, can constitute a very suitable Jazz guitar. The Telecaster is probably the most common non-traditional-Jazz-guitar Jazz guitar. Tele's neck pickups are usually warmer than Strat's. Besides, the Telecaster's simplicity suits well Jazz playing. Jazz players are generally not the relentless tweakers that Rockers are. They usually stick with one good sound for a whole gig. Finally, they do not need the double cut-away that Strats offer, as they tend to play in a lower register. Jazz playing is also more horizontal over the neck, and not so much "in position". The highest notes are often reached from the 12th or 15th position.
Here is a non-exhaustive list of famous Jazz players who primarily play Telecasters.
- Ed BICKHERT (1932-2019)
- was the quintessential old-school Jazz player who did most of his career on a Tele. He played a stock Tele for many years before swapping the neck pickup for a P.A.F. He was an outstanding accompanist, reminiscent of Jim HALL, relying on the sustain and note definition (especially in the low-register) offered by the Tele. His collaboration with Paul DESMOND is a good illustration of his style.
- Ted GREENE (1946-2005)
- was a famous L.A.-based educator. He wrote four seminal books: two about chords and two about single note playing. He was a proficient chord melody player, sounding like a piano. He released only one record, but there are many videos, taken by students in the 1990s, showing him sitting on the floor and demonstrating semi-improvised solo guitar arrangements of tunes called on the spot.
- Bill FRISELL (1951-)
- is one of the most underrated famous players. This probably comes from a total absence of flashiness and demonstrative virtuosity. Yet, like Jim HALL, his style is more complex and subtle than it appears. His music can be appreciated by both people who are new to Jazz and by hardcore Jazzers. He has a very diverse discography that blends different styles (e.g. Blues Dream which is a modal Jazz / Blues / Country mash-up)
- Mike STERN (1953-)
- is a singular and influential guitarist, who can be recognized within a few seconds (partly because he always plays the same licks). Despite being a fusion player, he can play standards (e.g. his Standards album or Bunny BRUNEL's Dedication). He played with Miles, ergo Jazz-approved.
- Tim LERCH (1960±5-)
- is a Seattle-based educator and performer. He is a former student of Ted GREENE. He gained online fame by carrying the flag of Telecaster Jazz players, by perpetuating Ted GREENE's heritage and by popularizing the use of the CC pickup in a Tele.
- Julian LAGE (1987-)
- is everyone's favorite. His Live in Los Angeles is one of the most revered recent Jazz performances. He used a 1954 Blackguard hooked to a 1960 Fender Tweed Champ. When someone asks me if one can really play hardcore Jazz on a Tele, I send the link to I'll be seeing you with "QED". His style blooms on the enhanced dynamic range and note separation offered by the Tele.
In addition, several famous Jazz players occasionnally play Telecaster-type guitars: Barney KESSEL, Joe PASS, Herb ELLIS, John SCOFIELD, Sylvain LUC. If you add jazzy blues guitarists to this list, Robben FORD considers his 1960 desert blonde Tele the most important guitar of his career.
1.2 What Are the Pros and Cons of Telecasters?
The fact that Leo FENDER's 1950 design is still one of the most popular guitars to date is a credit to his genius. Although the Telecaster was not the first ever solid-body guitar (see the endless controversy involving Paul BIGSBY, Merle TRAVIS, Les PAUL and Leo FENDER), it was the first mass-produced one. Many consider it to be flawless (the obvious flaws of the Esquire prototype had been fixed with the original Broadcaster, that was later renamed the Telecaster). What is sure is that Leo was a visionary with a powerful work ethics. His instruments were designed as tools for working musicians, without any superfluous (e.g. without precious solid wood carved tops). Every feature was solely motivated by one of the following: quality of the sound, playability, ease to produce and service. It gave Fender instruments the elegance of functionality. He could achieve this approach because his company was first a radio shop and not an instrument company. He could thus conceive new instruments (electric guitars and basses, amps, etc.) from scratch. On the contrary, a brand such as Gibson, which already had a 50 year history prior to that, could not depart as easily from its tradition of building quality acoustic instruments. The release of the Gibson Les Paul, in 1952, was a response to Fender, but it carried the weight of the Gibson heritage. The proud wood-workers at Gibson were building Les Pauls out of mahogany, with a flame-maple top, a rosewood fretboard, and a set neck. The Les Paul is a solid-body archtop. On the contrary, Fender guitars were made out of commonly available woods (swamp ash, alder and sometimes pine), with a bolt-on, one-piece, maple neck. The neck was designed to be easily replaced in case of problems, or simply when the frets were worn out. They were crafted by workers who had no prior experience in guitar making.
We can make an analogy with computer's operating systems.
- A Gibson
- is like a Windows PC: it is historical, but cumbersome and sometimes annoying.
- A PRS
- is like a Mac (Paul REED SMITH himself looks very much like Steve JOBS): well-made, but trying to impose its ergonomy on the player. PRSs are renowned to be playable out of the box, but difficult to customize.
- A Fender-type
- guitar is like a Linux PC: rough, but simple and heavily modular and customizable by the user. With a bit of investment, they can be turned into ergonomic, very personal and unique tools. Their design (bolt-on neck, easily accessible electronics, possibility to route a universal pickup cavity hidden by the pickguard) permits extensive experimentation and thus allows the player to better understand the role of the different key components of a guitar and how to better achieve his sound. Anyone can swap the neck of a Telecaster to test different profiles, fingerboard radii or frets. Anyone who is not afraid of soldering can swap pots, caps, and pickups and decide what sound he likes best.
1.2.1 The Inconvenients of a Telecaster
Despite what some people think, the Telecaster is not a flawless design.
- Its look
- is an acquired taste. When it was first released, it was mocked for looking like a canoe paddle, a snow shovel or a toilet seat. Whether you admit it or not, a guitar is like a big necklace. It is something you wear to look cool, it is a statement, and most young players find it ugly. The Tele is an adult guitar.
- It is rough.
- It does not have smooth contours and bevels. Its neck joint is felt too bulky by shredders playing in the high register. Its bridge, especially the edges of the "ashtray", can be uncomfortable or even catch the pick in its course. In addition, the bridge was originally designed with a big nickel cover acting as a Faraday cage. When this cover is on, it is impossible to palm-mute.
- It is usually bright,
- especially if it is a modern model. It is also thin sounding. In addition, the Tele twang, that Country players rave about, is quirky to Jazz players.
- It is noisy
- and noiseless pickups tend to sound sterile.
- Its intonation
- is not optimal, at least with a traditional, three-saddle Tele bridge. Modern Teles have six saddles that can independently be adjusted, but they sound even grittier, probably because they are made out of steel instead of brass.
- The output jack socket is wobbly.
- If it is not frequently tightened, it will rotate and the contacts of the jack can become faulty.
- The control plate
- is not perfectly designed. The volume and tone knobs are too much spread apart, which leaves not enough space for the selector to be operated easily. In its traditional orientation, the tip of the selector almost touches the volume knob, when it is on the bridge pickup. It makes it difficult to flip it back in the neck position.
1.2.2 The Advantages of a Telecaster
The Tele has many advantages, and many of its flaws can be addressed, provided that one is willing to slightly depart from "the way Leo did it".
- Its simplicity
- and the fact that its elegant design is solely motivated by functionality make it a truly minimalist tool. It forces you to focus on what you play. It is the equivalent of ink or charcoal drawing. As a consequence, it is also easy to set-up, fix, tweak and experiment with. You do not depend on makers. You are able to optimize it to your taste and fix it on the road. For instance, the way the nut slot is designed allows you to not glue it. It will just stay there with the downward string pressure. It means you can have different nuts for different string gauges and swap them instantly when changing strings.
- Its wide tonal range,
- unexpected from a simple guitar, comes from the fact that its two pickups are very different (by comparison, the three pickups in a Strat are all the same). It gives the Tele an unmatched versatility. It is extensively used in virtually all electric guitar styles : Jazz, Blues, Funk, Rock, Country, Pop, Hard Rock, Metal, etc. It is versatile because it can approach many types of guitar sound. It is however not a Swiss army knife, such as some guitars with splittable humbuckers and piezo that can be blended together. It keeps its own personality.
- It has a nice tone
- and permits a very expressive playing, with plenty of sustain (which is good for chord melodies). Its tone is very sensitive to picking (finger style, picking soft or loud, pick orientation), more than other guitars, I feel. Pickup, pedal and amp designers often test their prototypes on Teles. Its bright / thin-sounding quality, mentioned above, can be addressed by swapping the neck pickup for a darker one (CC, P90, Humbucker, etc.). Finally, the tighter bass response of a Tele blends better with an upright bass, to my mind.
- Its clarity
- allows players to use close voicings in the lower register without sounding muddy. It works well down-tuned.
- Its ergonomy
- is also unanimous, except for its neck joint. It is well-balanced and relatively light. The control layout issue, that was mentioned above, can easily be addressed by swapping the control plate for one with the knobs closer to each other and a slanted selector. In addition, the symmetry of the control plate allows the player an additional modularity: it can be reversed to bring the volume knob closer to the neck and the selector to the back. This is my favorite layout, as the volume becomes easily adjustable with the pinky while playing. Finally, concerning the problematic edges of the bridge, several after-market companies propose edgeless drop-in replacement bridges.
- Its sturdiness
- makes it a very reliable guitar that can be taken everywhere. Its solid body makes it less fragile than hollowbodies. It is also less dependent on weather conditions. The wobbly jack socket can be fixed by swapping the jack plate for one mounted with screws. The risk of breaking the headstock is very low, contrary to Les Pauls, SGs and ES-335s. A Tele can be carried around in a soft gig bag without reasonable risks. When flying with a low-cost company, one has the option to unbolt the neck from the body and wrap them in a hand luggage. It is not recommended to check a guitar, even a sturdy one, unless you have a good flight case.
- It has a good tuning stability,
- especially compared to floating bridge models (Strats, Les Pauls with Bigsbies, Jazzmasters, etc.). The intonation issue of the traditional three-saddle bridge can be solved by using compensated saddles. There are also bridges with six individual brass saddles.
- Its is cheaper
- than archtops, at the same quality level, unless you are looking into the custom shop or vintage markets. It is even more the case now that entry level models have benefited from the improvement of CNC machines and from the gain of expertise of East Asian manufacturers.
- No feedback
- at Jazz gig volumes, as mentioned above.
- A wealth of information
- is available on Teles. There are a lot of books, videos and blogs about the history, the playing styles, the set-ups and modifications of Teles. In addition, spare parts are easy to find: tuners, bridges, plates, pots, caps, selectors and boutique pickups. Alternate wiring diagrams are available online. Several companies even offer necks and bodies (make sure to check the compatibility of the neck pocket).
1.3 What Makes a Guitar a Telecaster?
How much a modified Tele stays a Tele? This is subjective, but, in my mind a Tele is defined by the following elements:
- the overall shape of the Telecaster designed by Leo FENDER;
- a bolt-on neck;
- a 25.5 inch scale-length;
- a hard-tail bridge;
- two magnetic pickups. In particular, the classic bridge pick-up seems to be essential to the personality of the Telecaster. One could argue that swapping the bridge pickup for a P90 or a humbucker will decrease the Telecasterness of the guitar.
On the contrary, several parameters seem secondary to what makes a guitar a Tele.
- The brand
- does not really matter. A Tele is so simple that many companies, including some owned by Leo himself (e.g. G&L) made credible Teles. Independent luthiers can also make good Teles.
- The type of wood
- seems almost irrelevant, as original Teles were indifferently made out of swamp ash, alder or pine. Fender even made a few runs with mahogany. The maple neck is more a constant (with or without a rosewood fretboard), but the famous rosewood-neck Telecaster that Fender made for George HARRISON is still a Tele.
- Chambered bodies
- or semi-hollow bodies (e.g. Thinline Tele) do not make a big difference to the sound, in my experience.
- The neck pick-up
- is disregarded by many Country and Rock players, because it is too dark and smooth. This is actually one of the reasons why Jazzers like it. However, it does not define the quality of a Tele, it can be swapped for a Charlie Christian (e.g. Danny GATTON), a P90 (e.g. Bill FRISELL), a gold-foil (e.g. Josh SMITH), a Dynasonic (e.g. Julian LAGE), a Filtertron (e.g. John ABERCROMBIE), a mini-humbucker (e.g. Brent MASON) or a full-size humbucker (e.g. Keith RICHARDS). A Telecaster is an Esquire plus an additional neck pickup.
- The addition of a floating bridge
- (Strat tremolo, Bigsby or B-bender) is quite common, but it weakens some of the main qualities of Teles: their simplicity and tuning stability. Adding so many extra moving parts gets us outside of the Tele realm. So, in my mind, a Tele with a B-bender is not a "Tele", it is a "Tele with a B-bender".
- Altering the scale-length
- works well but changes the guitar tuning. We can get different guitars that will not be "Teles", but "short-scale Teles" or "baritone Teles".
1.4 Defining my Own Guitar
Based on all the information I gathered, after having tried many guitars and done a lot of research, I could define the type of Tele I wanted. This is of course subjective, and purely motivated by my own taste and by the type of music and venue I play.
- Sound:
- warm with some dynamics.
- A warm sounding neck pick-up, but with more dynamics than a humbucker. This is what I play 90% of the time. A P90 is a good choice.
- A Broadcaster-type bridge pickup to get the traditional Tele sound, but warmer and fatter than modern Teles.
- Ergonomy:
- reliable with easy volume control.
- A reversed control plate for easier volume access and tone swells. Moving the selector to the back is of no consequence, knowing I mostly stay on the neck pickup.
- A traditional three brass saddle bridge, to get a smoother attack than with steel saddles. The saddles have to be compensated for intonation.
- As little sensitive as possible to hygrometry and temperature changes. Roasted woods are a good option.
- A smooth-feeling, unfinished neck, with a soft V profile (I just like the way it feels), a round fingerboard (7.25" radius; which is practical to finger complex chords), narrow and tall frets (vintage frets are too small). A roasted maple neck can be played unfinished. Having played an archtop for many years, I do not need markers, only side dots.
- As light as possible without making concessions to the sound.
- Look:
- organic look and feel.
- A personal, woody-looking instrument, far from the Californian aesthetics that was drawing from the car industry codes and colors. I wanted an instrument that looks like an old piece of furniture, with as little plastic as possible. The latter implies replacing the plastic pickguard and the tip of the selector switch by homemade wooden parts. Swamp ash is a good body option, because of its visible grain, with a translucent finish. Swamp ash can be roasted.
- Doable at home. It implies avoiding toxic products, such as nitrocellulose lacquer. Tru oil finish seems a good choice.
2 SOURCING THE PARTS
The whole point of building a guitar is to get a custom instrument, where we control as many parameters as possible, but without paying Custom Shop prices (i.e. >4000 €). We save the labor (and prestige) money, but, by purchasing retail components, we pay the full price on each part. Some oversea, mass-produced models, at the same quality level, could be cheaper than assembling your own partcaster, since big companies get very good deals on parts (tuners, electronics, bridge, etc.) and the labor is quite cheap. In addition, a homemade guitar will never look as slick as a factory production. You also have to account for the fact that you will mess-up some steps (e.g. I had to make four bone nuts, before making a playable one). So, in conclusion, putting together a partcaster should be motivated by at least one of the following points:
- combining a set of features that are not available on series instruments;
- wanting to experiment to better understand what makes a guitar tick;
- feeling the pride that goes with assembling your own instrument.
My only prior experience was a one-afternoon internship with a professional luthier to learn how to set-up a guitar. I learned the rest by reading books and websites, and watching videos. Before building this guitar, I could do a full set-up (neck, intonation, pick-up heights) and do basic soldering (pots, caps, selector and swapping pickups). I had no woodworking experience whatsoever.
Table 1 lists the brand, weight and price of the different components. I tried to get the best quality for each one of the components. The total price is typical of a Fender Player series (≈1200 €) and the weight is quite low (≈3.1 kg or 6.8 lb). I detail each part below.
| Part | Brand | Weight | Price (including tax and shipping) |
|---|---|---|---|
| Neck | Warmoth | 500 g | 362 € |
| Body | Warmoth | 1800 g | 380 € |
| Neck plate | Allparts | 28 g | 3.50 € |
| Bridge | Gotoh | 91 g | 51 € |
| Control plate | Göldö | 58 g | 12.10 € |
| Knobs | Allparts | 2×26 g | 2×4 € |
| Tuners | Gotoh | 187 g | 39.90 € |
| String tree | Allparts | 3 g | 2 € |
| Bone nut | Allparts | 3 g | 2.50 € |
| String ferrules | Gotoh | 10 g | 5 € |
| Strap attach | Allparts | 10 g | 2.50 € |
| Neck pickup | SP Custom | 145 g | 119.60 € |
| Bridge pickup | SP Custom | 90 g | 96 € |
| Pots | CTS | 2×20 g | 2×16 € |
| Capacitor | Allparts | 3 g | 7.80 € |
| Selector | Oak Grisby | 25 g | 12 € |
| Jack socket | Switchcraft | 10 g | 5.20 € |
| Jack plate | Electosocket | 16 g | 6 € |
| Pickguard | Castorama | 50 g | 0.80 € |
| Sanding paper | La Fabrique à Guitare | 6 € | |
| Grain filler | La Fabrique à Guitare | 3 € | |
| Tru Oil | La Fabrique à Guitare | 7 € | |
| Copper tape | Emma Music | 2 € | |
| Cloth wire | Emma Music | 2 € | |
| Total | 3.12 kg | 1160.4 € |
2.1 Neck and Body Choices
The quality of Warmoth necks and bodies is reputed. However, buying them from Europe is quite expensive, as there are important shipping fees and custom taxes, accounting for about one third of the total price. What decided me to go with Warmoth, despite the price, is their unmatched possibility to customize everything. In particular, I really wanted a vintage feeling soft V neck and a roasted swamp ash body. I also wanted a CC pickup cavity, because it is almost universal: it can fit any pickup except full-size humbuckers. Only Warmoth offered these options.
2.1.1 Neck
Here are the settings of my Warmoth Tele neck:
- Solid roasted maple;
- Vintage construction;
- 25.5" scale length;
- 7.25" fingerboard radius;
- V shape neck (Clapton type);
- 42 mm nut width;
- Narrow & tall nickel frets;
- Vintage tuning machine holes;
- No nut installed;
- No finish.
2.1.2 Body
Here are the settings of my Warmoth Tele body:
- Two piece roasted swamp ash;
- Charlie Christian pickup route;
- Front control route;
- Vintage bridge route;
- 4 screws Tele neck pocket;
- No bevels;
- No binding;
- 7/8" jack socket;
- No finish from Warmoth.
2.2 Electronics
2.2.1 Pickups
Since the primary components in the sound of an electric guitar are the pickups, this is where we should not be cheap. I chose to try the boutique pickups from a small French brand that was recommended to me by a luthier: SP Custom.
- Neck pickup:
- a SP Custom P90 Warm with a nickel cover (remember, no plastic). As its name says, it is a warm P90.
- Bridge pickup:
- a SP Custom Broadcast. As its name suggests, it is a Broadcaster replica, so slightly warmer and thicker than later models.
2.2.2 Components
I experimented with 250 kΩ and 500 kΩ pots and with 22 nF and 47 nF caps. With a broadcaster-style pickup, luthiers recommend 250 kΩ / 47 nF, whereas with a P90, especially a warm one, luthiers recommend 500 kΩ / 22 nF. In my case, I chose 250 kΩ / 47 nF, because I am going for a darker sound than the traditional Rock / Country tone. Even with these values, I slightly roll off the tone pot and my volume pot is always around 50%, which is the way to go.
- Volume pot:
- CTS vintage, 250 kΩ, logarithmic.
- Tone pot:
- CTS vintage, 250 kΩ, logarithmic.
- Capacitor:
- Allparts, paper in oil, 47 nF.
- Selector:
- Oak Grisby, 3 positions. I experimented with a four-way selector, with the Lollar Charlie Christian pickups, on a Vintera Tele. I did not like the fourth position (both pickups in series).
2.2.3 Ancillary
- Control plate:
- Göldö, reversed, with slanted selector.
- Knobs:
- flat top (nickel finish).
- Jack socket:
- mono Switchcraft.
- Output Jack plate:
- electrosocket with screws.
- Selector tip:
- homemade, carved from a piece of reclaimed Macassar ebony.
2.3 Accessories
2.3.1 Bridge
- Bridge:
- vintage Gotoh bridge ("in-tune"), with 3 compensated brass saddles.
- String ferrules:
- Gotoh.
2.3.2 Body
- Pickguard:
- homemade 3mm thick birch ply wood.
- Strap locks:
- Allparts, nickel (non-locking).
2.3.3 Headstock
I particularly like vintage-style Fender tuners. They are simple, light, but reliable. In addition, the end of the string is hidden in the shaft. So there is no risk of poking your fingers with it, and it does not look messy.
- Tuners:
- Gotoh SD91 vintage.
- Neck plate:
- Allparts with screws.
- Bone nut:
- Allparts, carved by hand.
- String tree:
- Allparts, nickel, vintage.
- Logo:
- glued reclaimed wenge veneer.
2.4 Necessary tools and products
Most of the tools and products are generic, except the nut and fret files that need to have a very specific shape and size to properly do the job.
2.4.1 Tools
The wear on the following tools, caused by building this guitar, is unnoticeable.
- Screw drivers (all sorts);
- Electric Drill;
- Dremel;
- Sanding block;
- Wood files;
- Soldering iron (simple one, without temperature control);
- Nut files (Göldö set);
- Fret files (crowning & edges; from Stewmac).
2.4.2 Consumable Products
- Sanding paper (240 to 2000 grit): 6 €.
- Grain filler (400 g; black; only used a small fraction): 8.50 €.
- Tru Oil (250 ml; only used a third of the bottle): 28 €.
- Copper tape: 2 €.
- Cloth wire: 2 €.
3 DETAILED BUILD STEPS
The build took several months, because I worked very slowly, sometimes not touching it for several weeks. I also spent time experimenting and practicing the different steps on scrap wood before applying it to the guitar.
3.1 Body Preparation
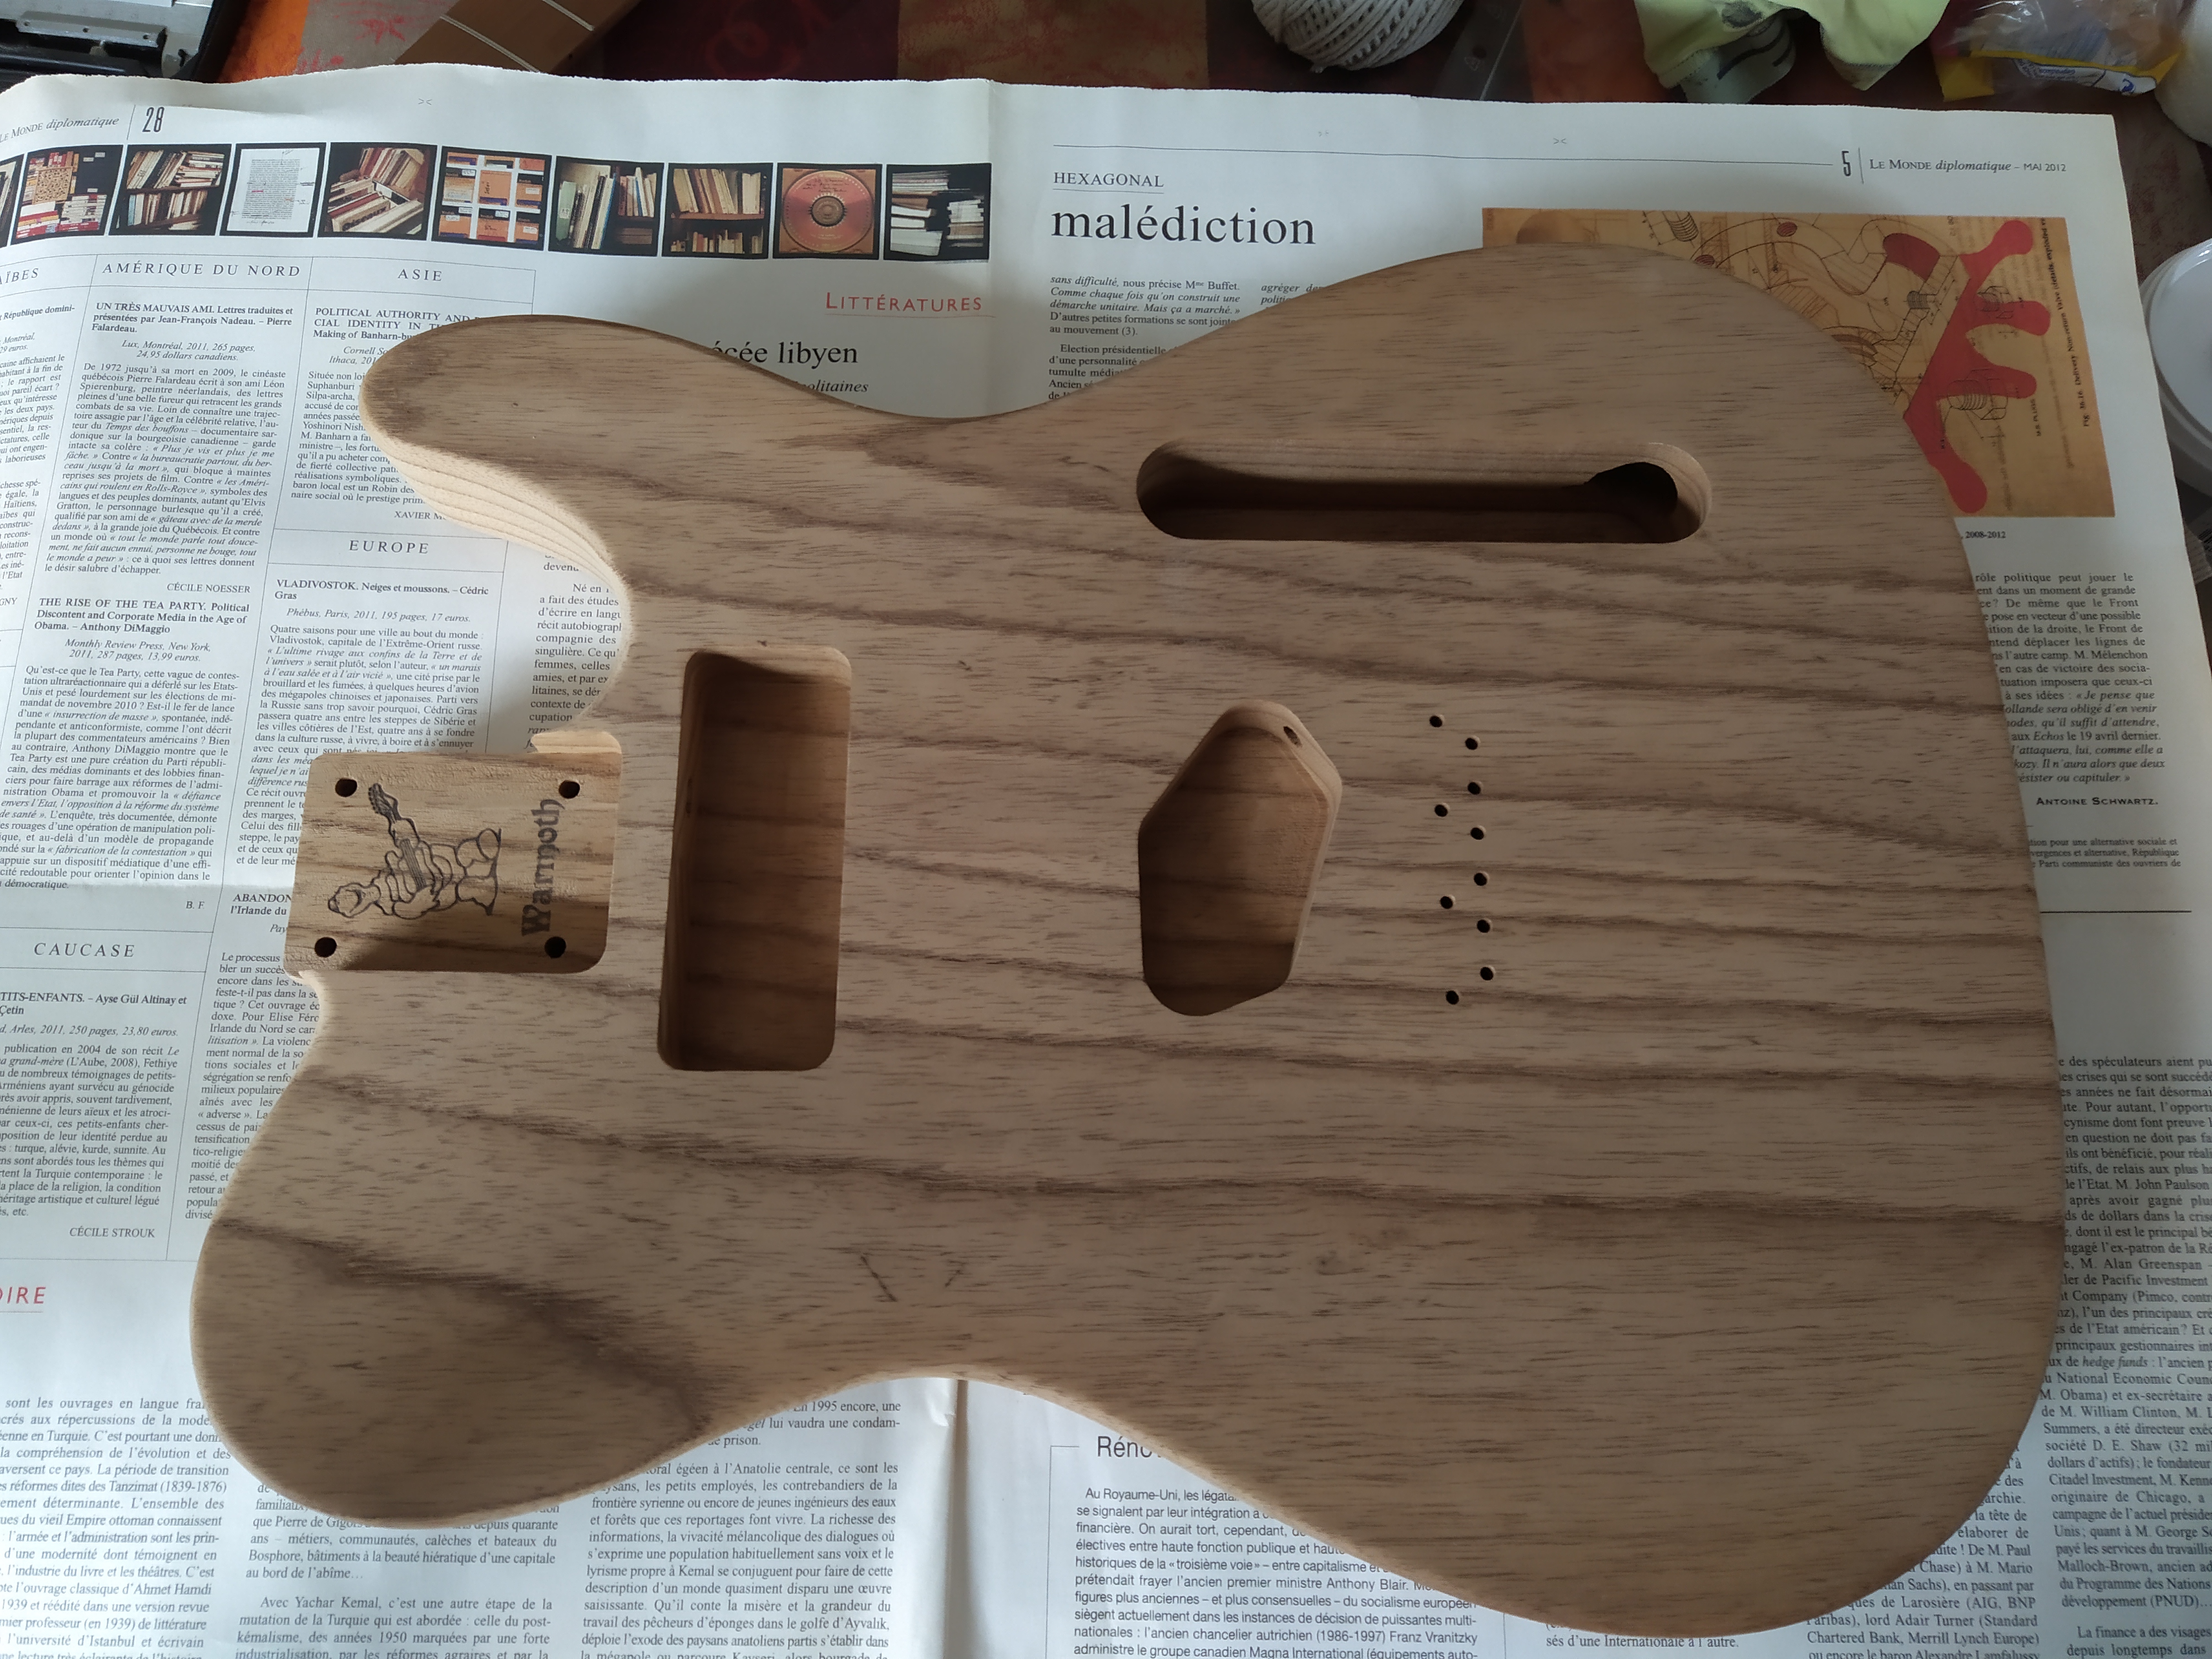
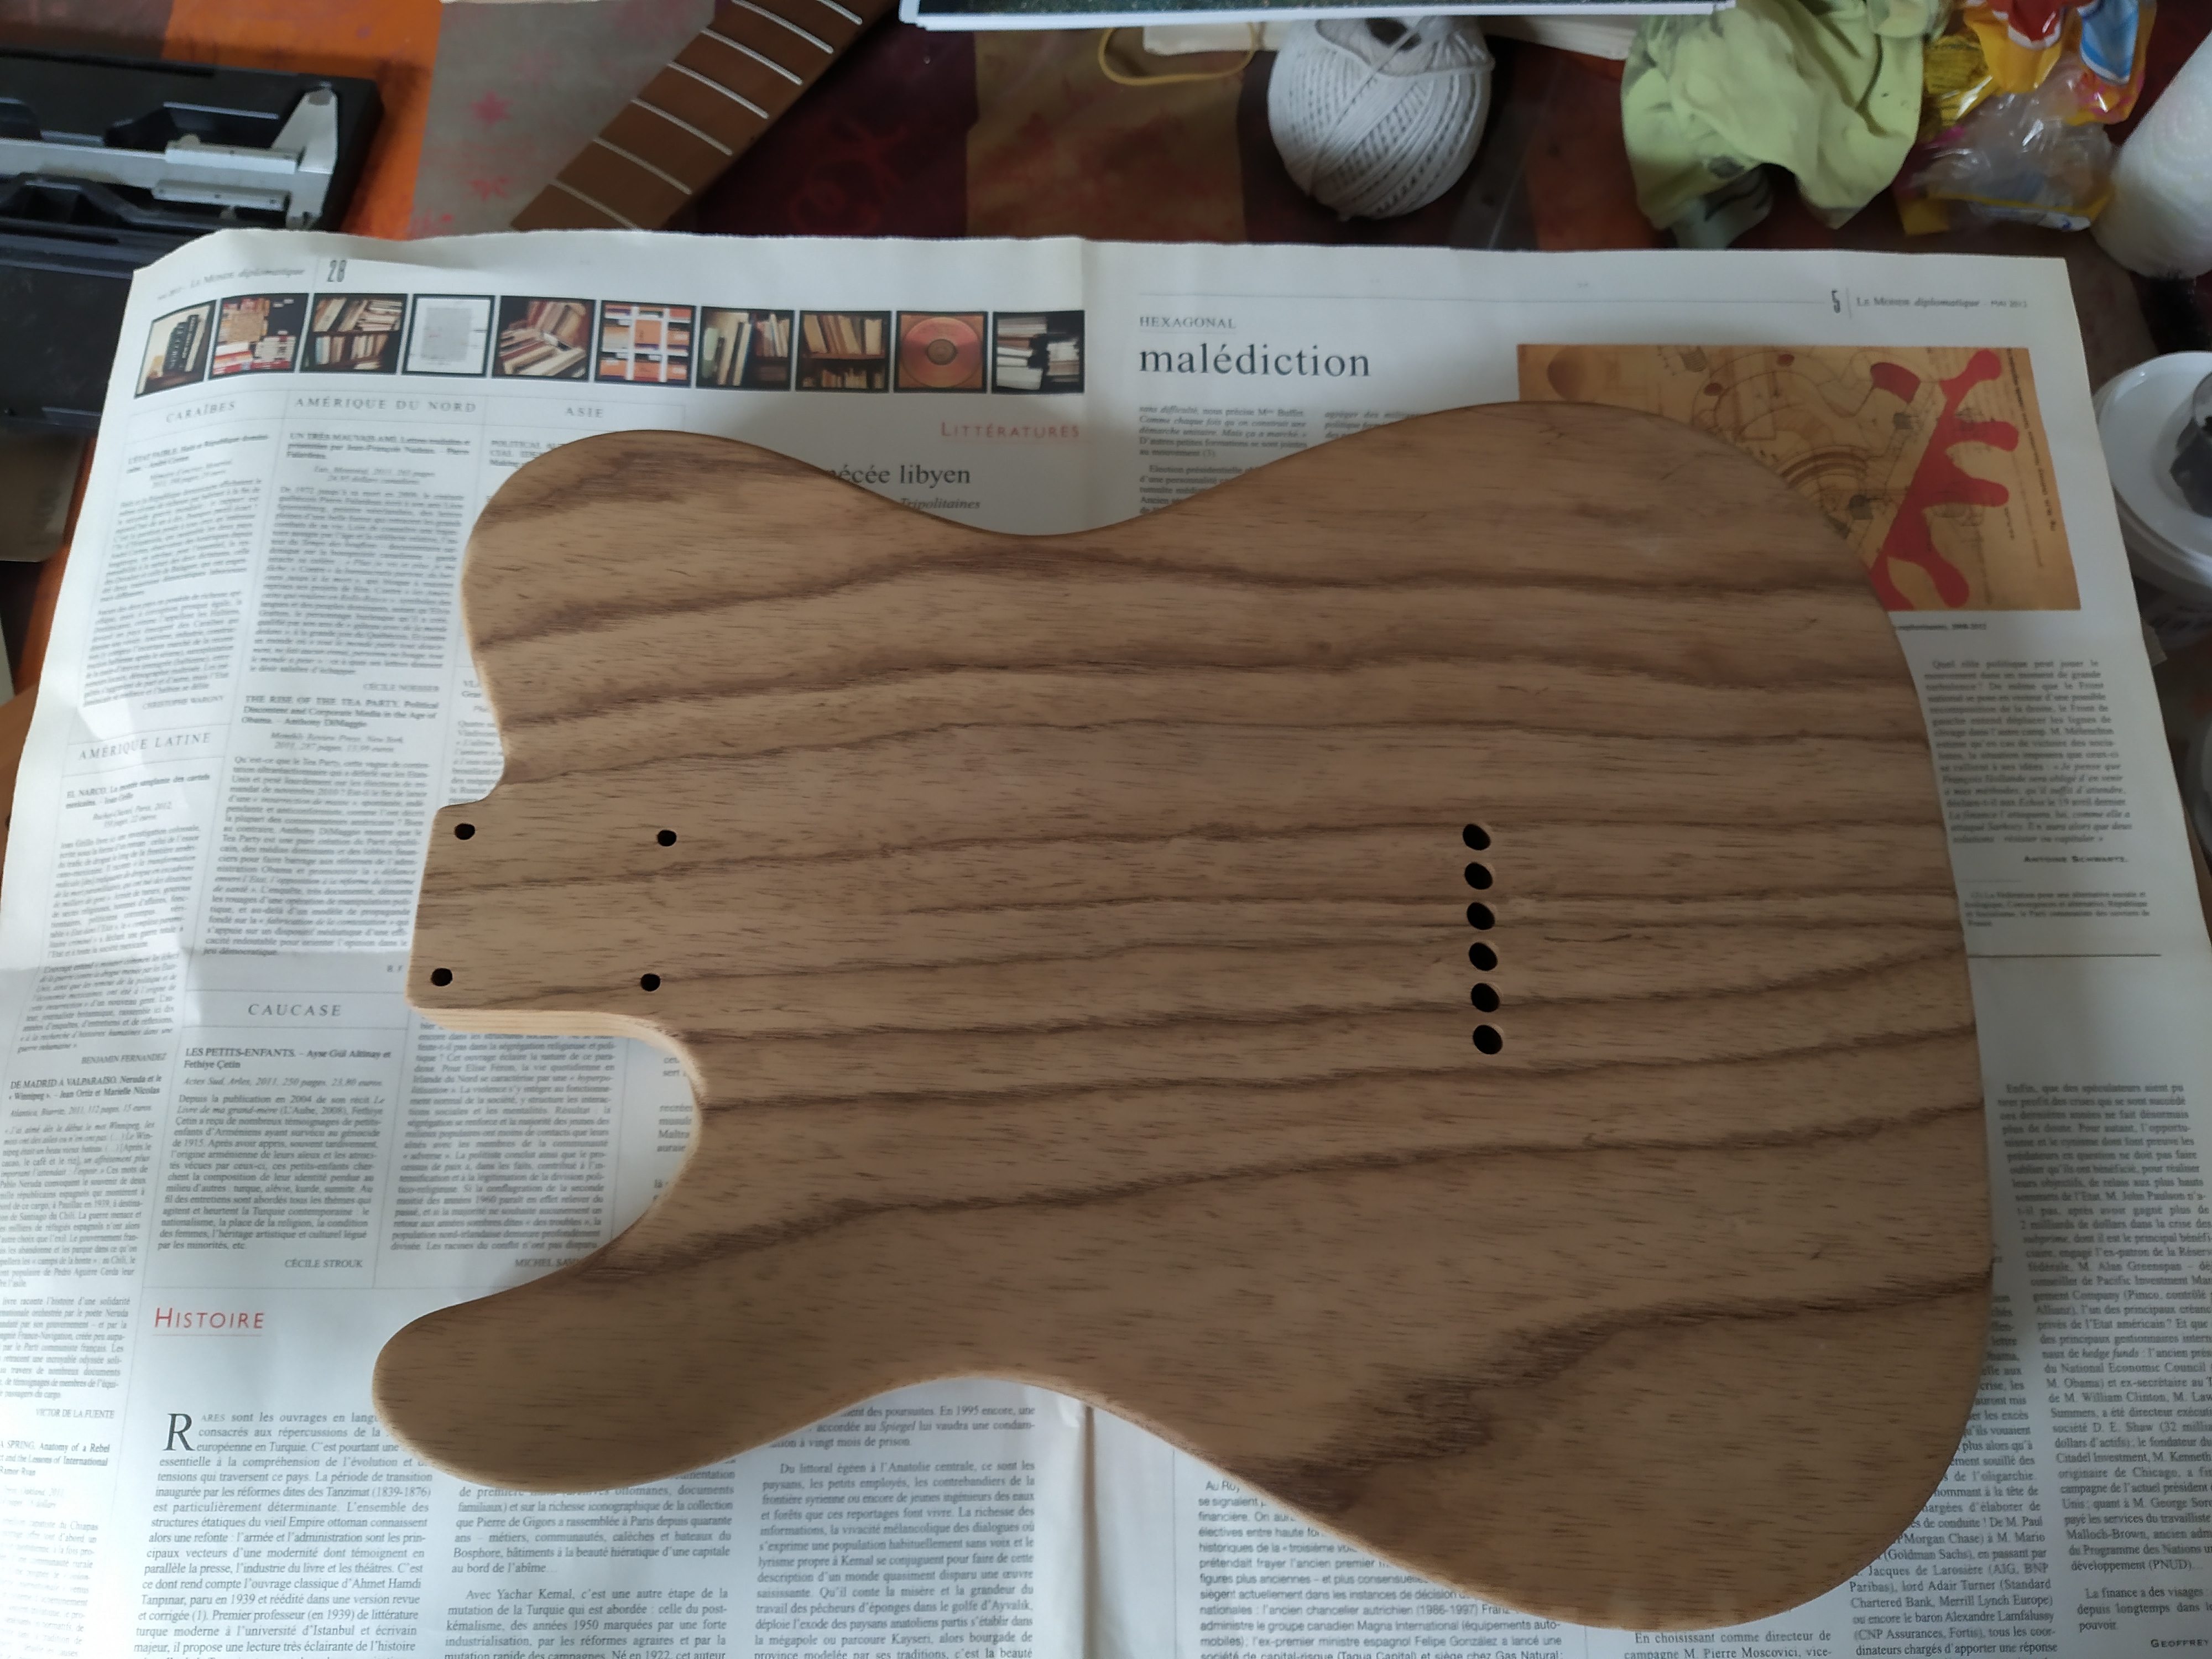
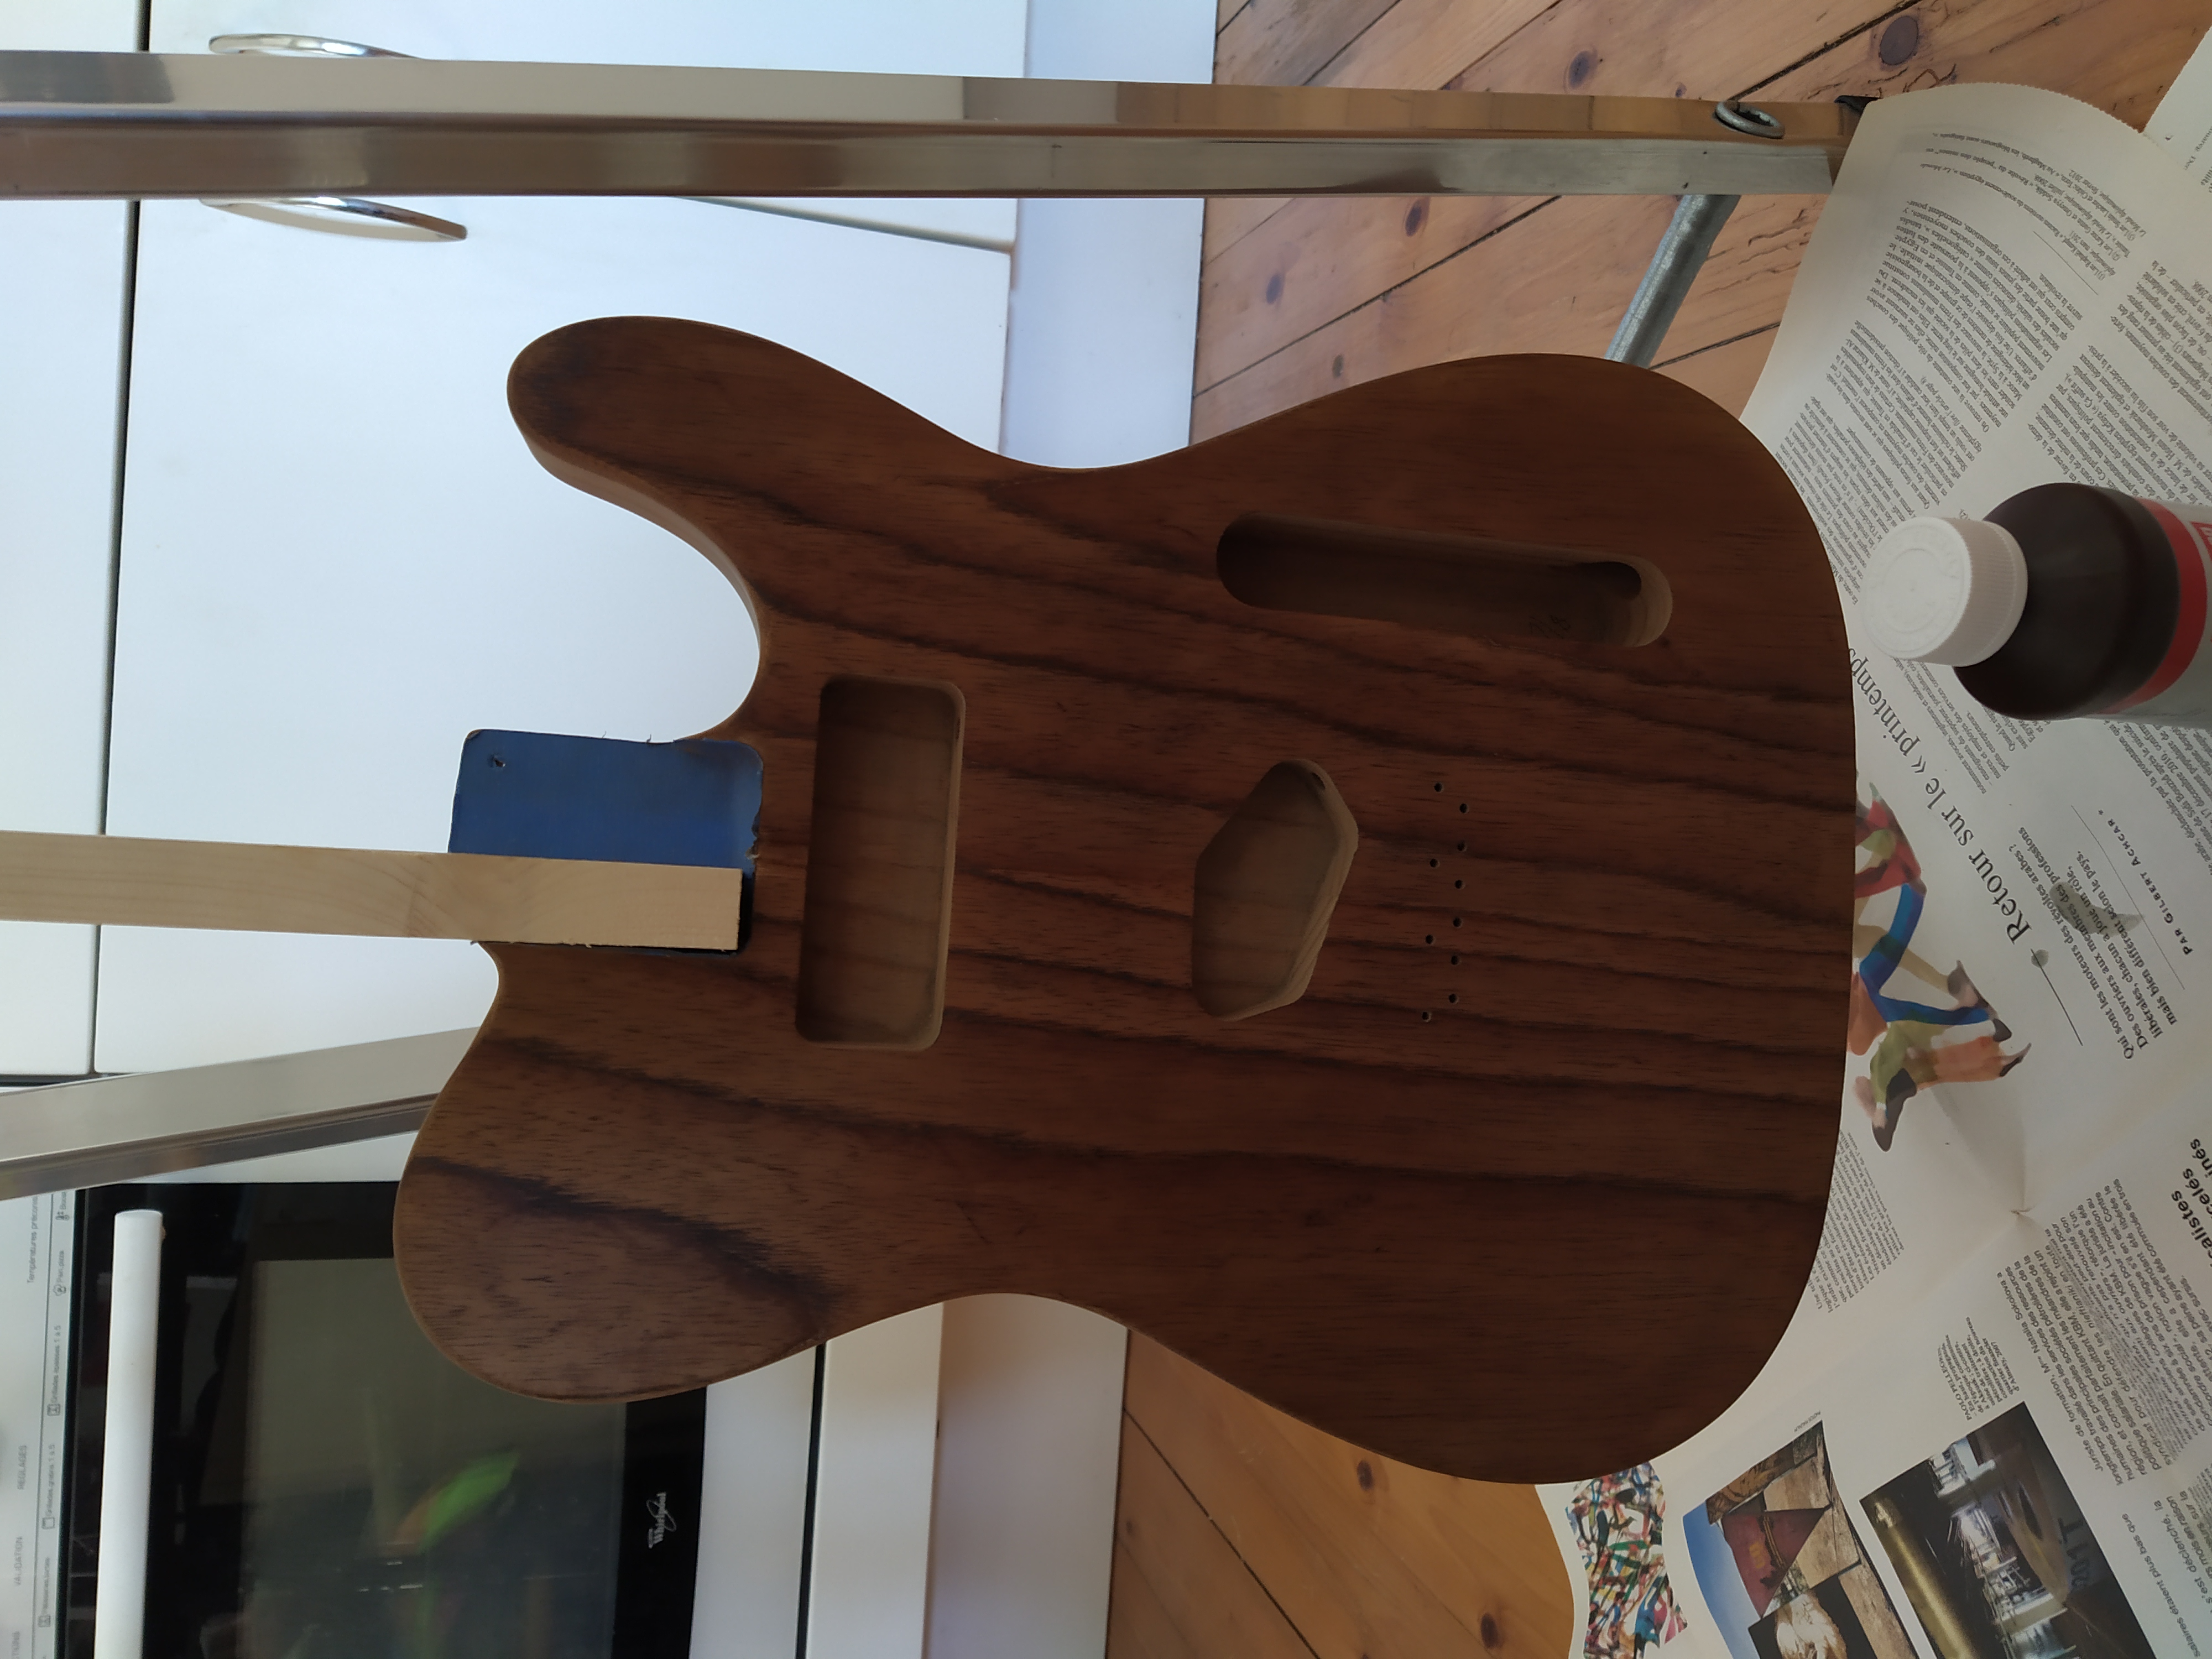
The body I received from Warmoth is shown in Fig. 1 and Fig. 2.
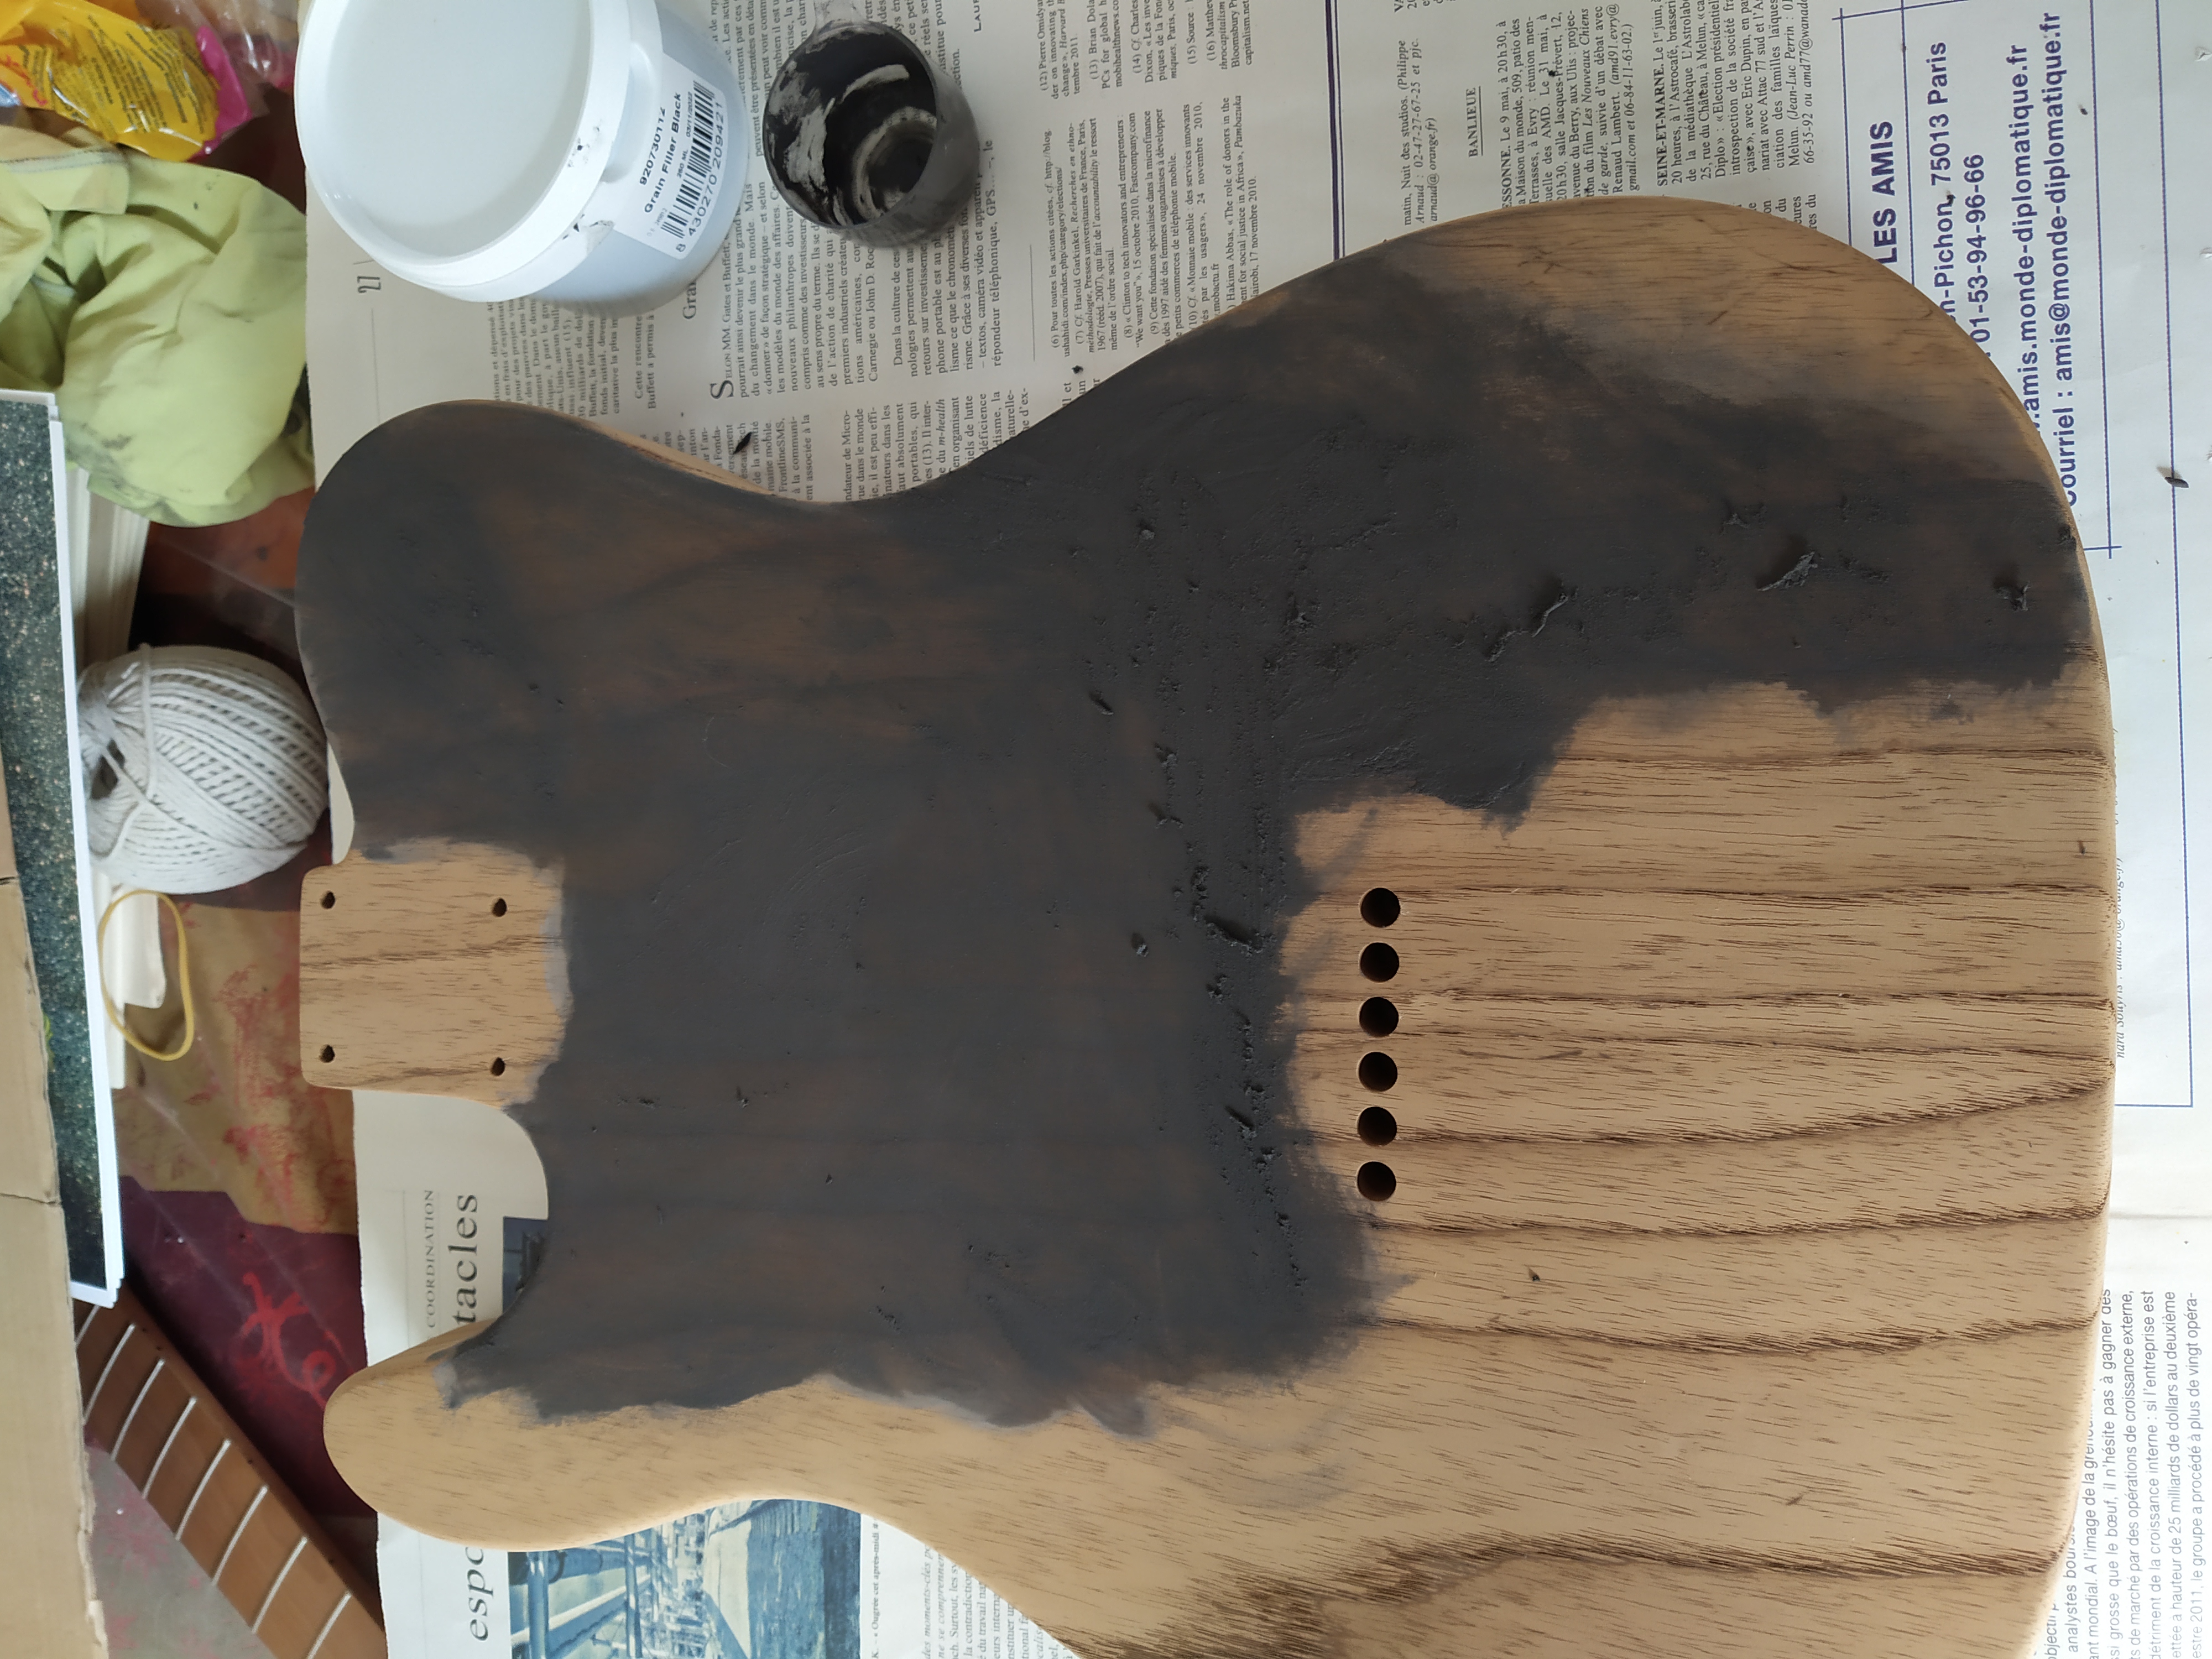
3.1.1 Enhancing the grain
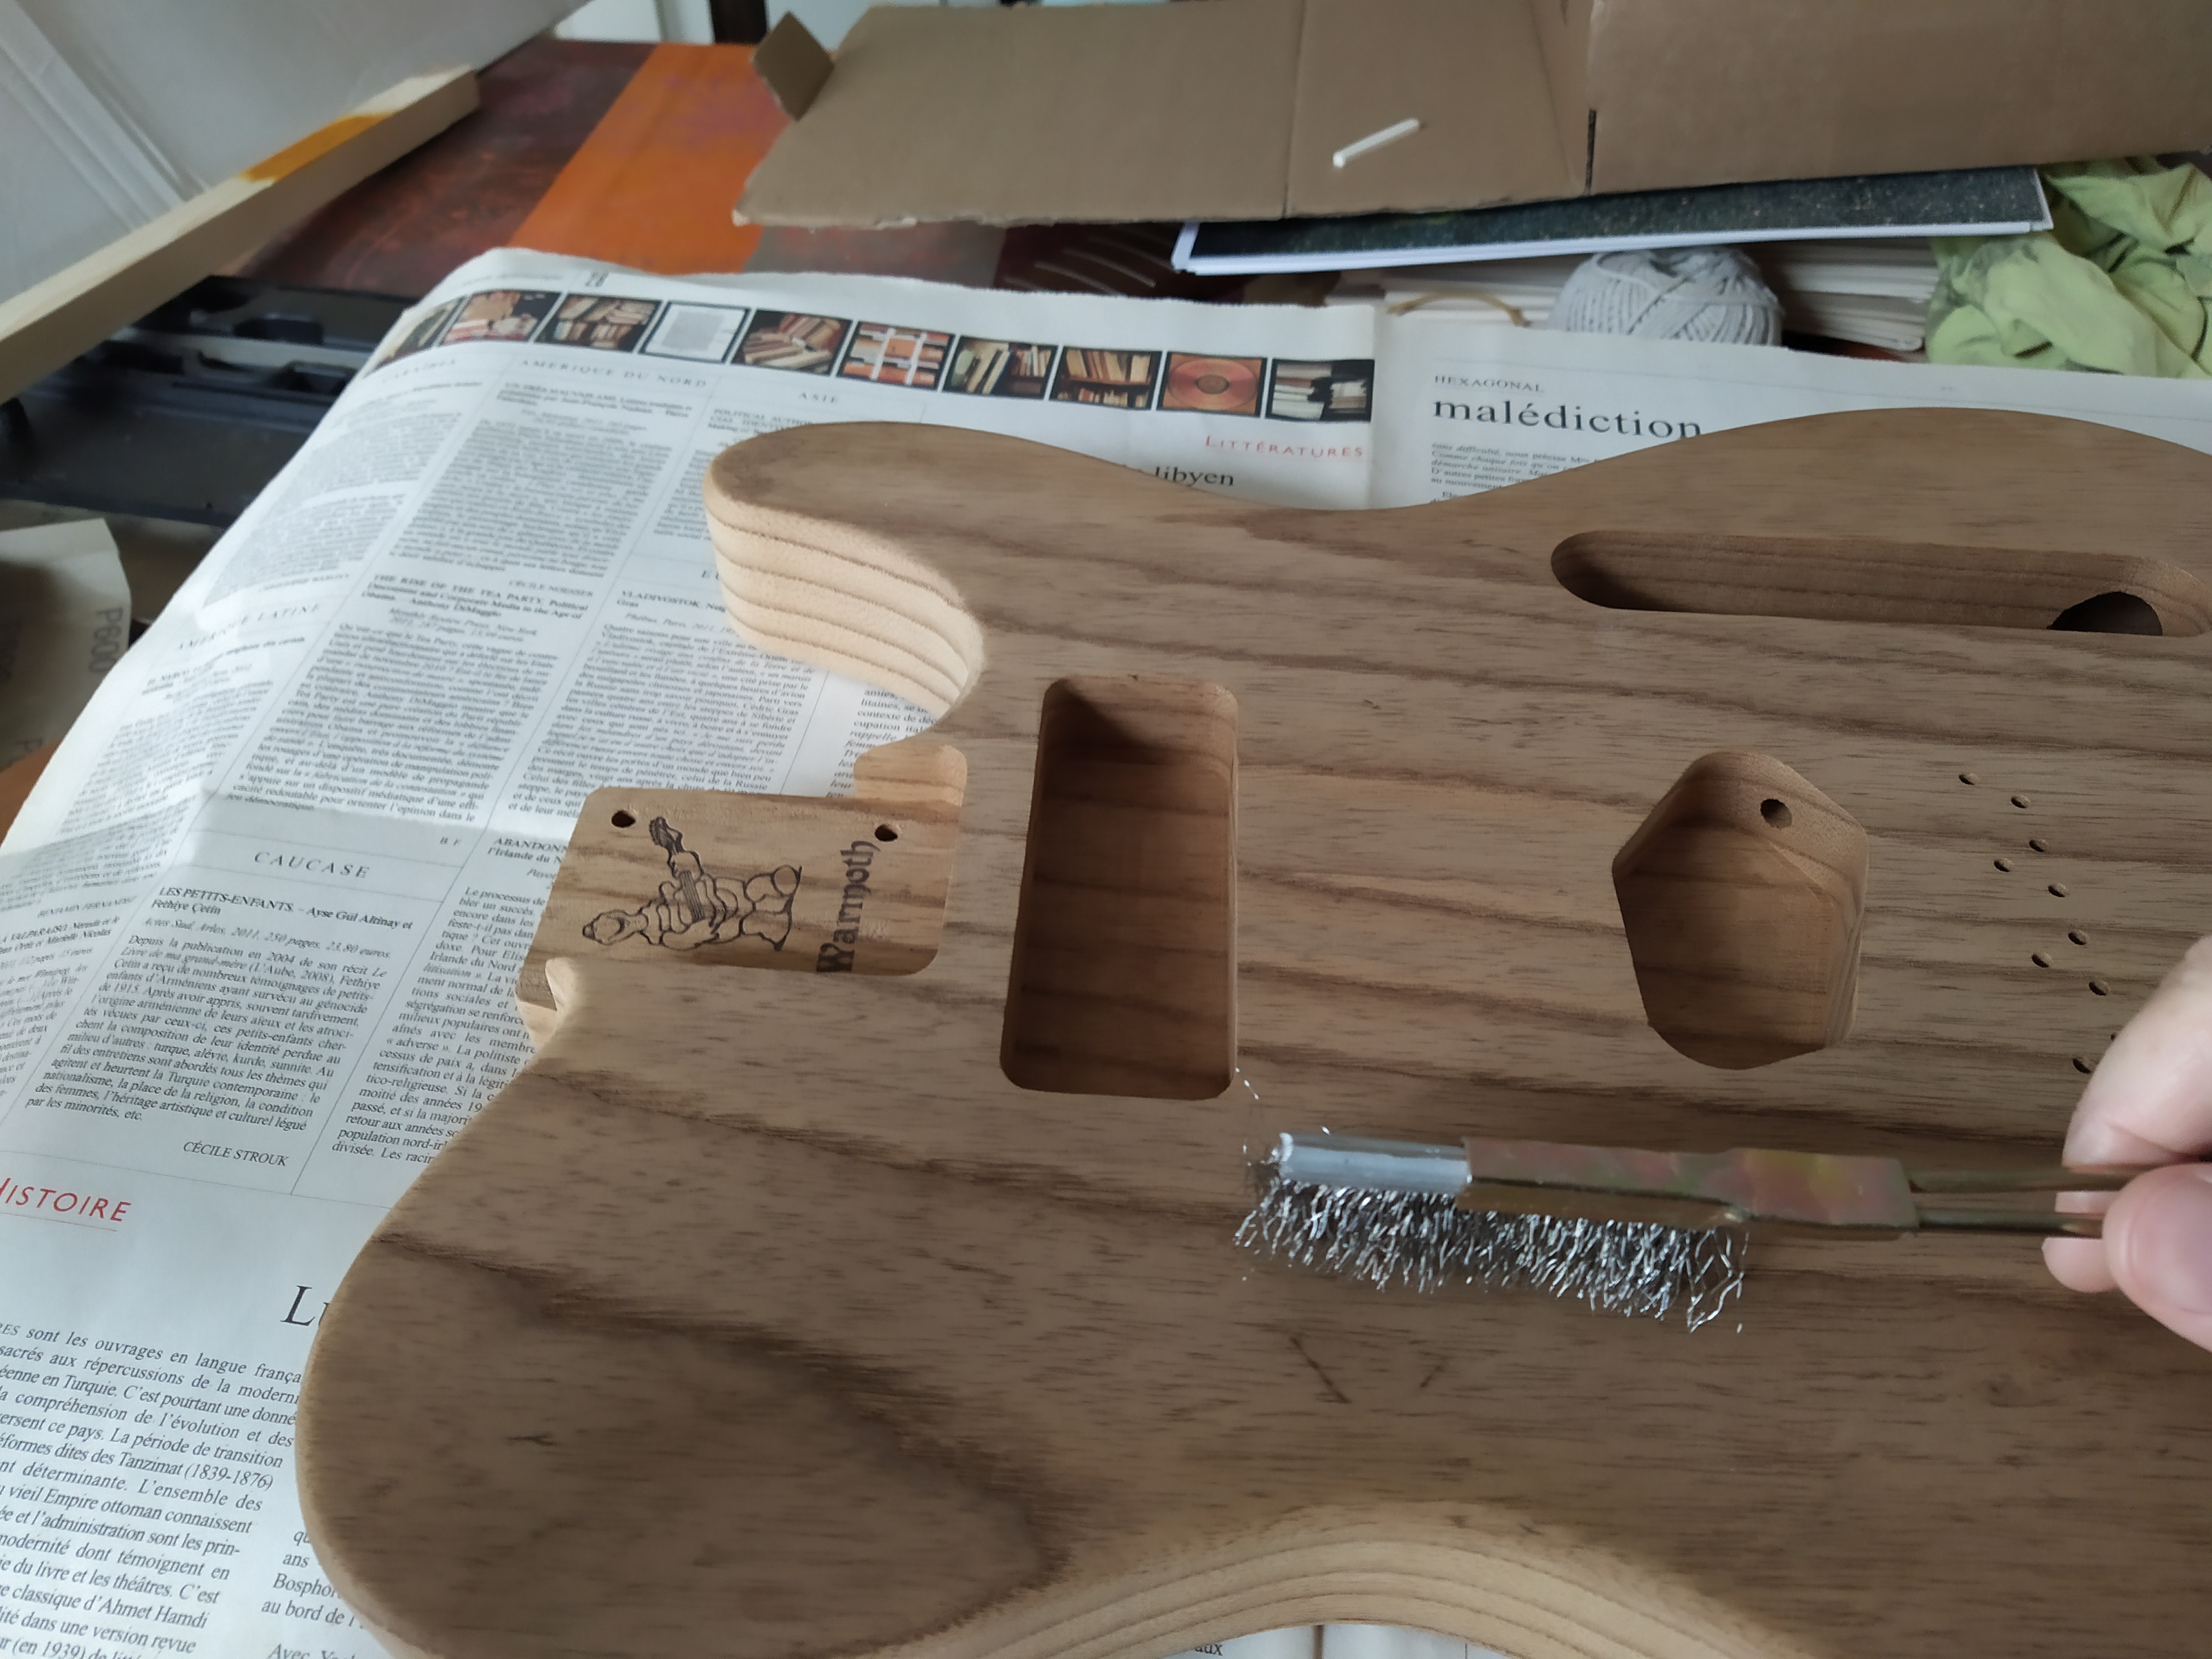
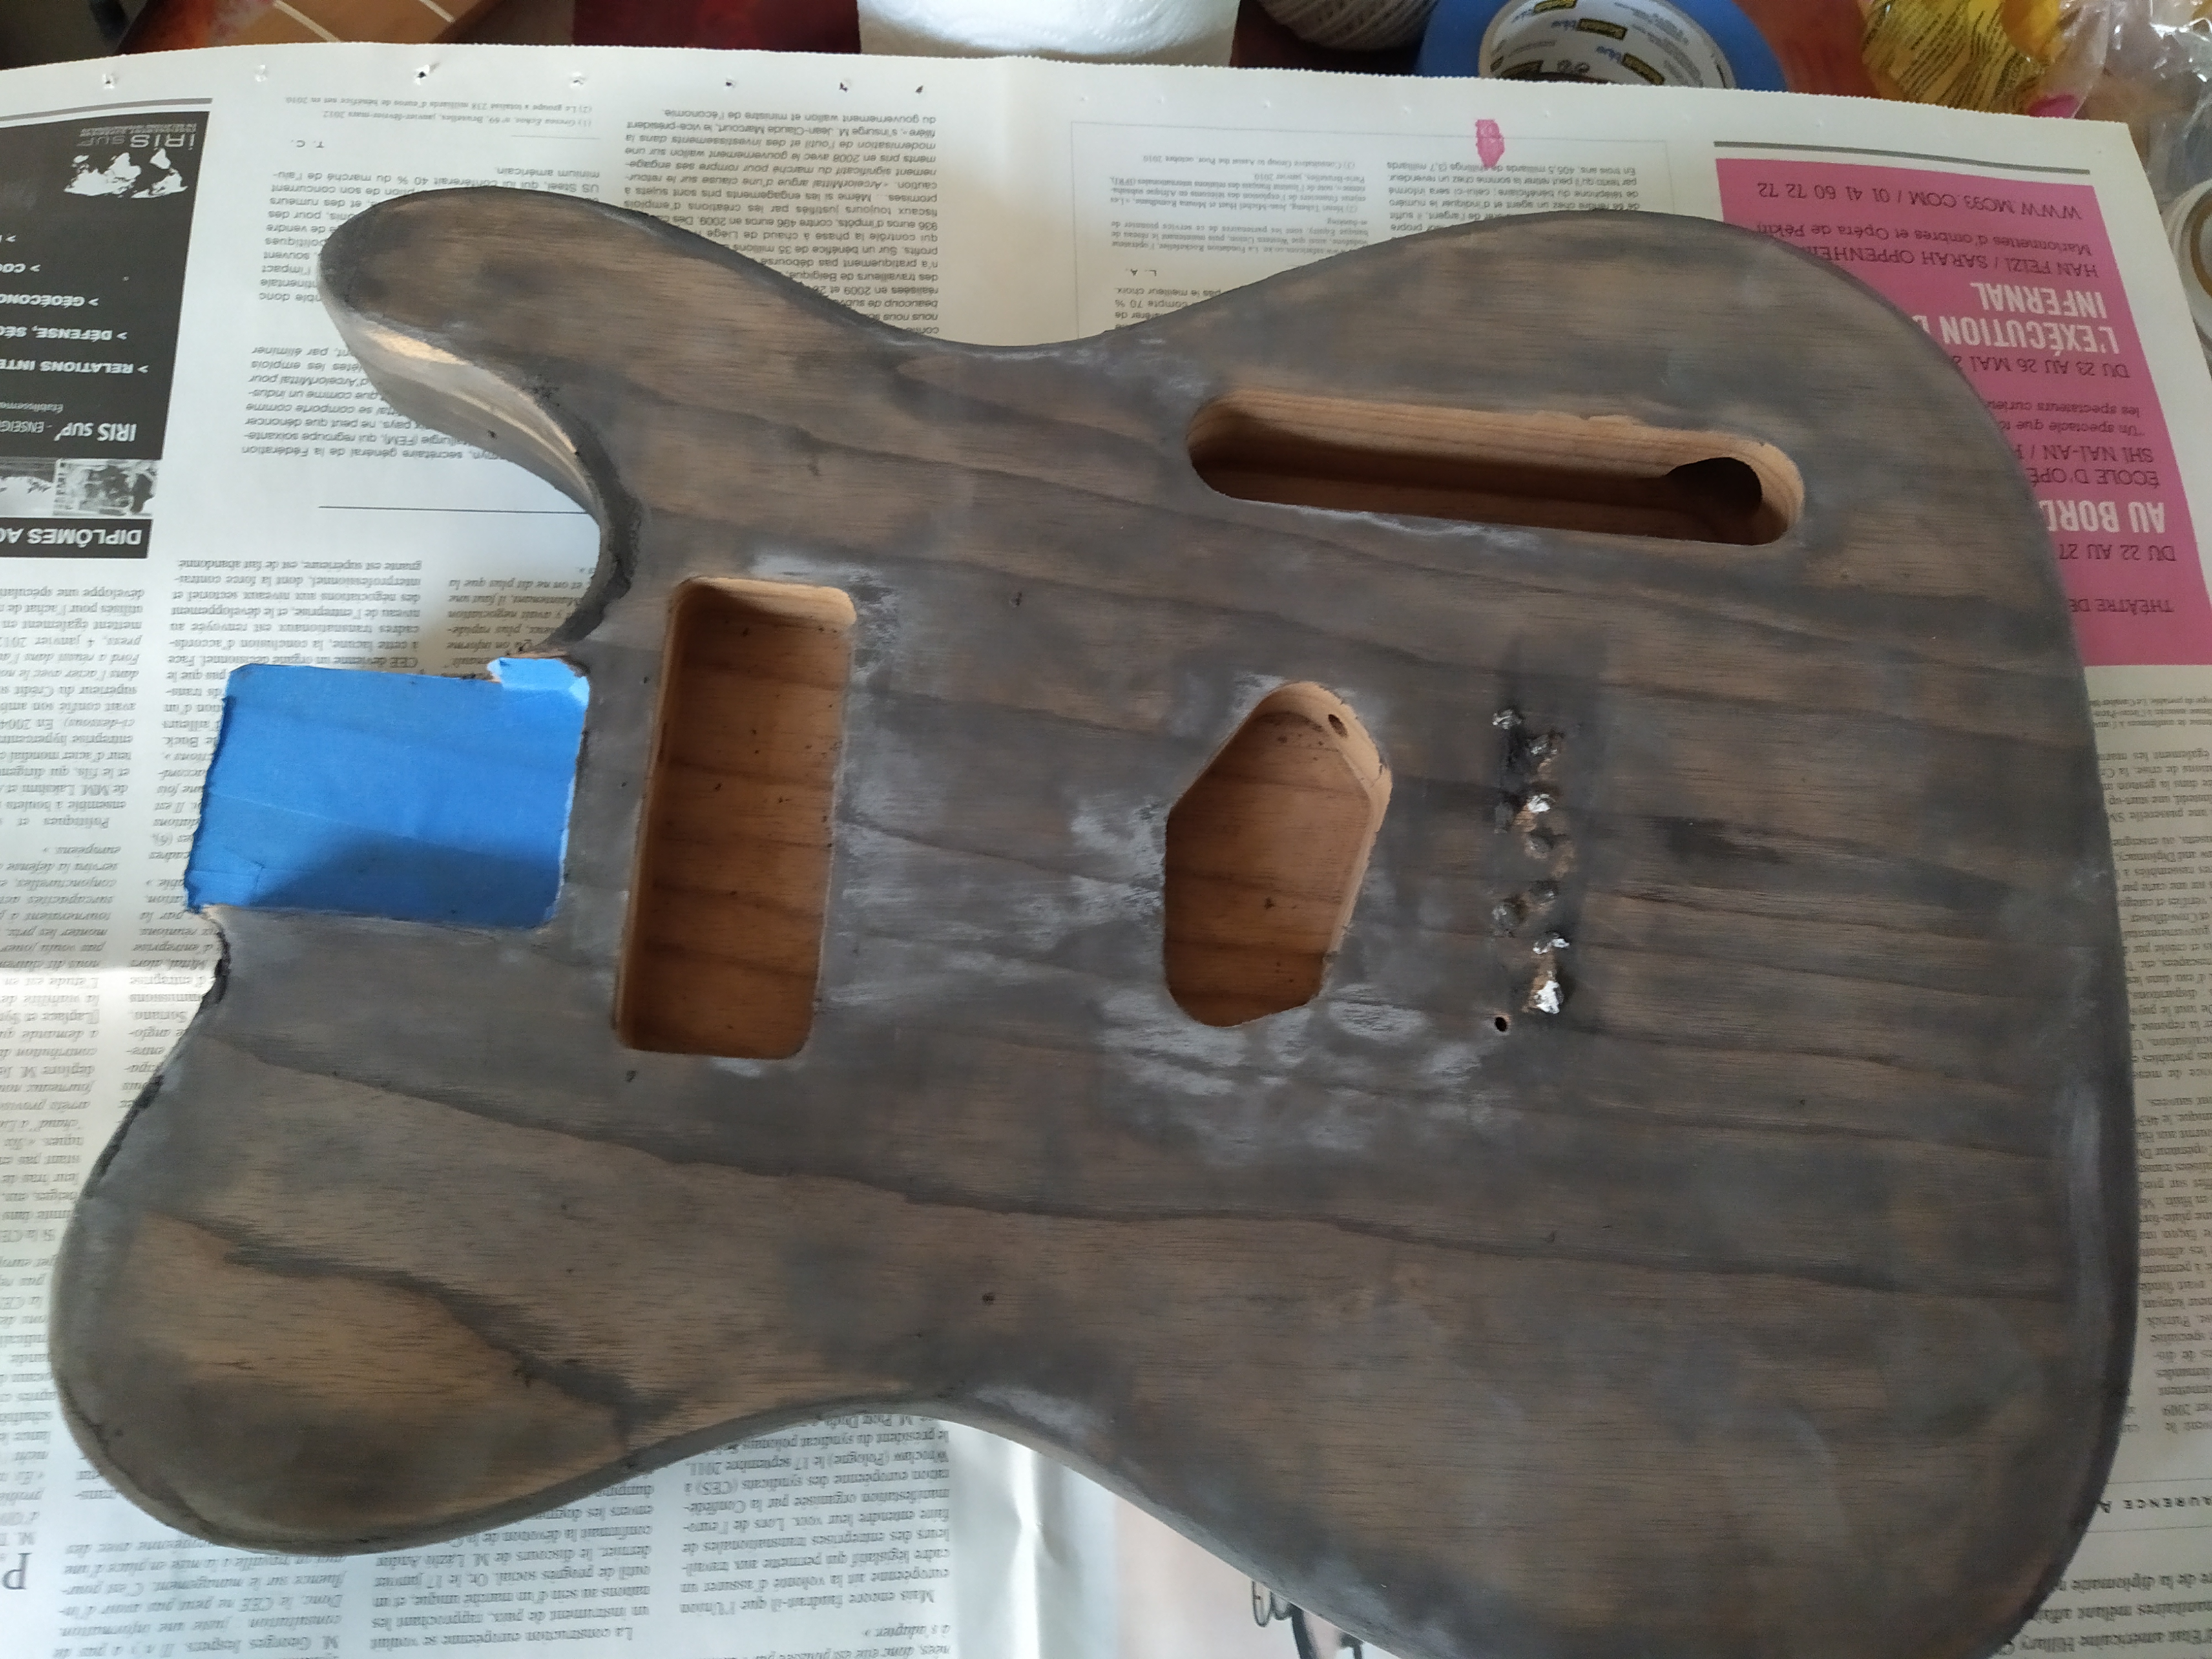
The first step consists in highlighting the wood grain. In French, it is called "céruser". It works particularly well with swamp ash, as it is an open grain wood, with spectacular patterns. It is achieved by opening the small pores in the soft part of the wood with a metal brush (Fig. 3). The small holes in the wood, following the fibers, can now be filled with a grain filler (black; diluted with a bit of water), which is a paste that hardens while drying. It looks messy at first (Fig. 4 & Fig. 5). It needs to dry for a few days.
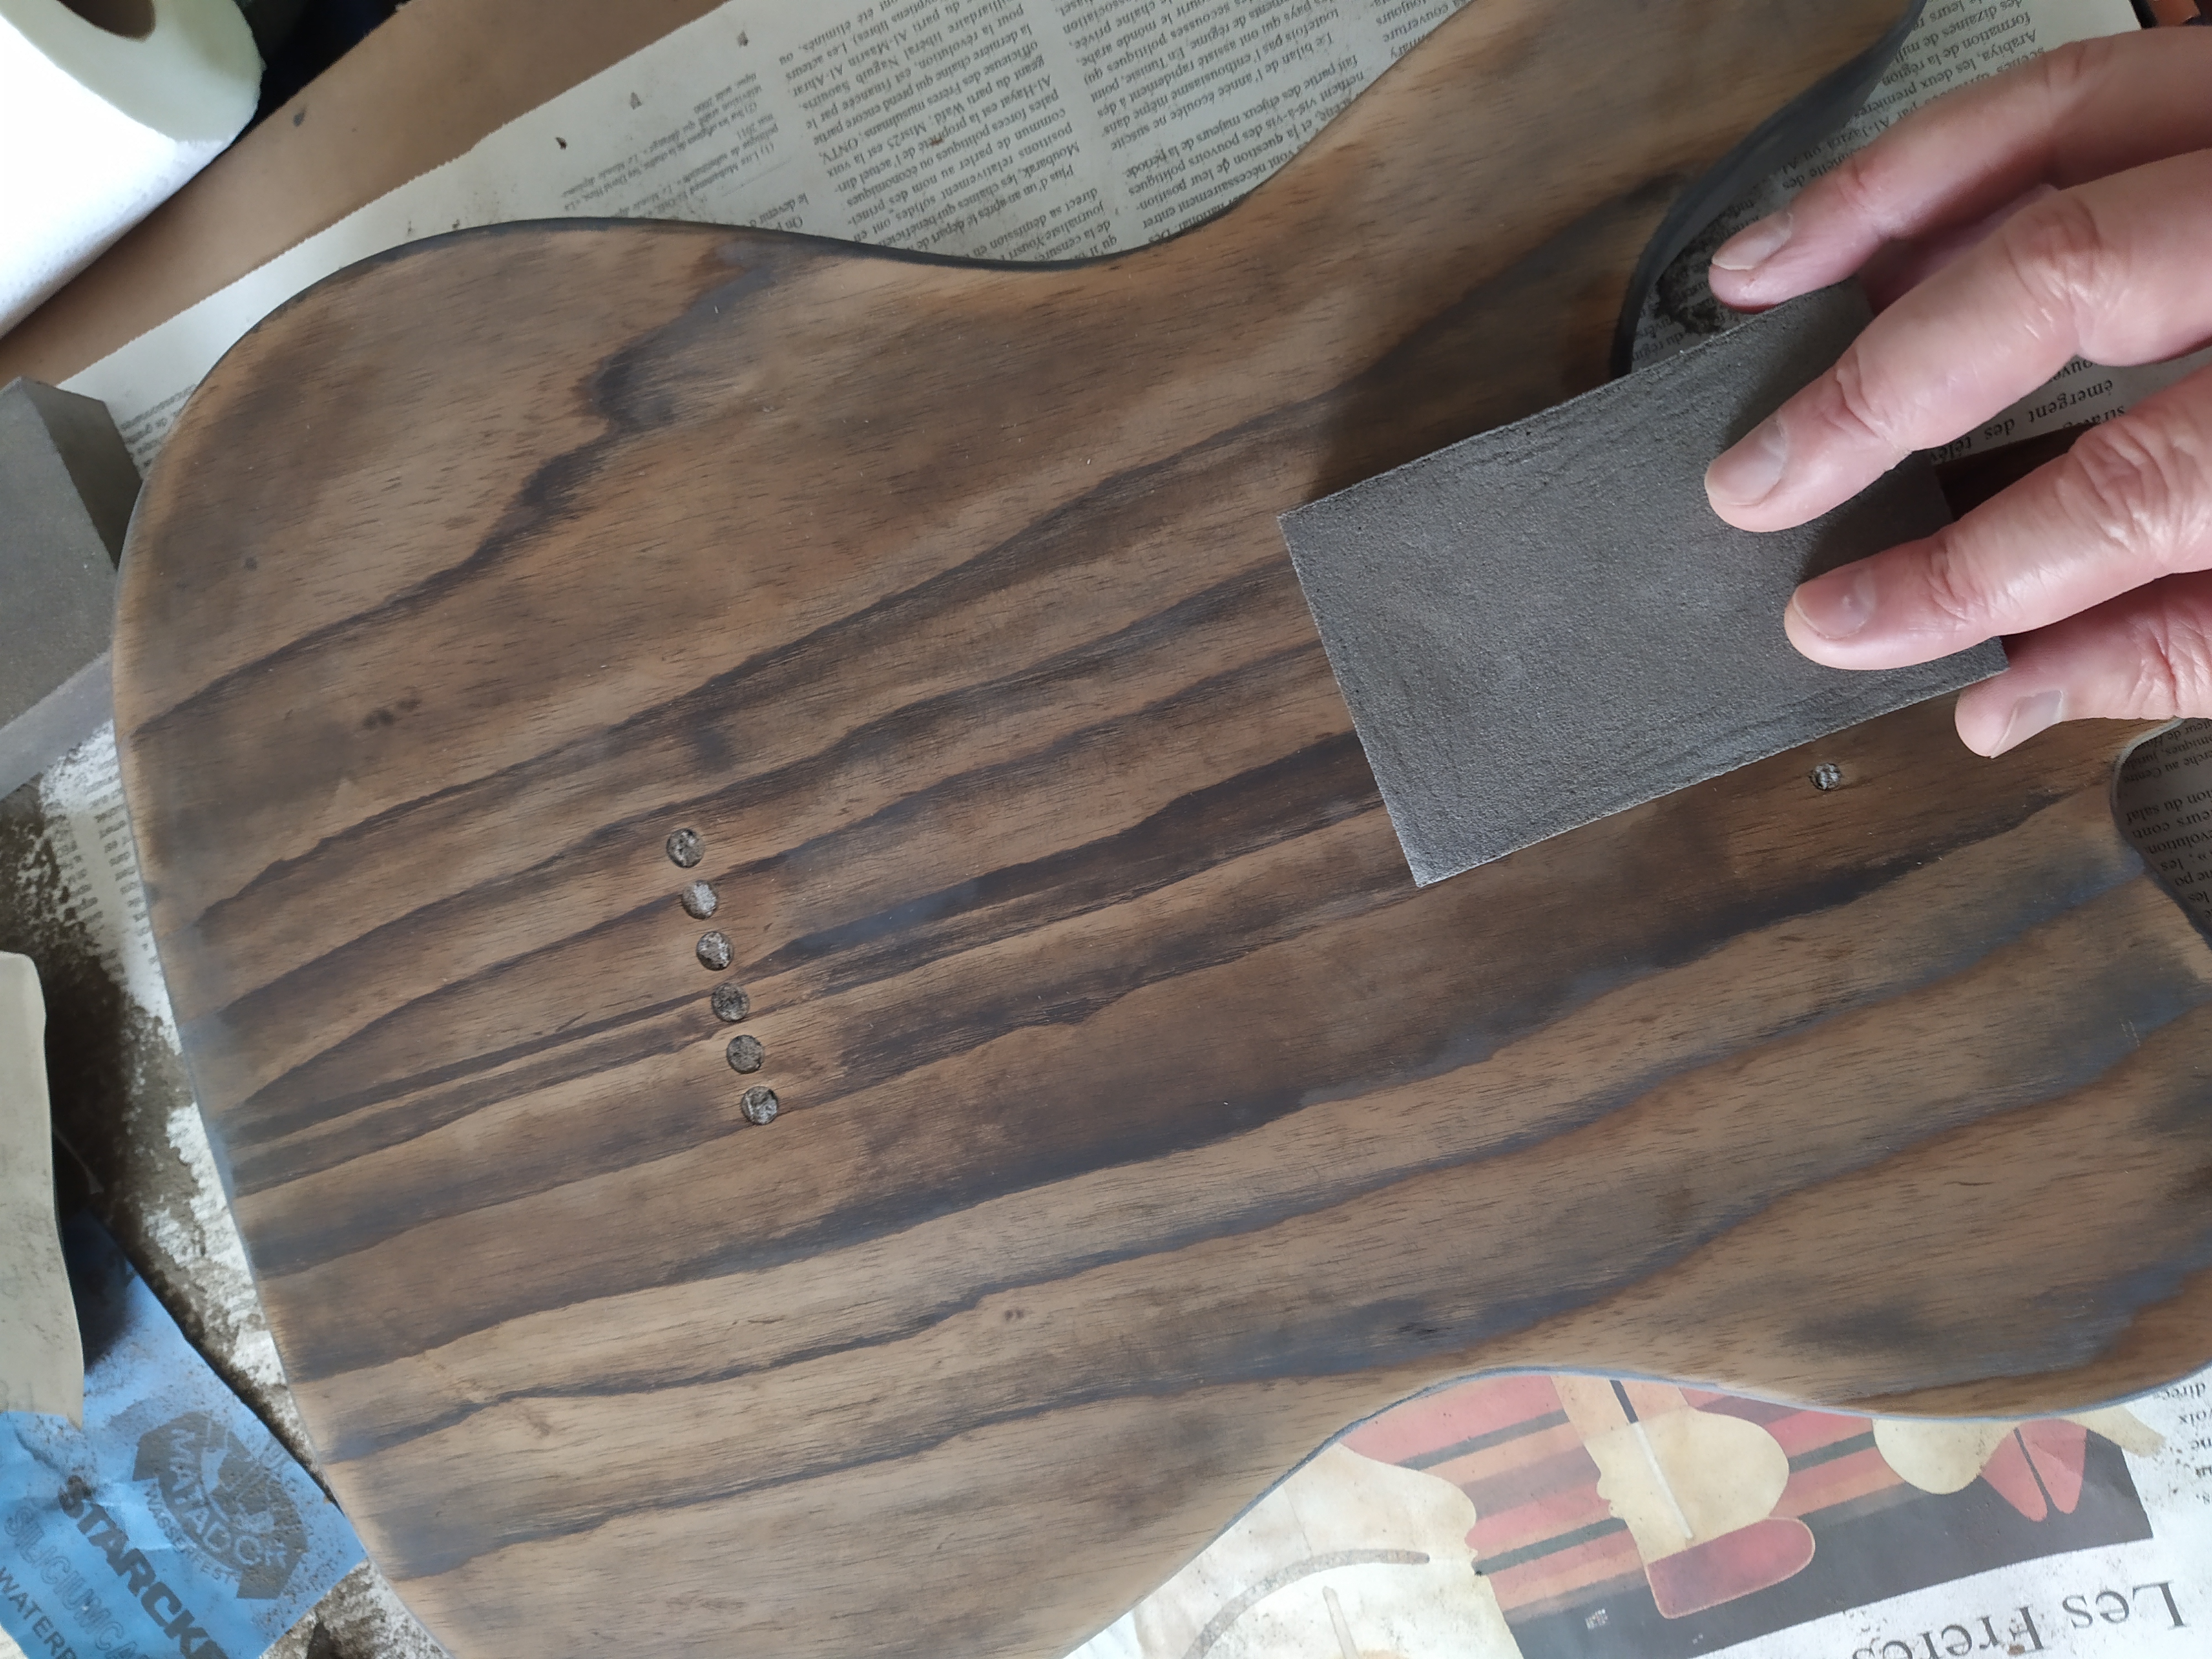
3.1.2 Sanding
3.1.3 Easy trussrod access
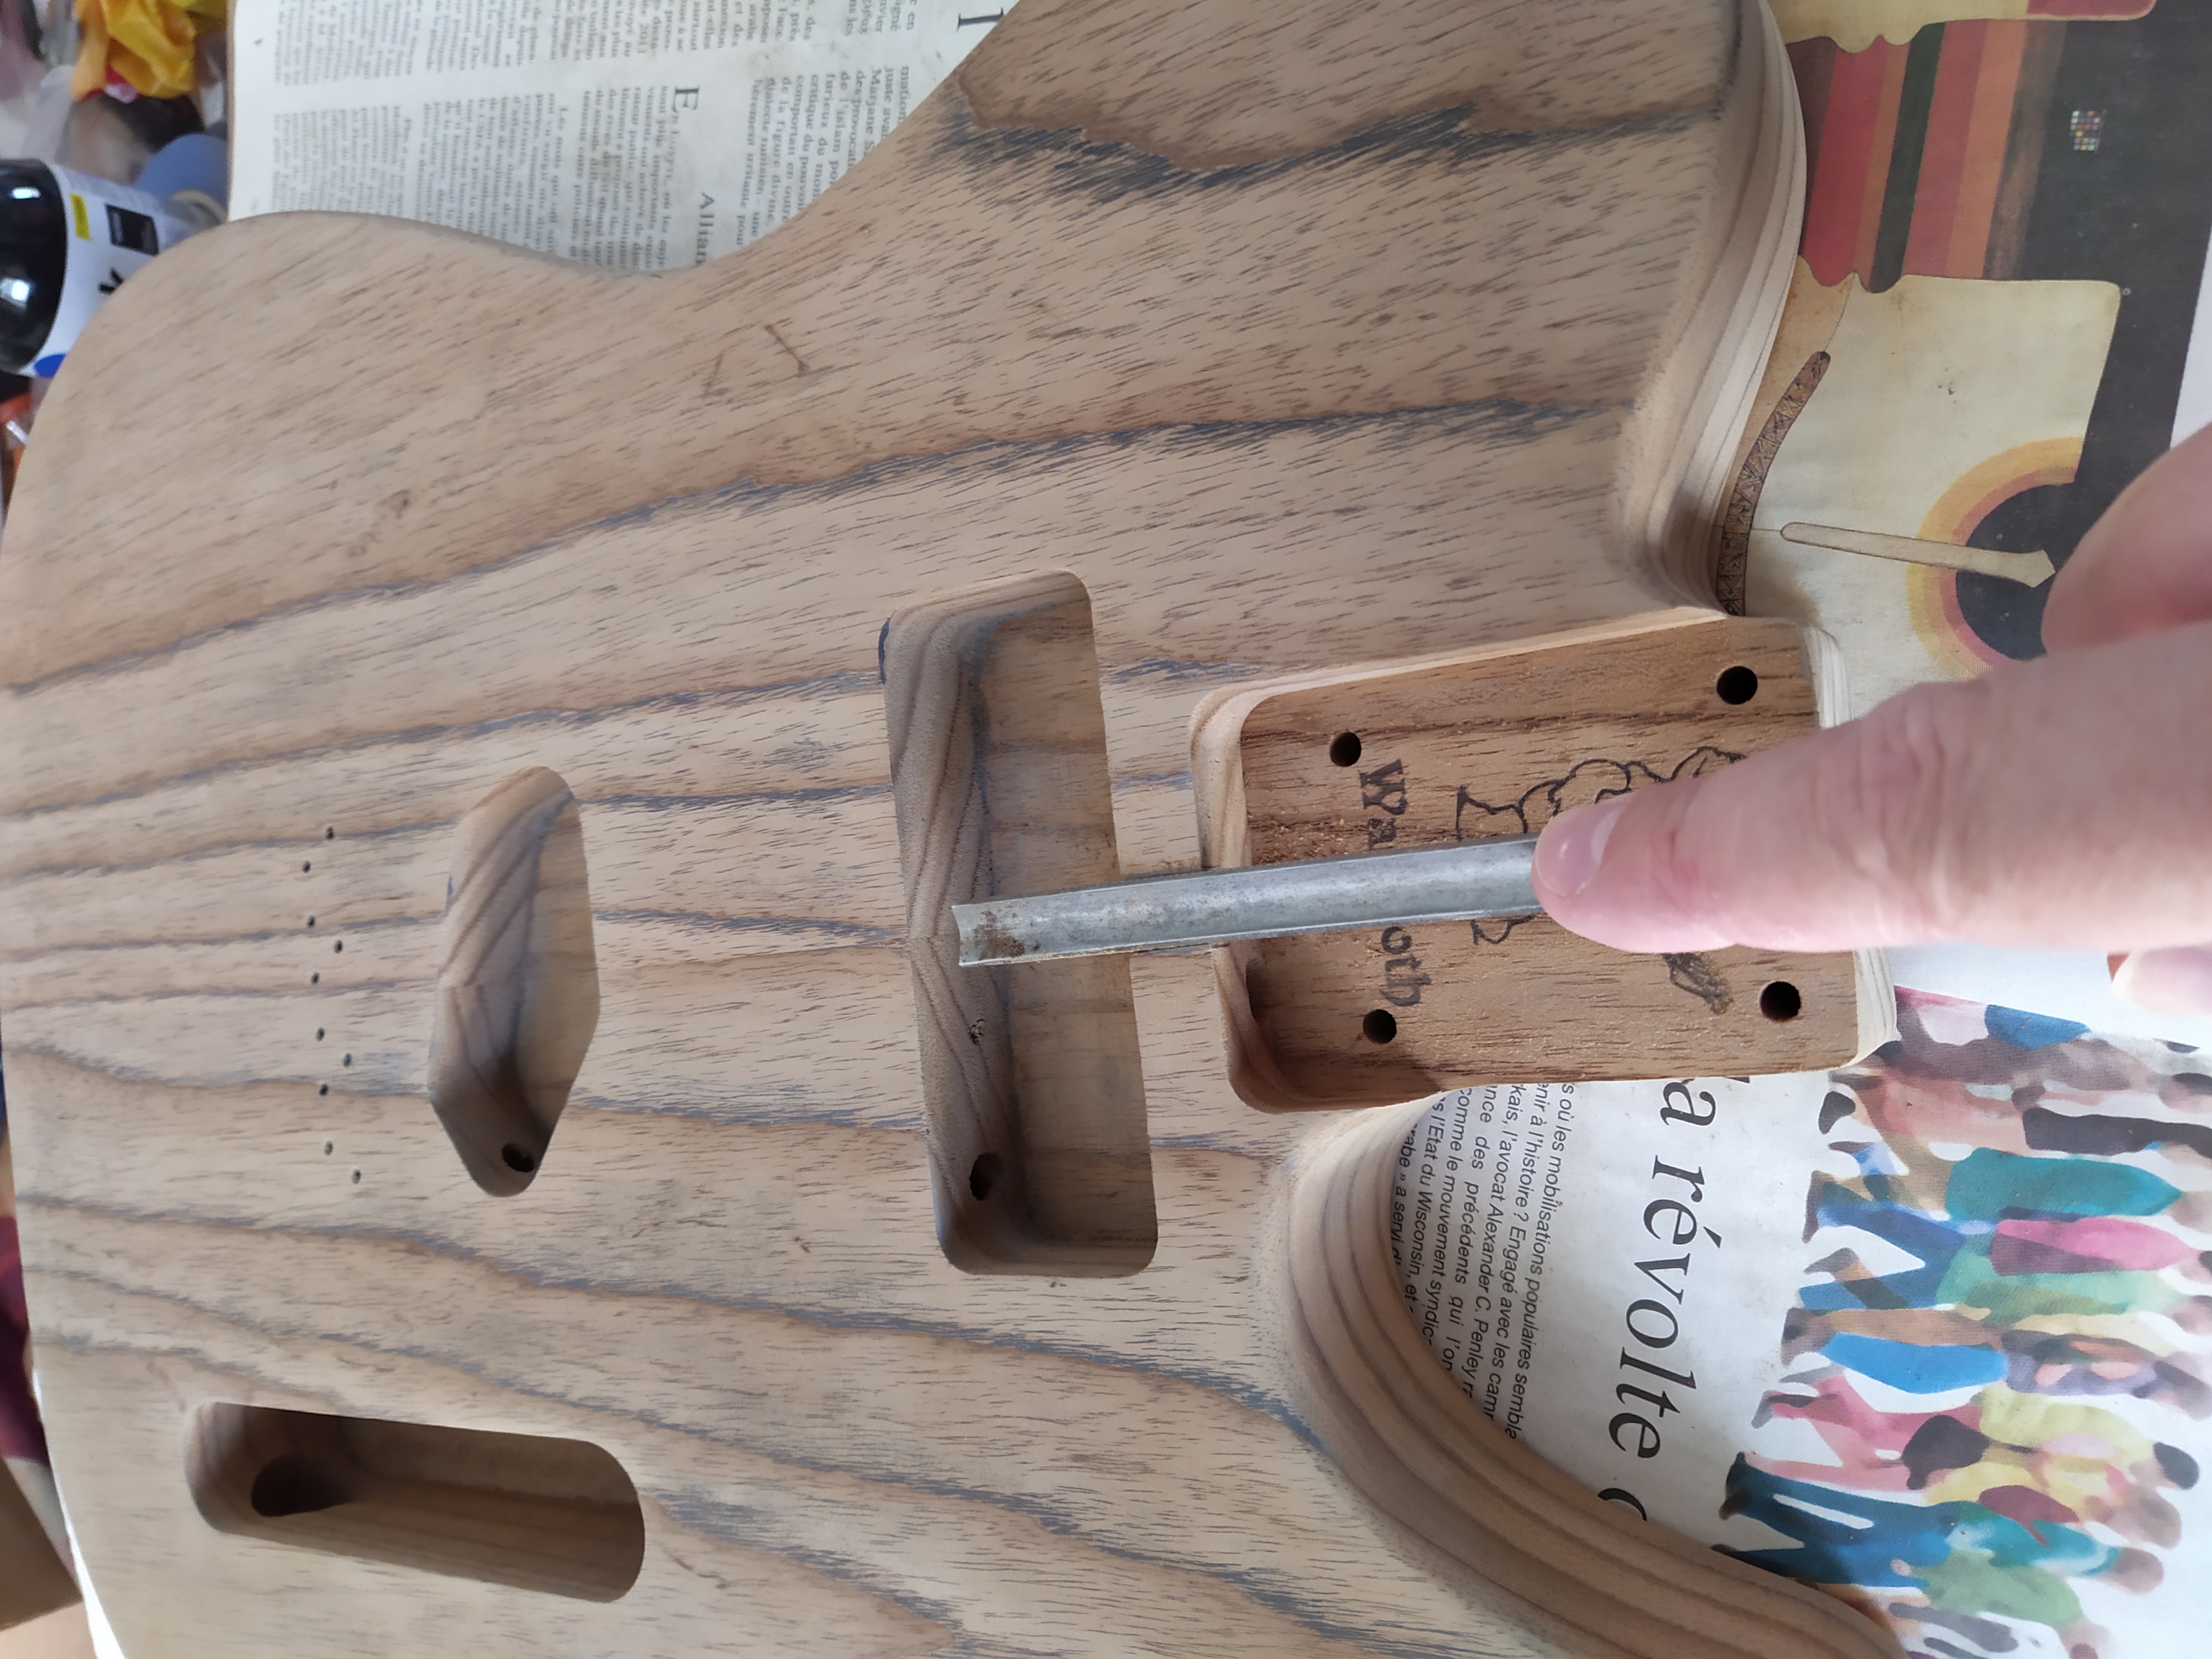
The trussrod of vintage-type Fender necks can be accessed from the bottom of the neck, and not from the headstock, contrary to other models. When the neck is bolted to the body, it is therefore not possible to adjust it. One thus has to remove the strings, unbolt the neck to adjust the trussrod, and iterate a few times, which is annoying. An easy fix is to carve a small channel in the body to access the trussrod without having to unscrew the neck. This is demonstrated in Fig. 7.
3.1.4 Oil finish
Tru Oil gives a nice finish. It however spectacularly changes the color of the roasted swamp ash, making it much darker. Compare Fig. 1 (before) and Fig. 8 (after). It also requires a lot of layers. I followed the following recipe.
- Apply 4 thin tru oil layers, waiting a few hours between each application.
- Wait 2 days and then sand with 1000 grit paper.
- Apply 4 thin tru oil layers, waiting a few hours between each application.
- Wait 2 days and then sand with 1200 grit paper.
- Apply 4 thin tru oil layers, waiting a few hours between each application.
- Wait 2 days and then sand with 1500 grit and 2000 grit paper.
So, in total, it requires applying 12 layers over the course of two weeks.
 Tru Oil finish will enhance small scratches in the woods and catch any dust in the air. It is thus important to make sure of the following points.
- The body needs to be fine sanded up to 1000 grit, before applying the first layer.
- It is important to apply the oil with a kitchen paper that does not tear.
- The body should be let to dry in a closet or a portable ward robe to avoid collecting dust.
3.1.5 Installing string ferrules
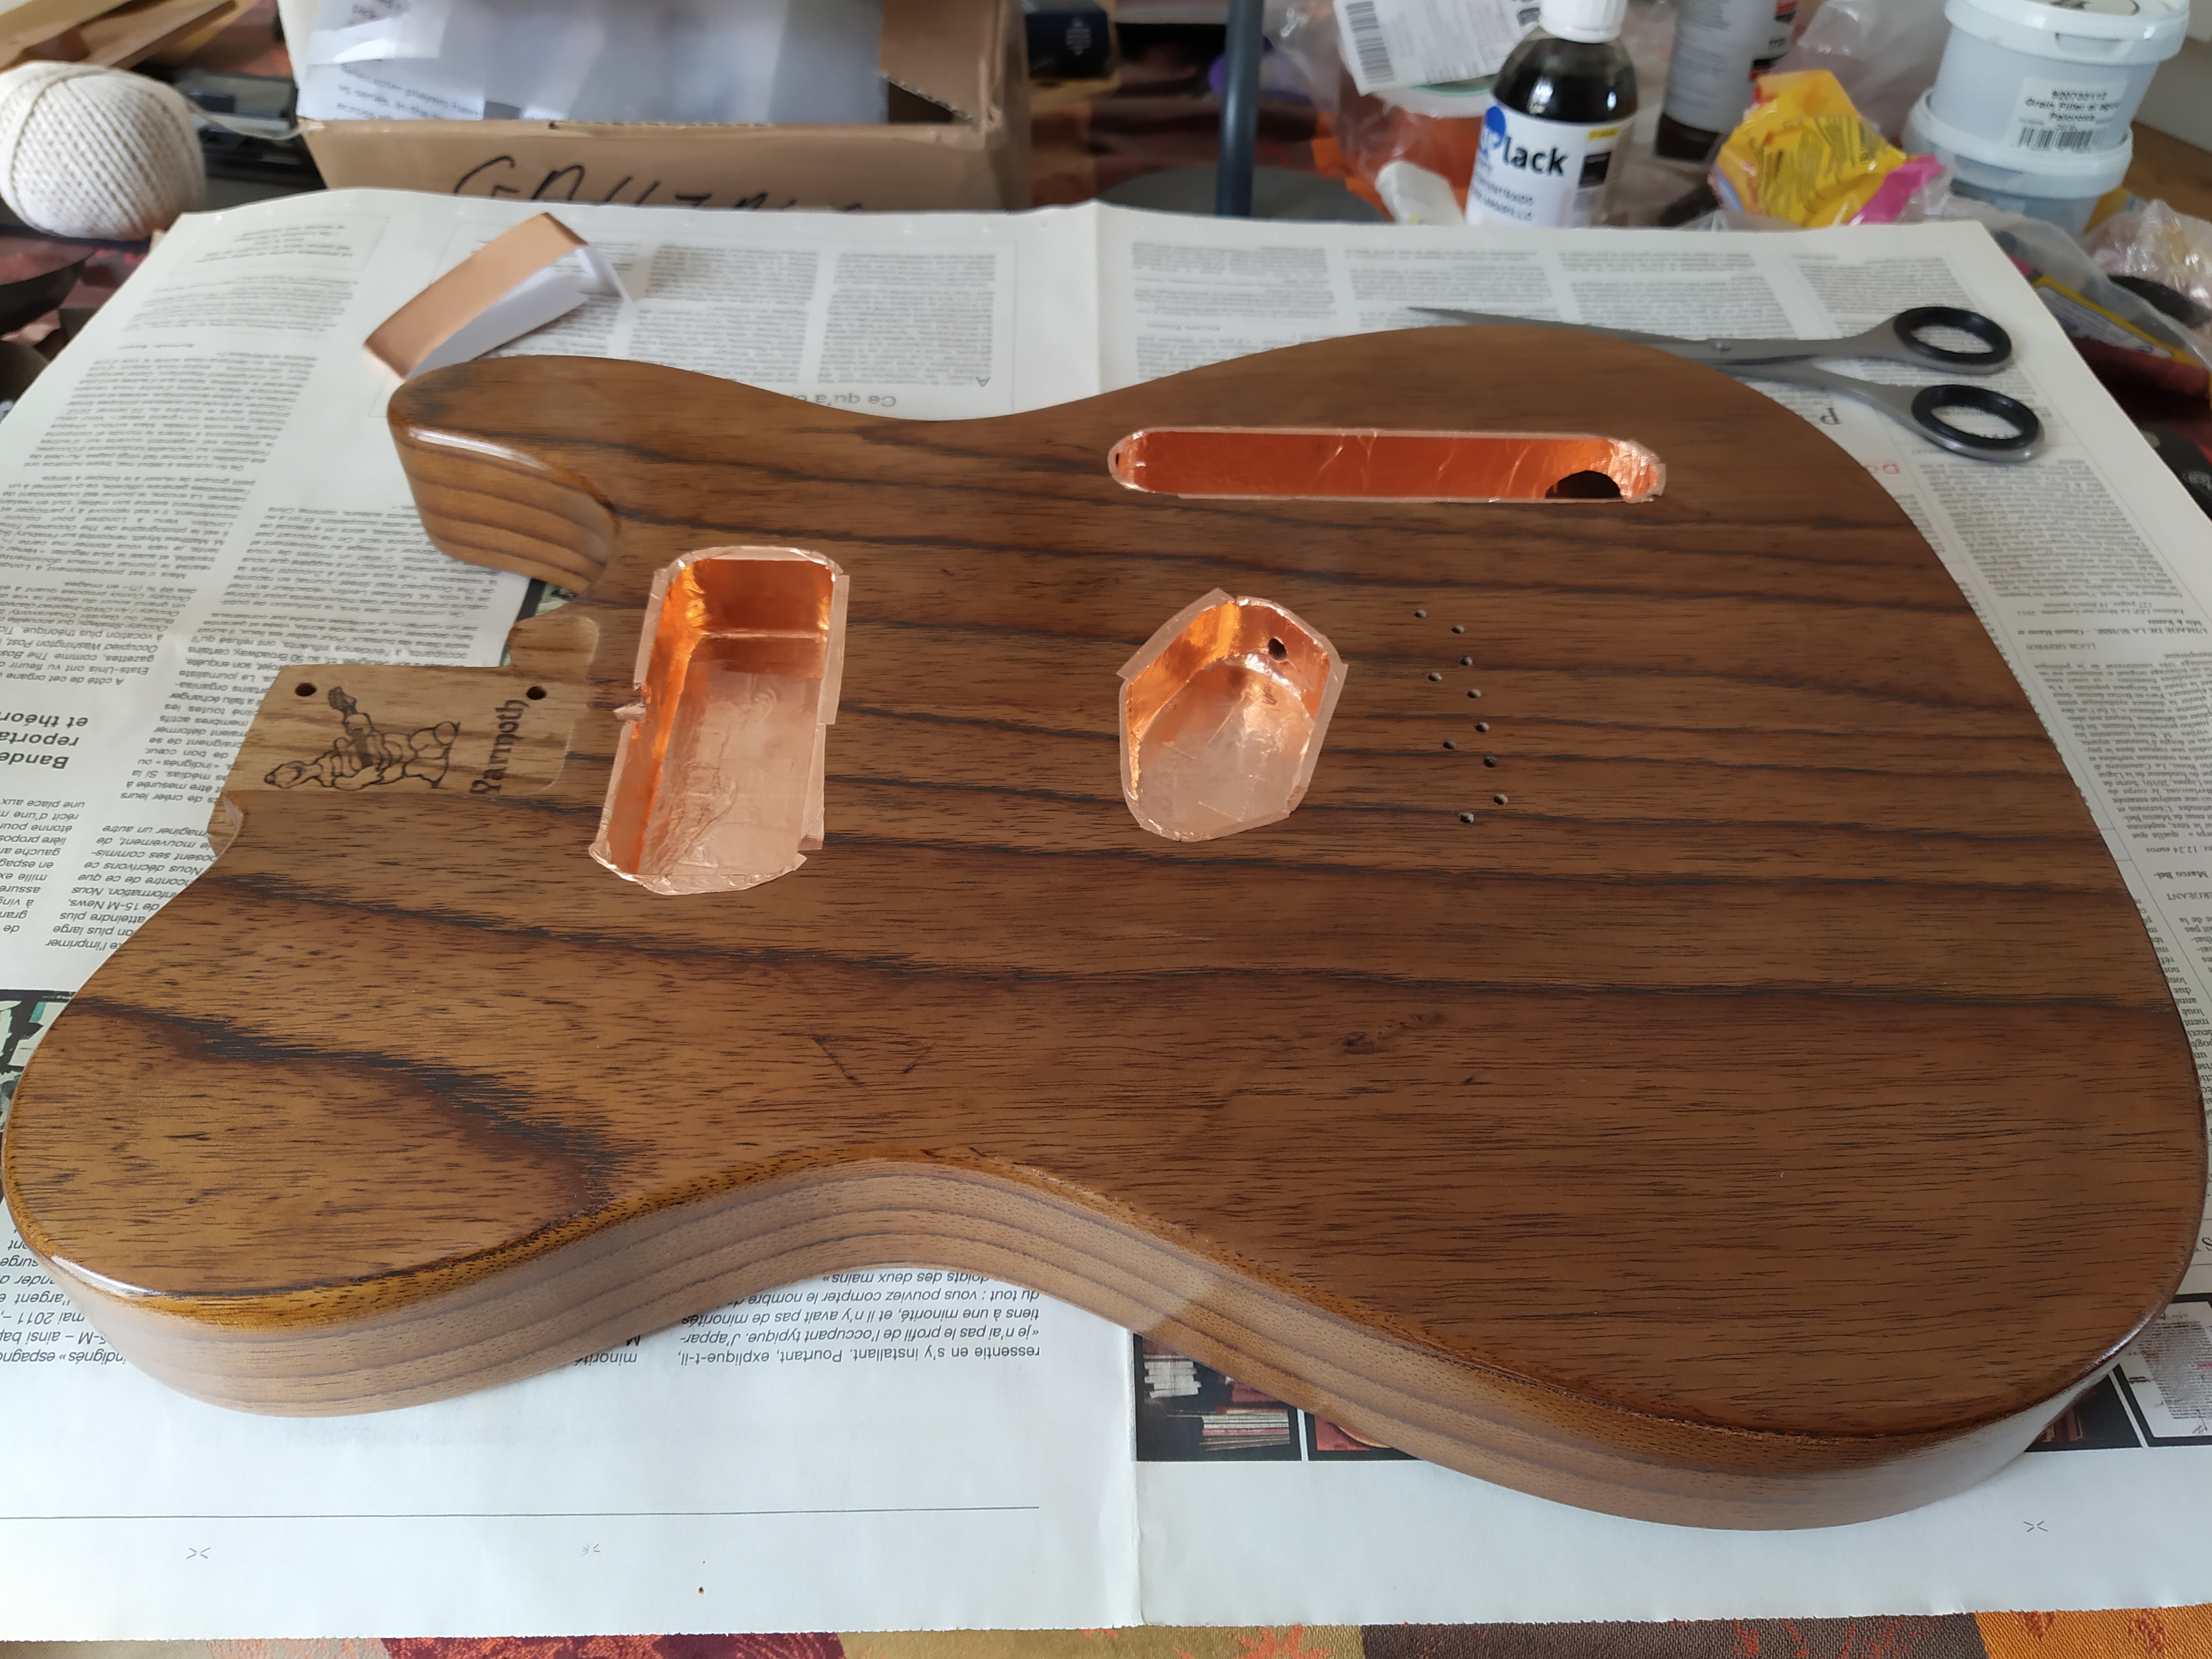
3.1.6 Drilling
There are several holes to drill in the body:
- 2 for the strap buttons;
- 2 for the control plate;
- 5 for the pickguard;
- 2 for the neck pickup (wood mounted);
- 2 for the jack socket.
It is not a difficult task, but to obtain a good result, it is important to apply the following recommendations.
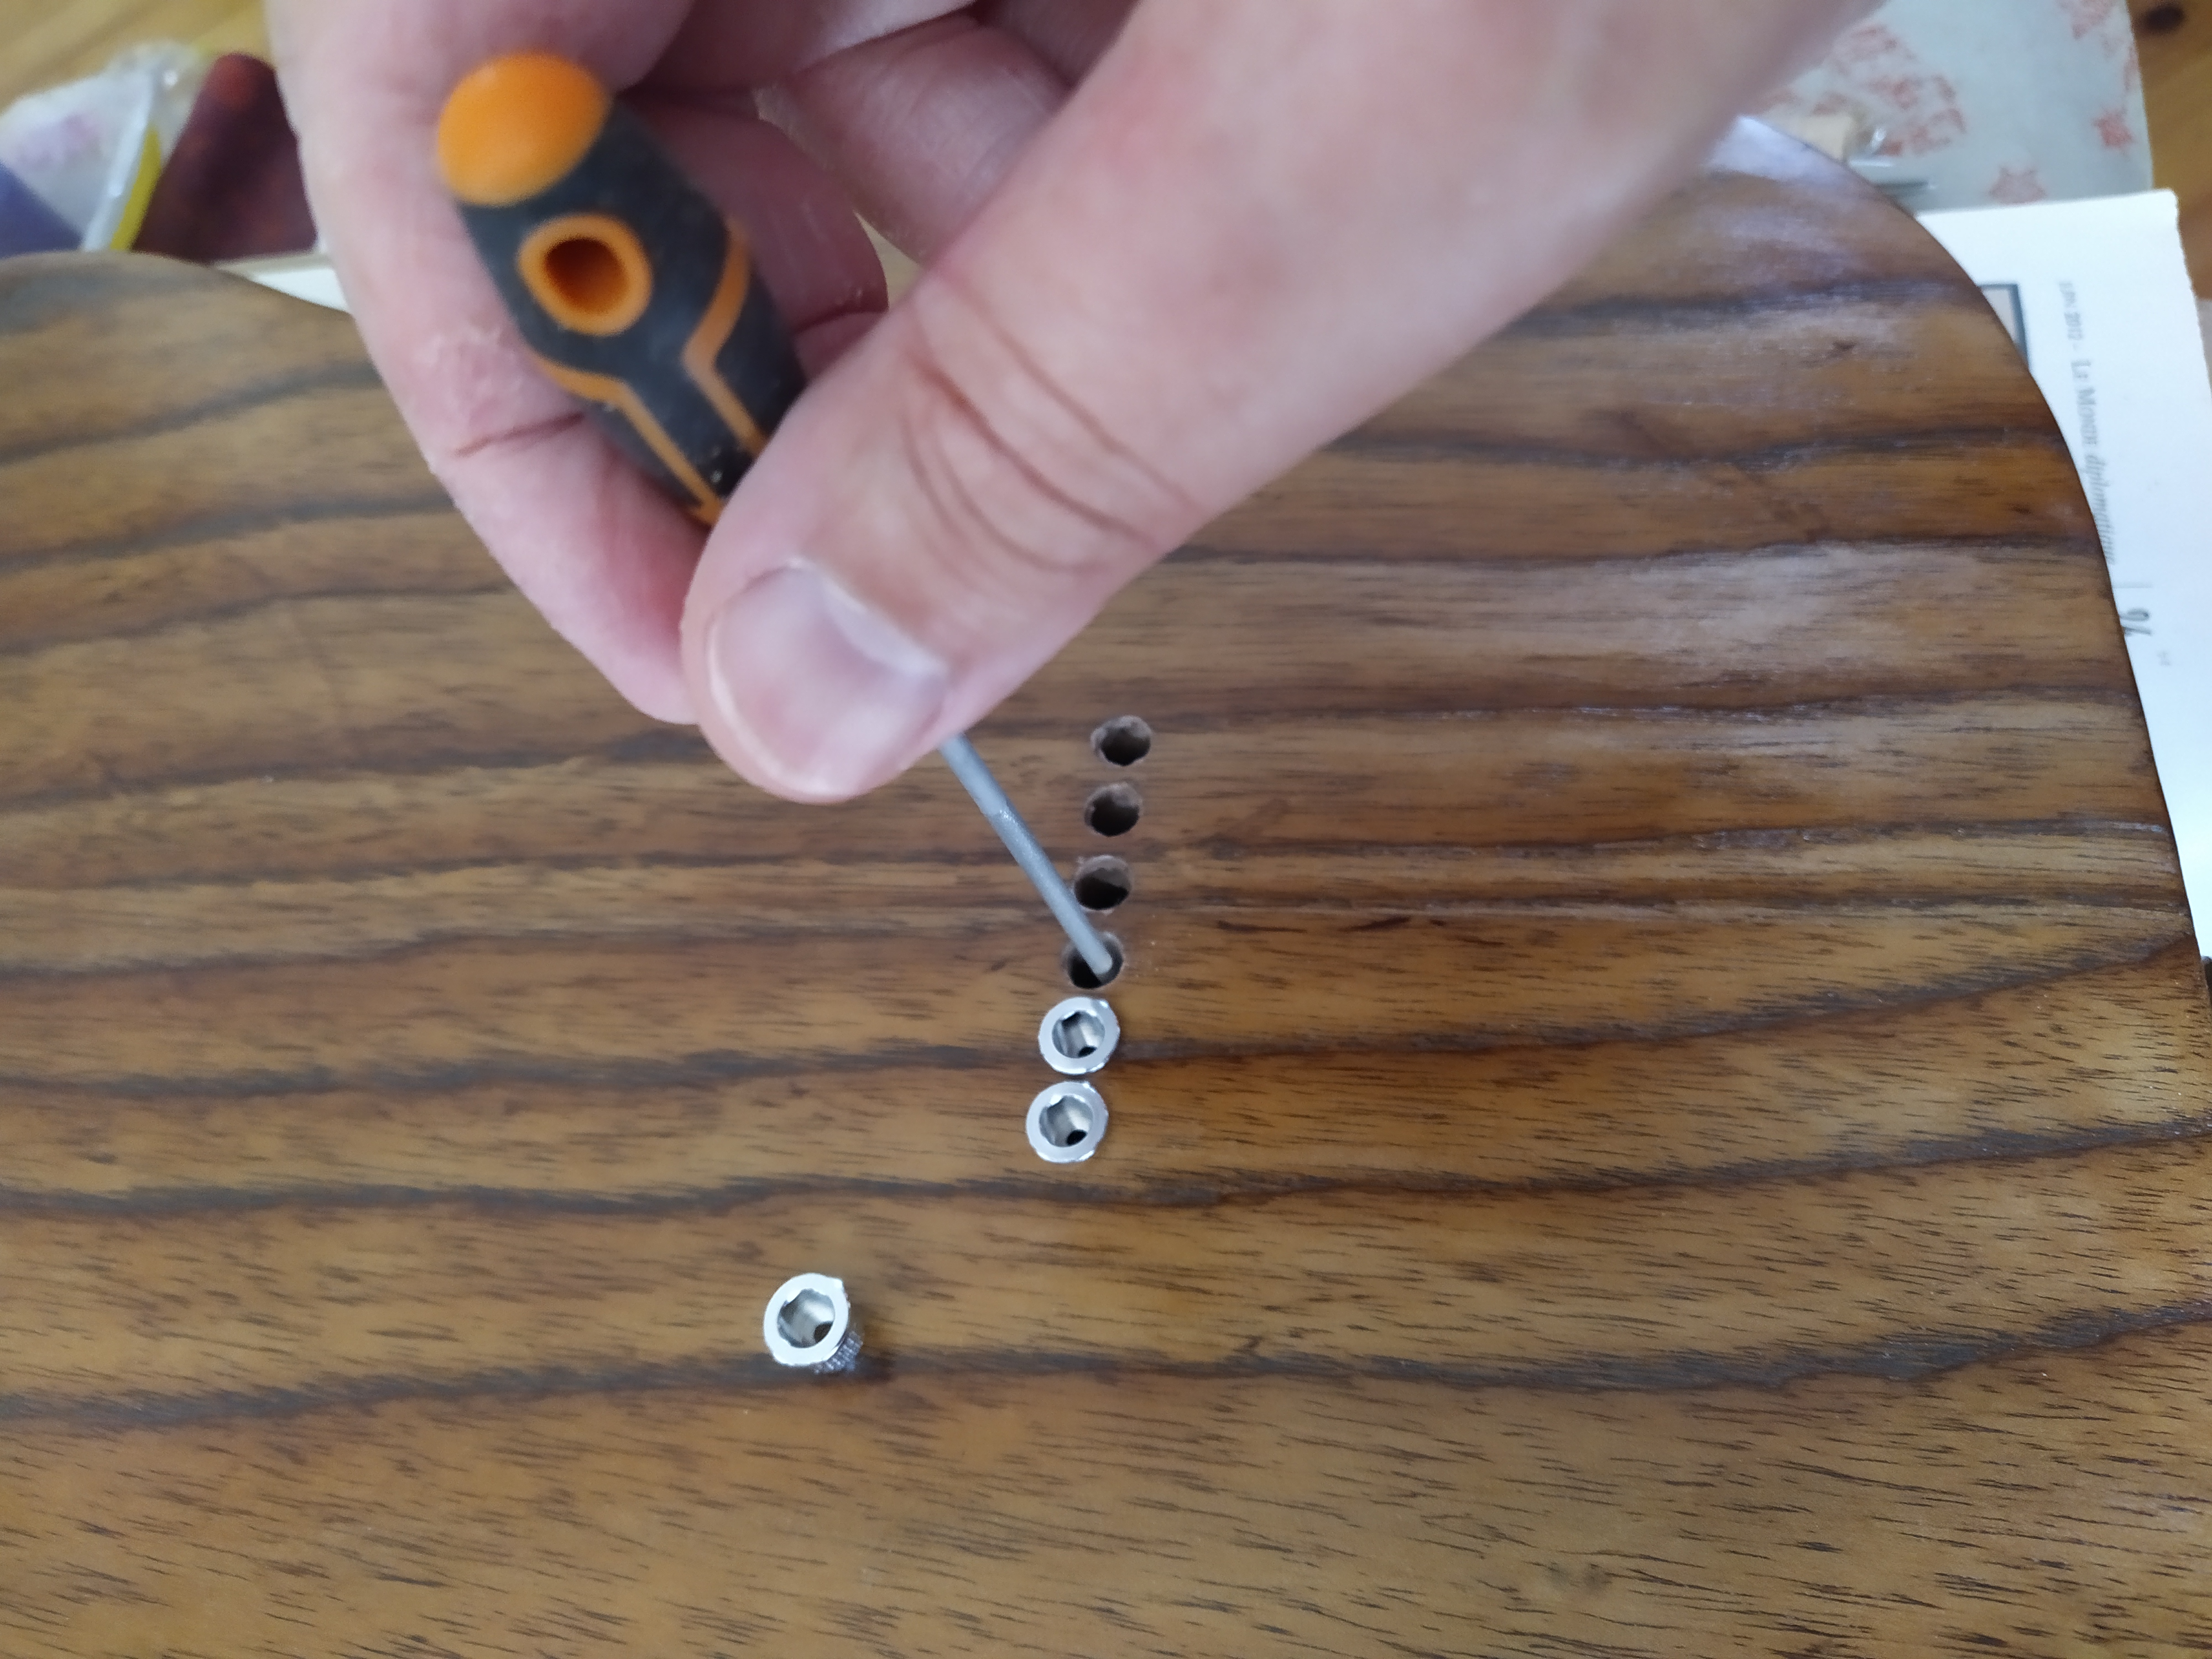
- Lay every component (bridge, pickguard, control plate) on the body in their position and secure them with masking tape. These different elements are indeed touching each other. Having a global view helps positioning them correctly. You can then mark the position of the holes with a paper pencil.
- To avoid cracking the wood, a pilot hole must be drilled for each screw. This hole must be slightly narrower than the screw size (I used 2mm drills for 3 mm screws). In addition, the depth of the hole must correspond to the length of the screw without the head.
3.2 Neck Preparation
I chose to leave the neck unfinished. This is a quite common choice with roasted maple. Regular maple needs to be finished, both because it gets easily stained by the dirt from the fingers, looking disgusting, and because it is sensitive to hygrometry, absorbing and releasing moisture in the air. Roasted maple solves this issue, because the roasting process seals the grain. It is thus more stable and does not stain. Applying even a small layer of oil would probably enhance the aesthetics of the neck. However, the raw wood feel is really addictive. In this case, feel takes precedence over look.
The raw neck from Warmoth is shown in Fig. 9 and Fig. 10. Only the frets were already installed.
3.2.1 Rolling the fingerboard edges
It is possible to roll the fingerboard edges, that is to lightly smooth the angles on each side. It is a tactile choice. The neck will feel smoother and more pleasant to play. It is also something that old guitars have in common, as it is naturally achieved over years of playing. Some people roll the edges of finished necks by pressing the fibers with the edge of a screw driver. With an unfinished neck, we however have the option to use sandpaper instead (Fig. 11), which gives a better control and does not apply as much stress on the neck. I used 240 grit paper and polished the result up to 2000 grit.
3.2.2 Fitting and installing the nut
Being a point of contact of the strings with the guitar, the nut is an important component. There are several reasons for carving a custom nut out of a blank piece of bone.
- Bone (usually reclaimed beef bone from the food industry) is the traditional material for acoustic and electric guitars, because of its hardness. However, Warmoth does not offer bone nuts, only composite materials. The only way to get a bone nut is thus to make one. Pre-cut and pre-slotted bone nuts are significantly more expensive and they need to be fitted and filed, anyway.
- Different string gauges require different nut slot widths. In principle, we should make a different nut if we change the string gauges. If we are OK with not gluing the nut (the only risk is losing it when changing strings), we can have one nut for each gauge we use, and swap them easily when we swap strings.
- The nut is subject to wear. It will need to be replaced at some point. Knowing how to make a new one is thus part of the basic guitar maintenance skills that can save us money on the long term.
The piece of bone first needs to be radiused and fitted to the width of the slot. I used 240 grit sanding paper taped to a flat wood block, as shown in Fig. 12. It is important to use a flat hard surface, as I was first using a regular sanding block, which is a bit soft. The nut ended narrower at the edges than at the center.
The nut position, width and depth needs to be carefully set.
- The slot width
- is determined by the size of the files. Manufacturers recommend using a set of files within one hundredth of an inch of the used string gauge. In my case, I used a set of 0.010—0.046 inch files and do not have issues mounting 0.011—0.050 inch strings.
- The slot position
can be estimated depending on the nut width (\(w=42\) mm here) and the string gauge. Leaving \(\delta_0=3.2\) mm on each sides of the fingerboard seems to be a good compromise. It is large enough to prevent fretting out and small enough to preserve most of the fingerboard's "real estate". The rest of the position is computed to have the same spacing, \(\delta\), between the edges of each string (i.e. \(w=2\times\delta_0+\sum_{i=1}^6s_i+5\times\delta\); where \(s_i\) is the width of string \(i\)). I generated the template in Fig. 13. It must be printed to size, i.e. 42 mm wide. It corresponds to the nut slot positions given in Table 2.
Figure 13: template nut slots. Table 2: nut slot centers, for a set of 0.011—0.050 strings, from the treble side. e b g D A E 3.2 mm 10.8 mm 18.0 mm 25.1 mm 32.0 mm 38.8 mm 
Figure 14: marking the position of the nut slots using the template of Fig. 13. - The slot depth
- is the most delicate operation. If it is not deep enough, the string will be hard to play and will be out of tune around the first frets. On the contrary, if is too deep, it will buzz. The idea is that the bottom of the nut slot should be aligned with the top of the other frets (assuming the neck is perfectly straight). In practice, we want a bit of margin. An easy method consists in putting a capo at the third fret and making sure that the string almost touches the top of the first fret. This step needs several iterations, removing small amounts of material, retuning, and checking that the guitar plays well without buzzing.
3.2.3 Installing the tuners
Installing the tuners is quite easy, but it is important to drill pilot holes for the screws to avoid cracking the wood.
- Install the eyelets that go with vintage-style Fender tuners. The holes needs to be gently filed so that the eyelet will fit without having to force too much.
Marking the position of the tuner screws (Fig. 15).

Figure 15: marking the position of the tuner screws. Drilling the holes of the tuner crews to the right depth (Fig. 16).
Figure 16: drilling the tuner screw holes.
3.3 Electronic
3.3.1 Shielding the cavities
With single coil pickups, it is important to shield the cavities, as much as possible. It does not suppress the hum and other parasite noises, but it quiets them significantly. It is easy to do (Fig. 18). The only thing to insure is that there is an electric continuity between any point in the cavity and the ground. The glue of the copper tape needs to be conducting.
3.3.2 Preparing the control plate
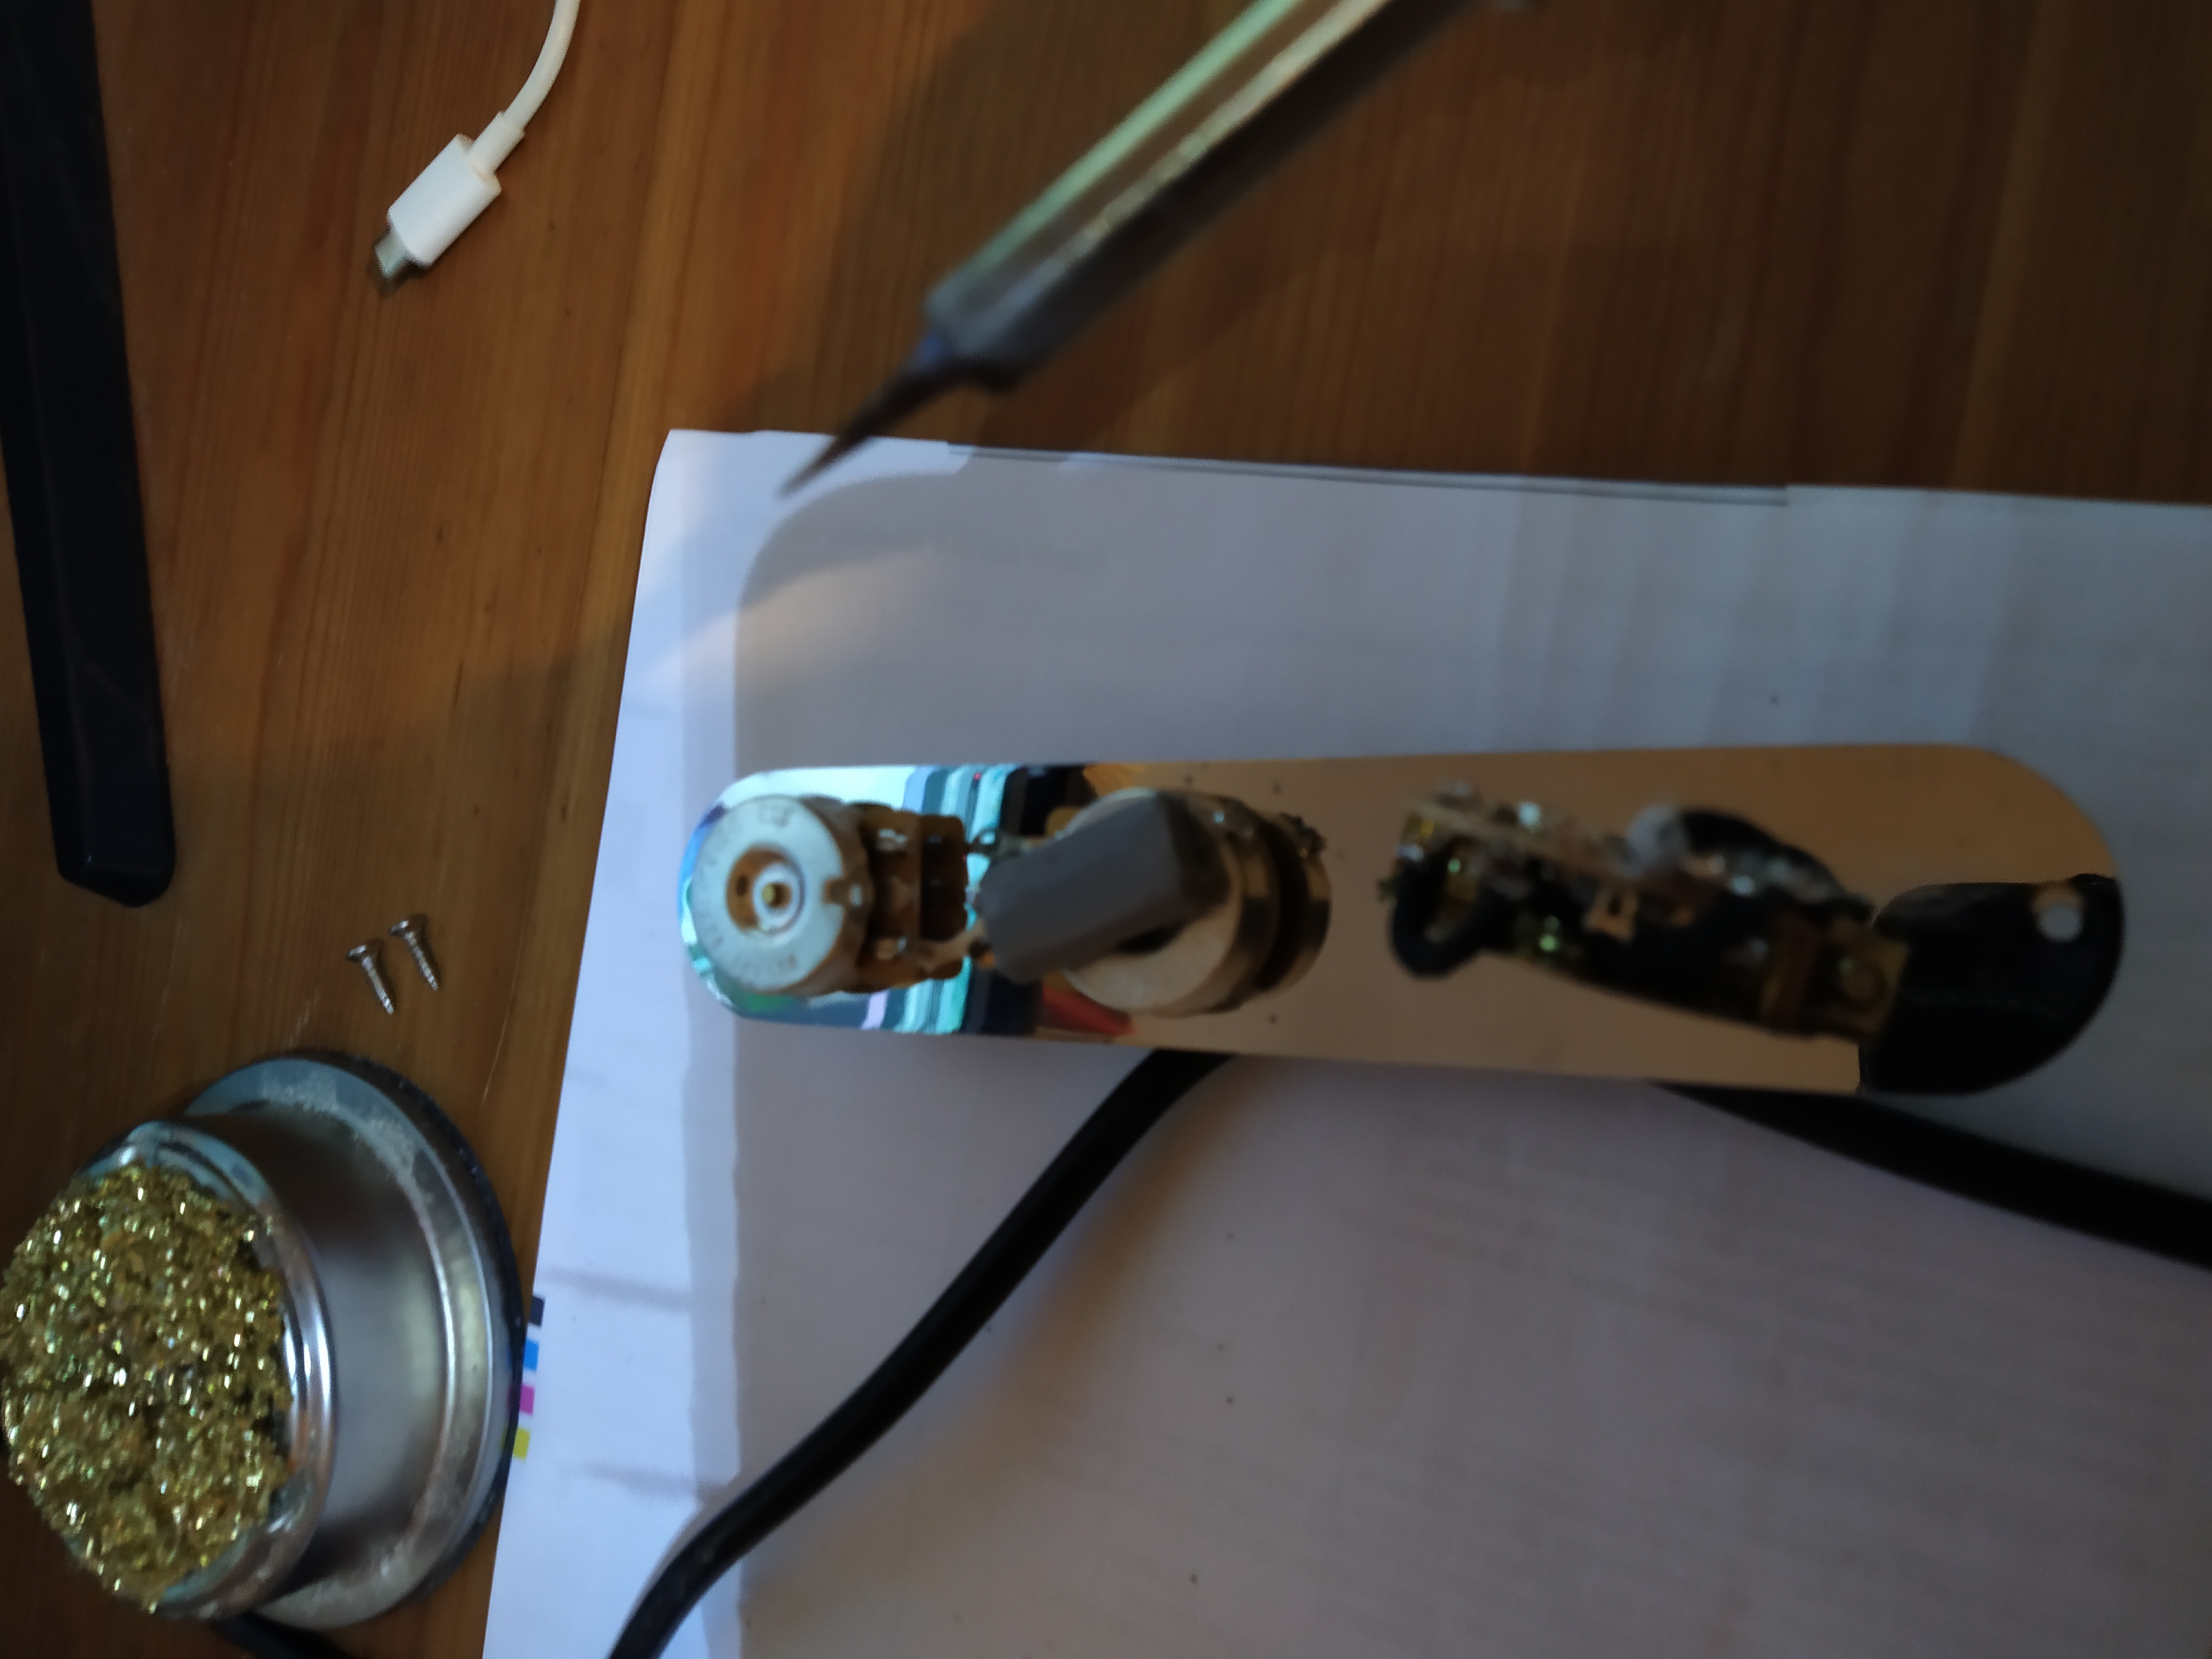
As mentioned above, the design of Fender guitars makes them easy to produce and service. In the case of a Tele, most of the soldering can be done on the control plate, without having to squeeze the components in a small f-hole afterwards. Here, I did a standard reversed Tele wiring (3 positions; Fig. 19).
3.4 Final Steps
3.4.1 Set-Up
Once every component is assembled, we need to do a set-up.
Installing fresh strings (Fig. 20).
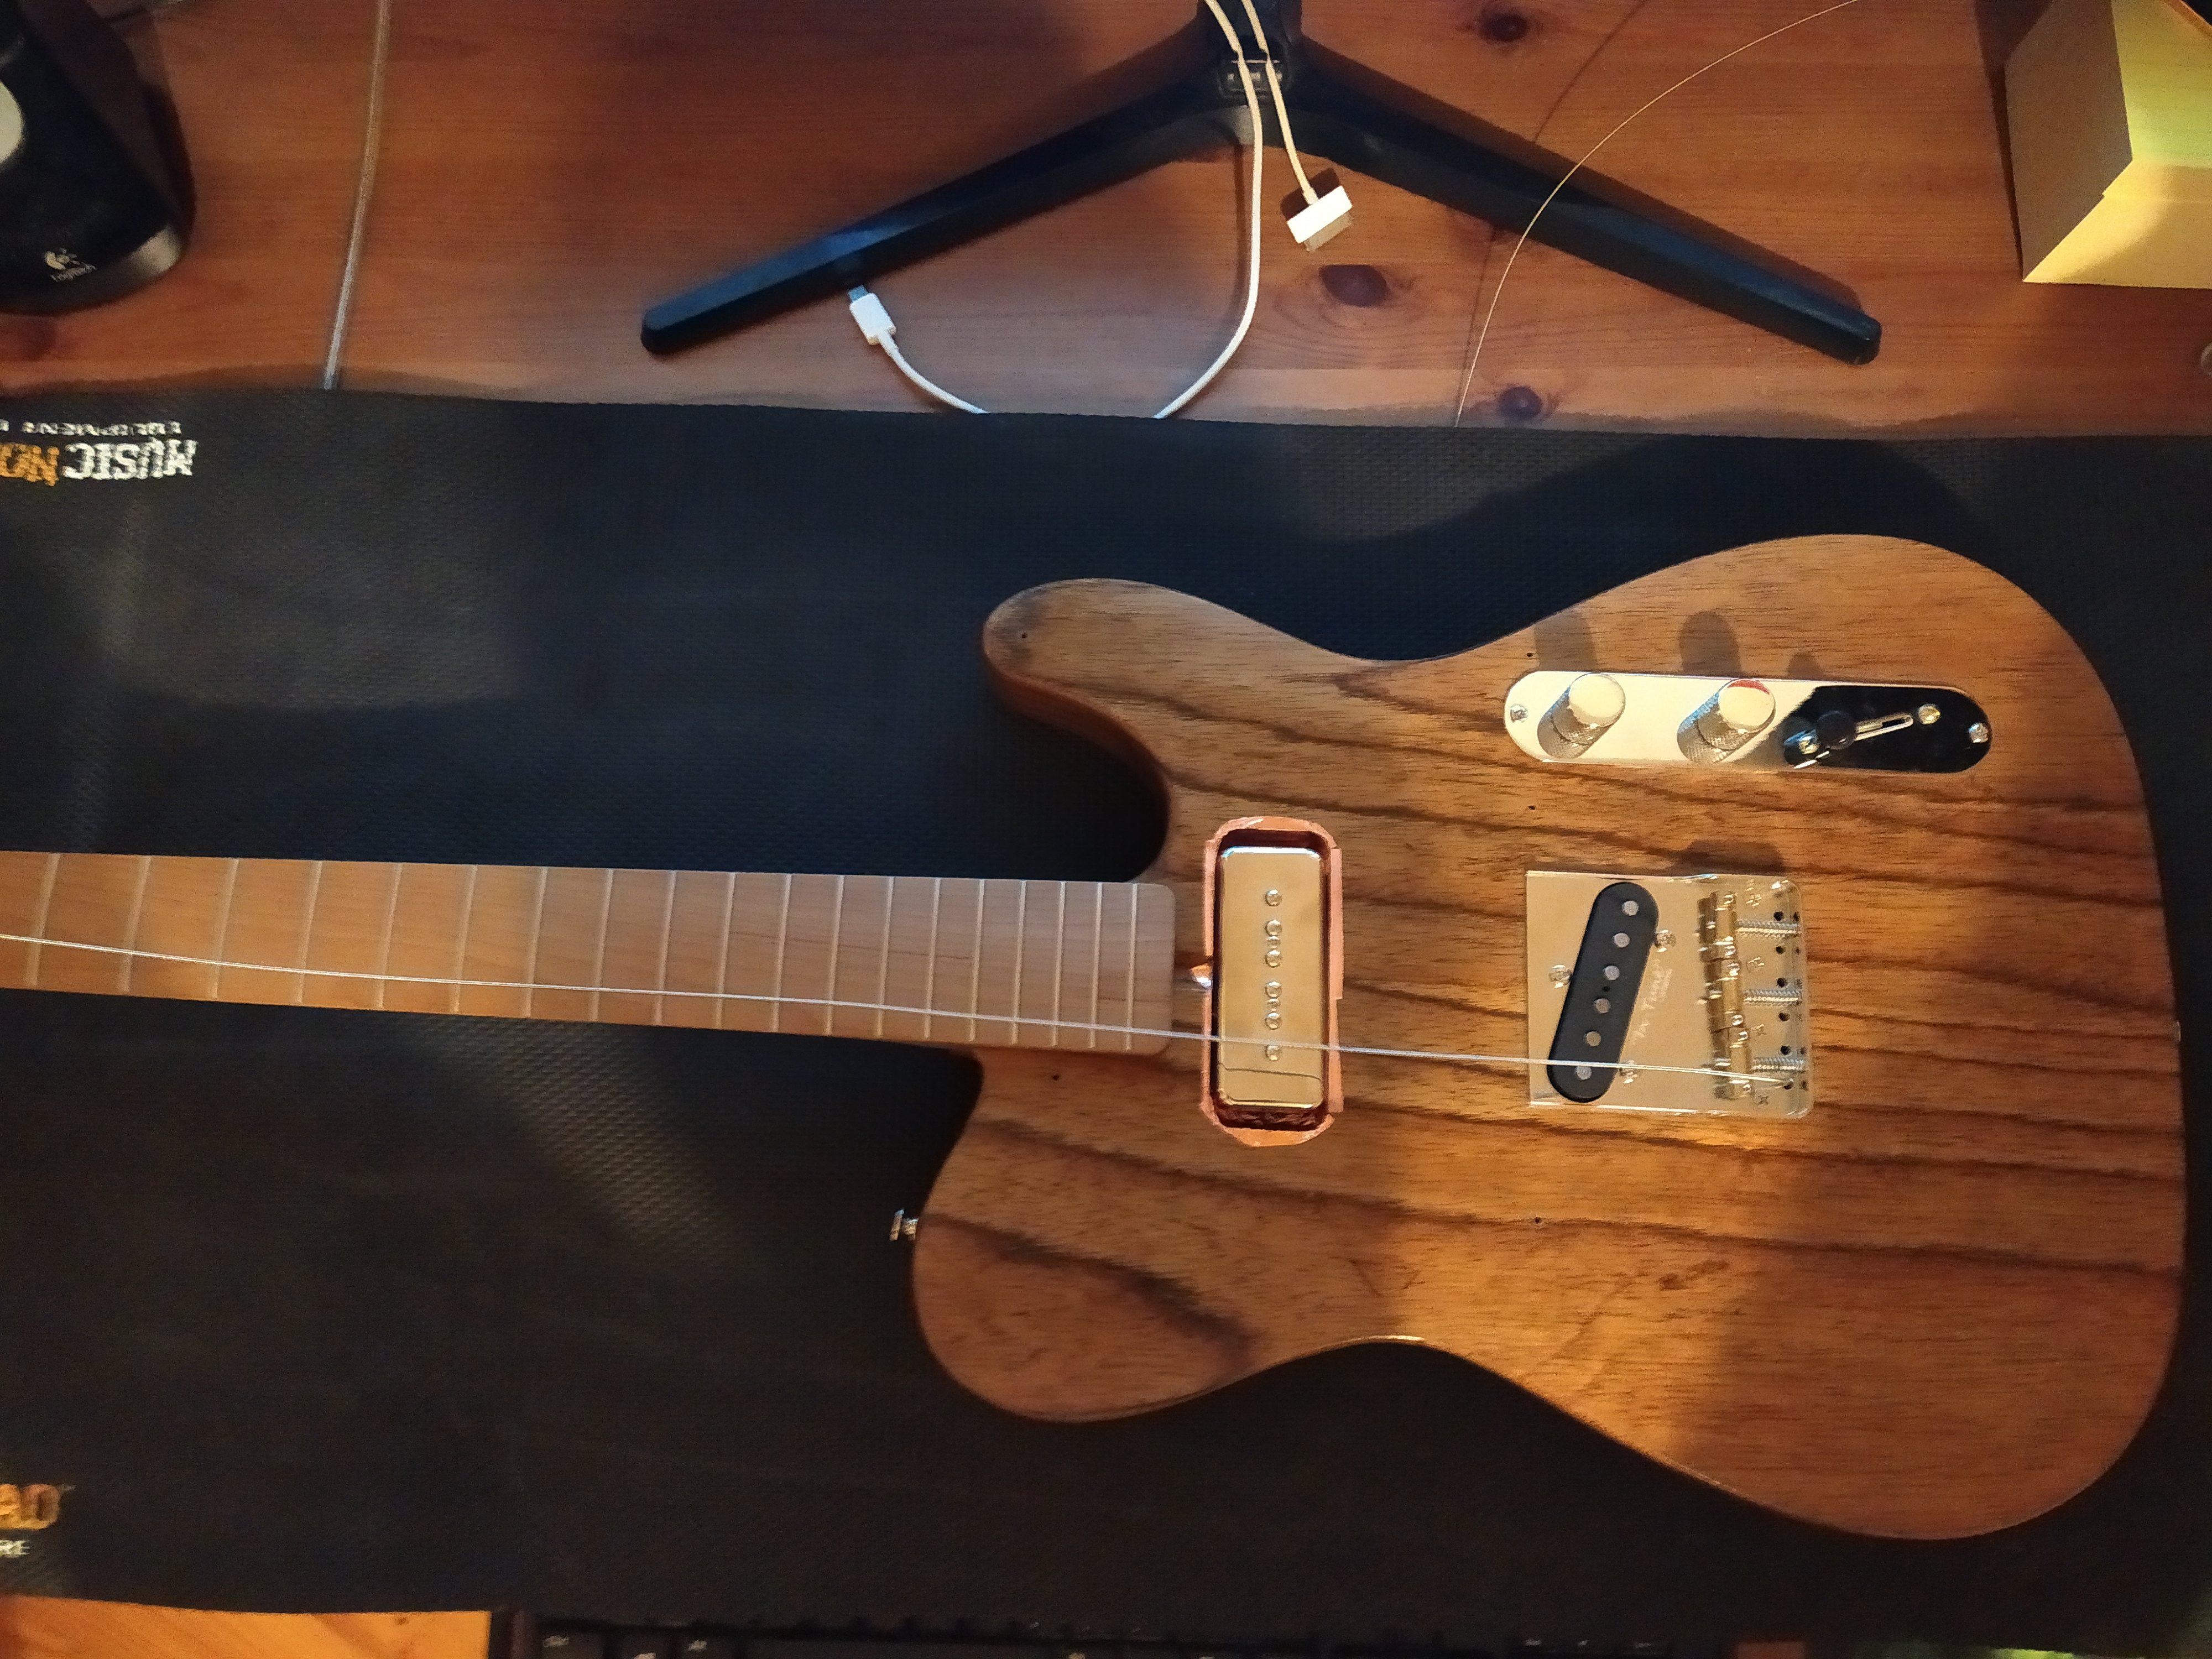
Figure 20: installing the first set of strings. - Positioning the string tree on the headstock, using the strings as a guide.
- Setting the neck relief, using the trussrod.
- Setting the action, following these steps.
- Setting the intonation.
- Setting the pickup height. In my case, I have a low output pickup in the bridge and a moderate output pickup in the neck. I thus need to balance their difference in volume by playing on their height. Ideally, I even want the bridge pickup to be slightly louder, as I use it as a balls-to-the-wall Rock / Blues / Funk solo booster. I thus set the bridge pickup the highest possible without causing a rattling noise when I strum hard. I then adjust the P90 height to get the desired volume level. The P90 ends up quite low. It is not a bad thing, as:
- it sounds less bassy when it is low;
- it gives more freedom to pick above the pickup.
- Leveling the frets with a radius block and 240 grit sanding paper.
- Crowning and polishing the frets.
3.4.2 Custom pickguard
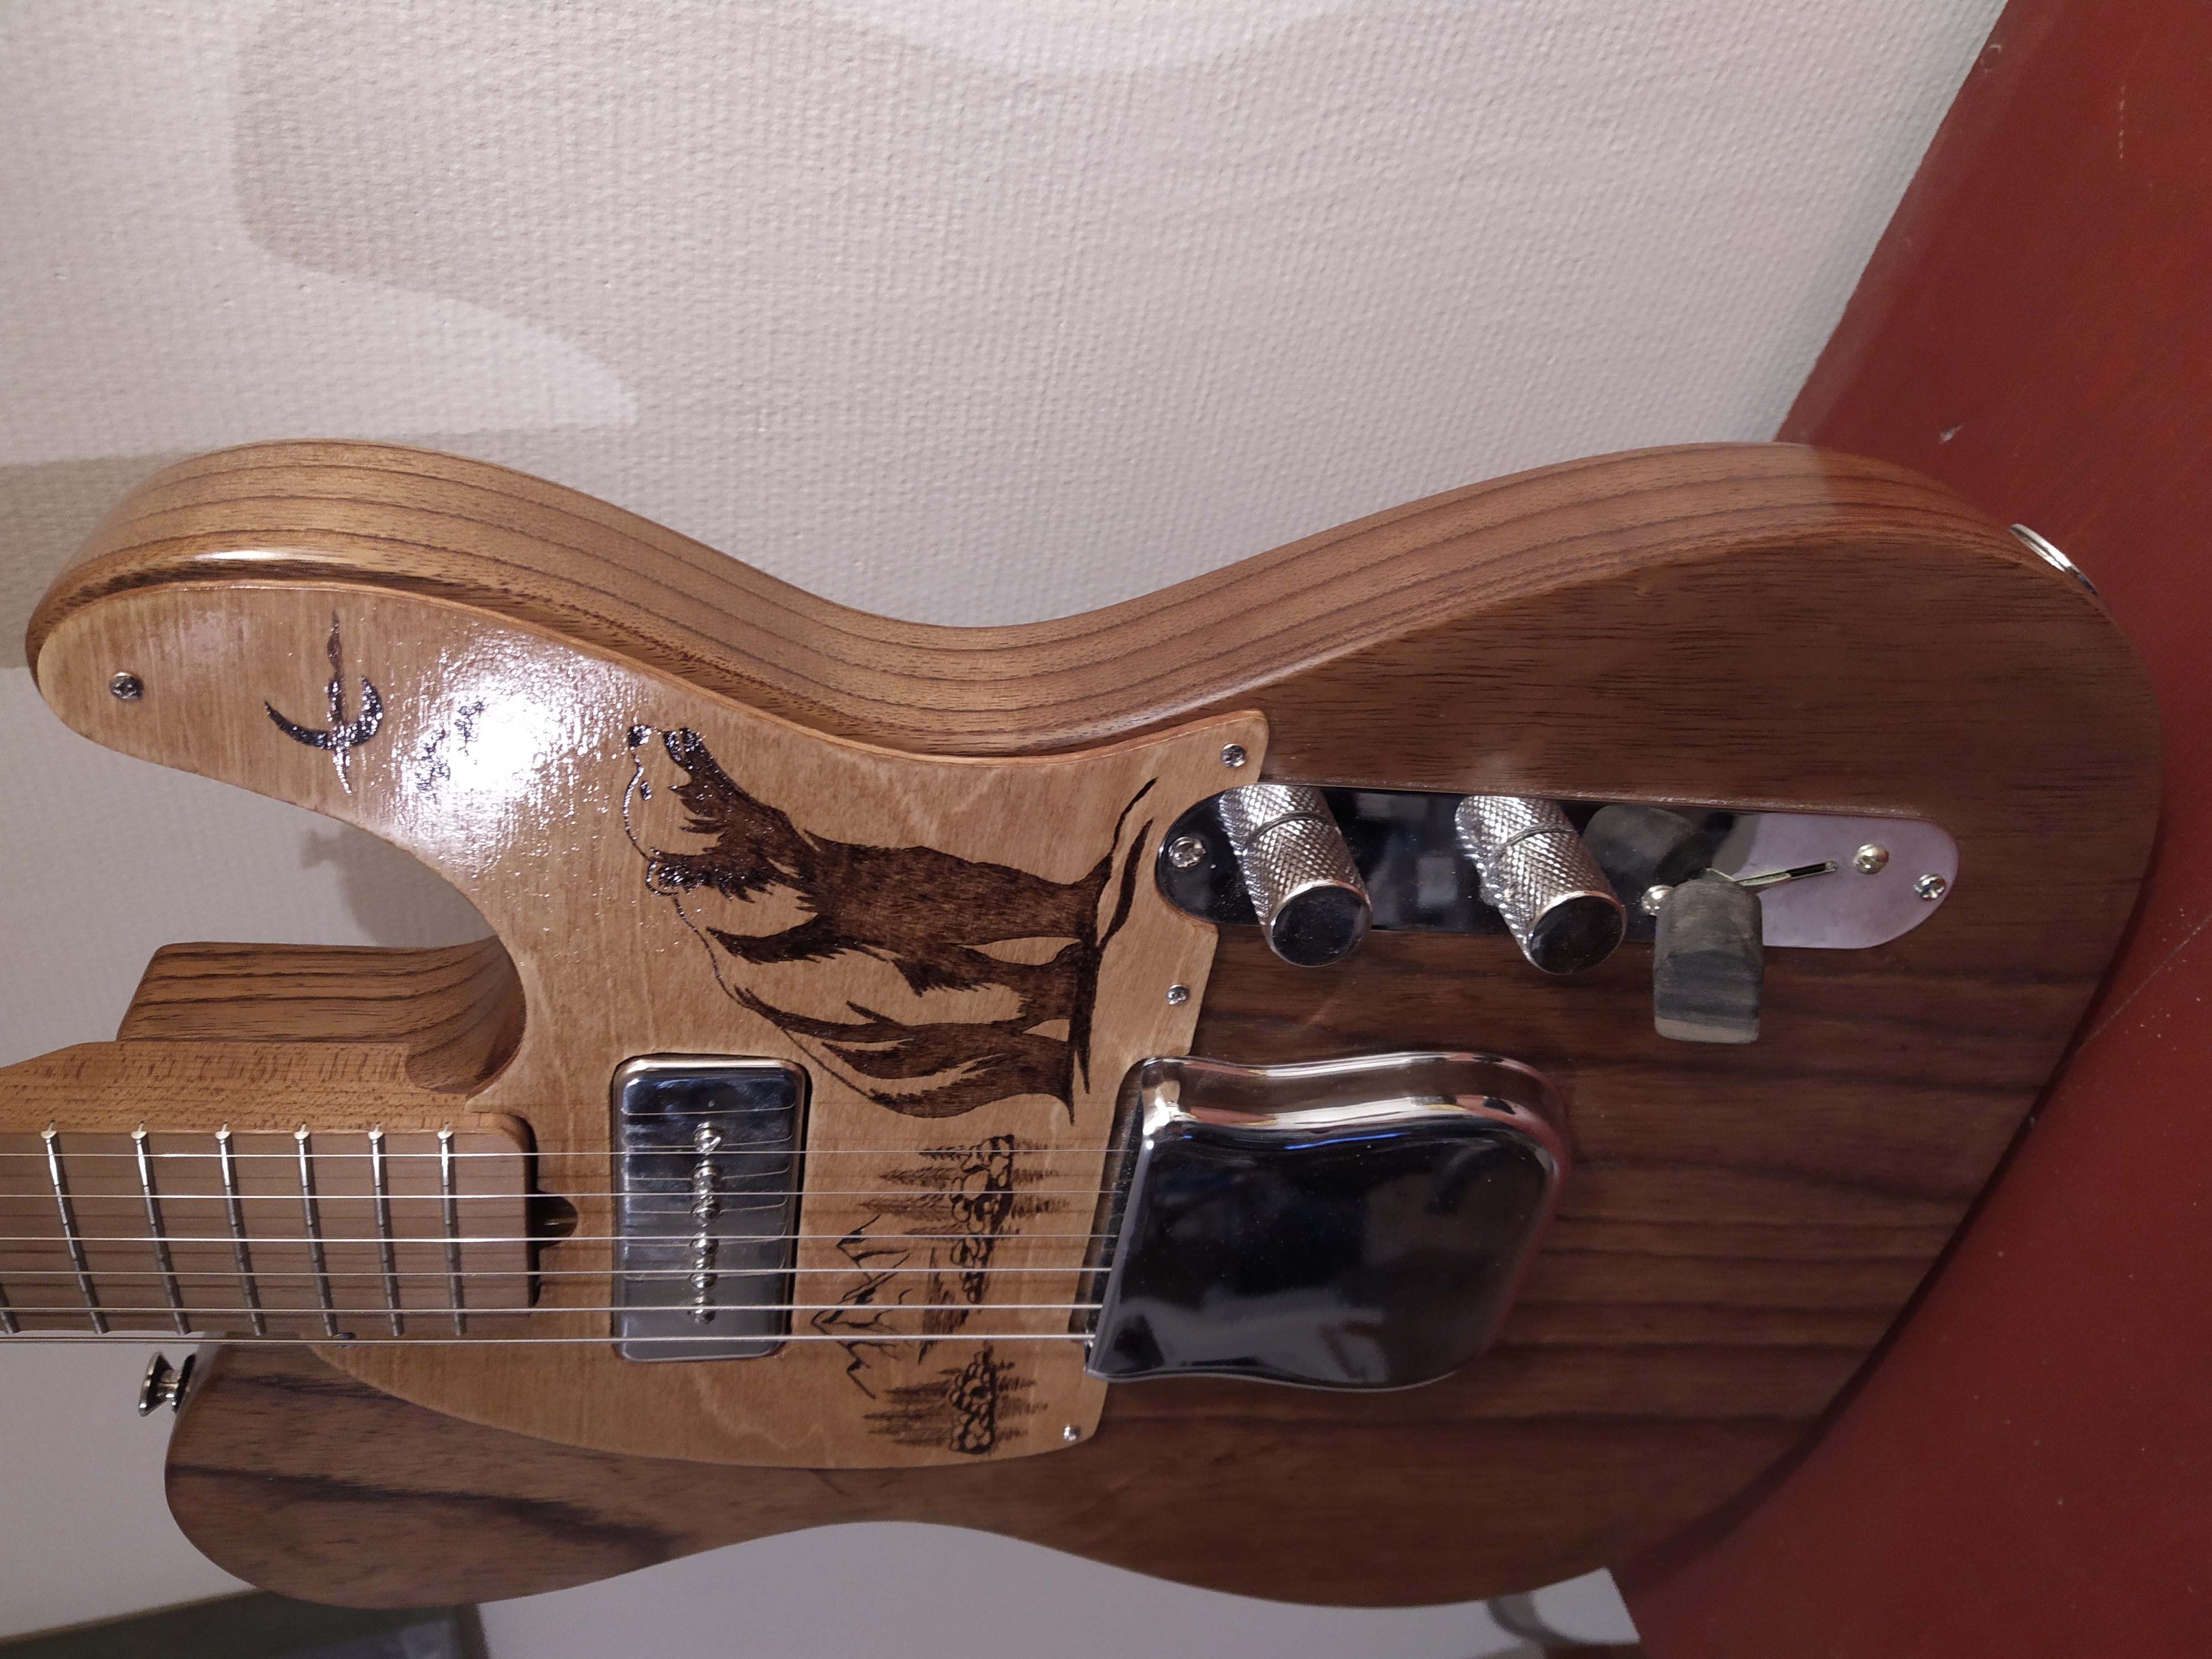
I find plastic pickguards hideous, even the tortoise ones. Besides, the pickguard is not instrumental to the sound and can be customized to your will. I thus decided to cut one out of a plank of birch plywood (3mm thick).
It was cut, filed and sanded to shape (Fig. 21). I used the pickguard of my Vintera as a template. This birch was stained with an oak color.
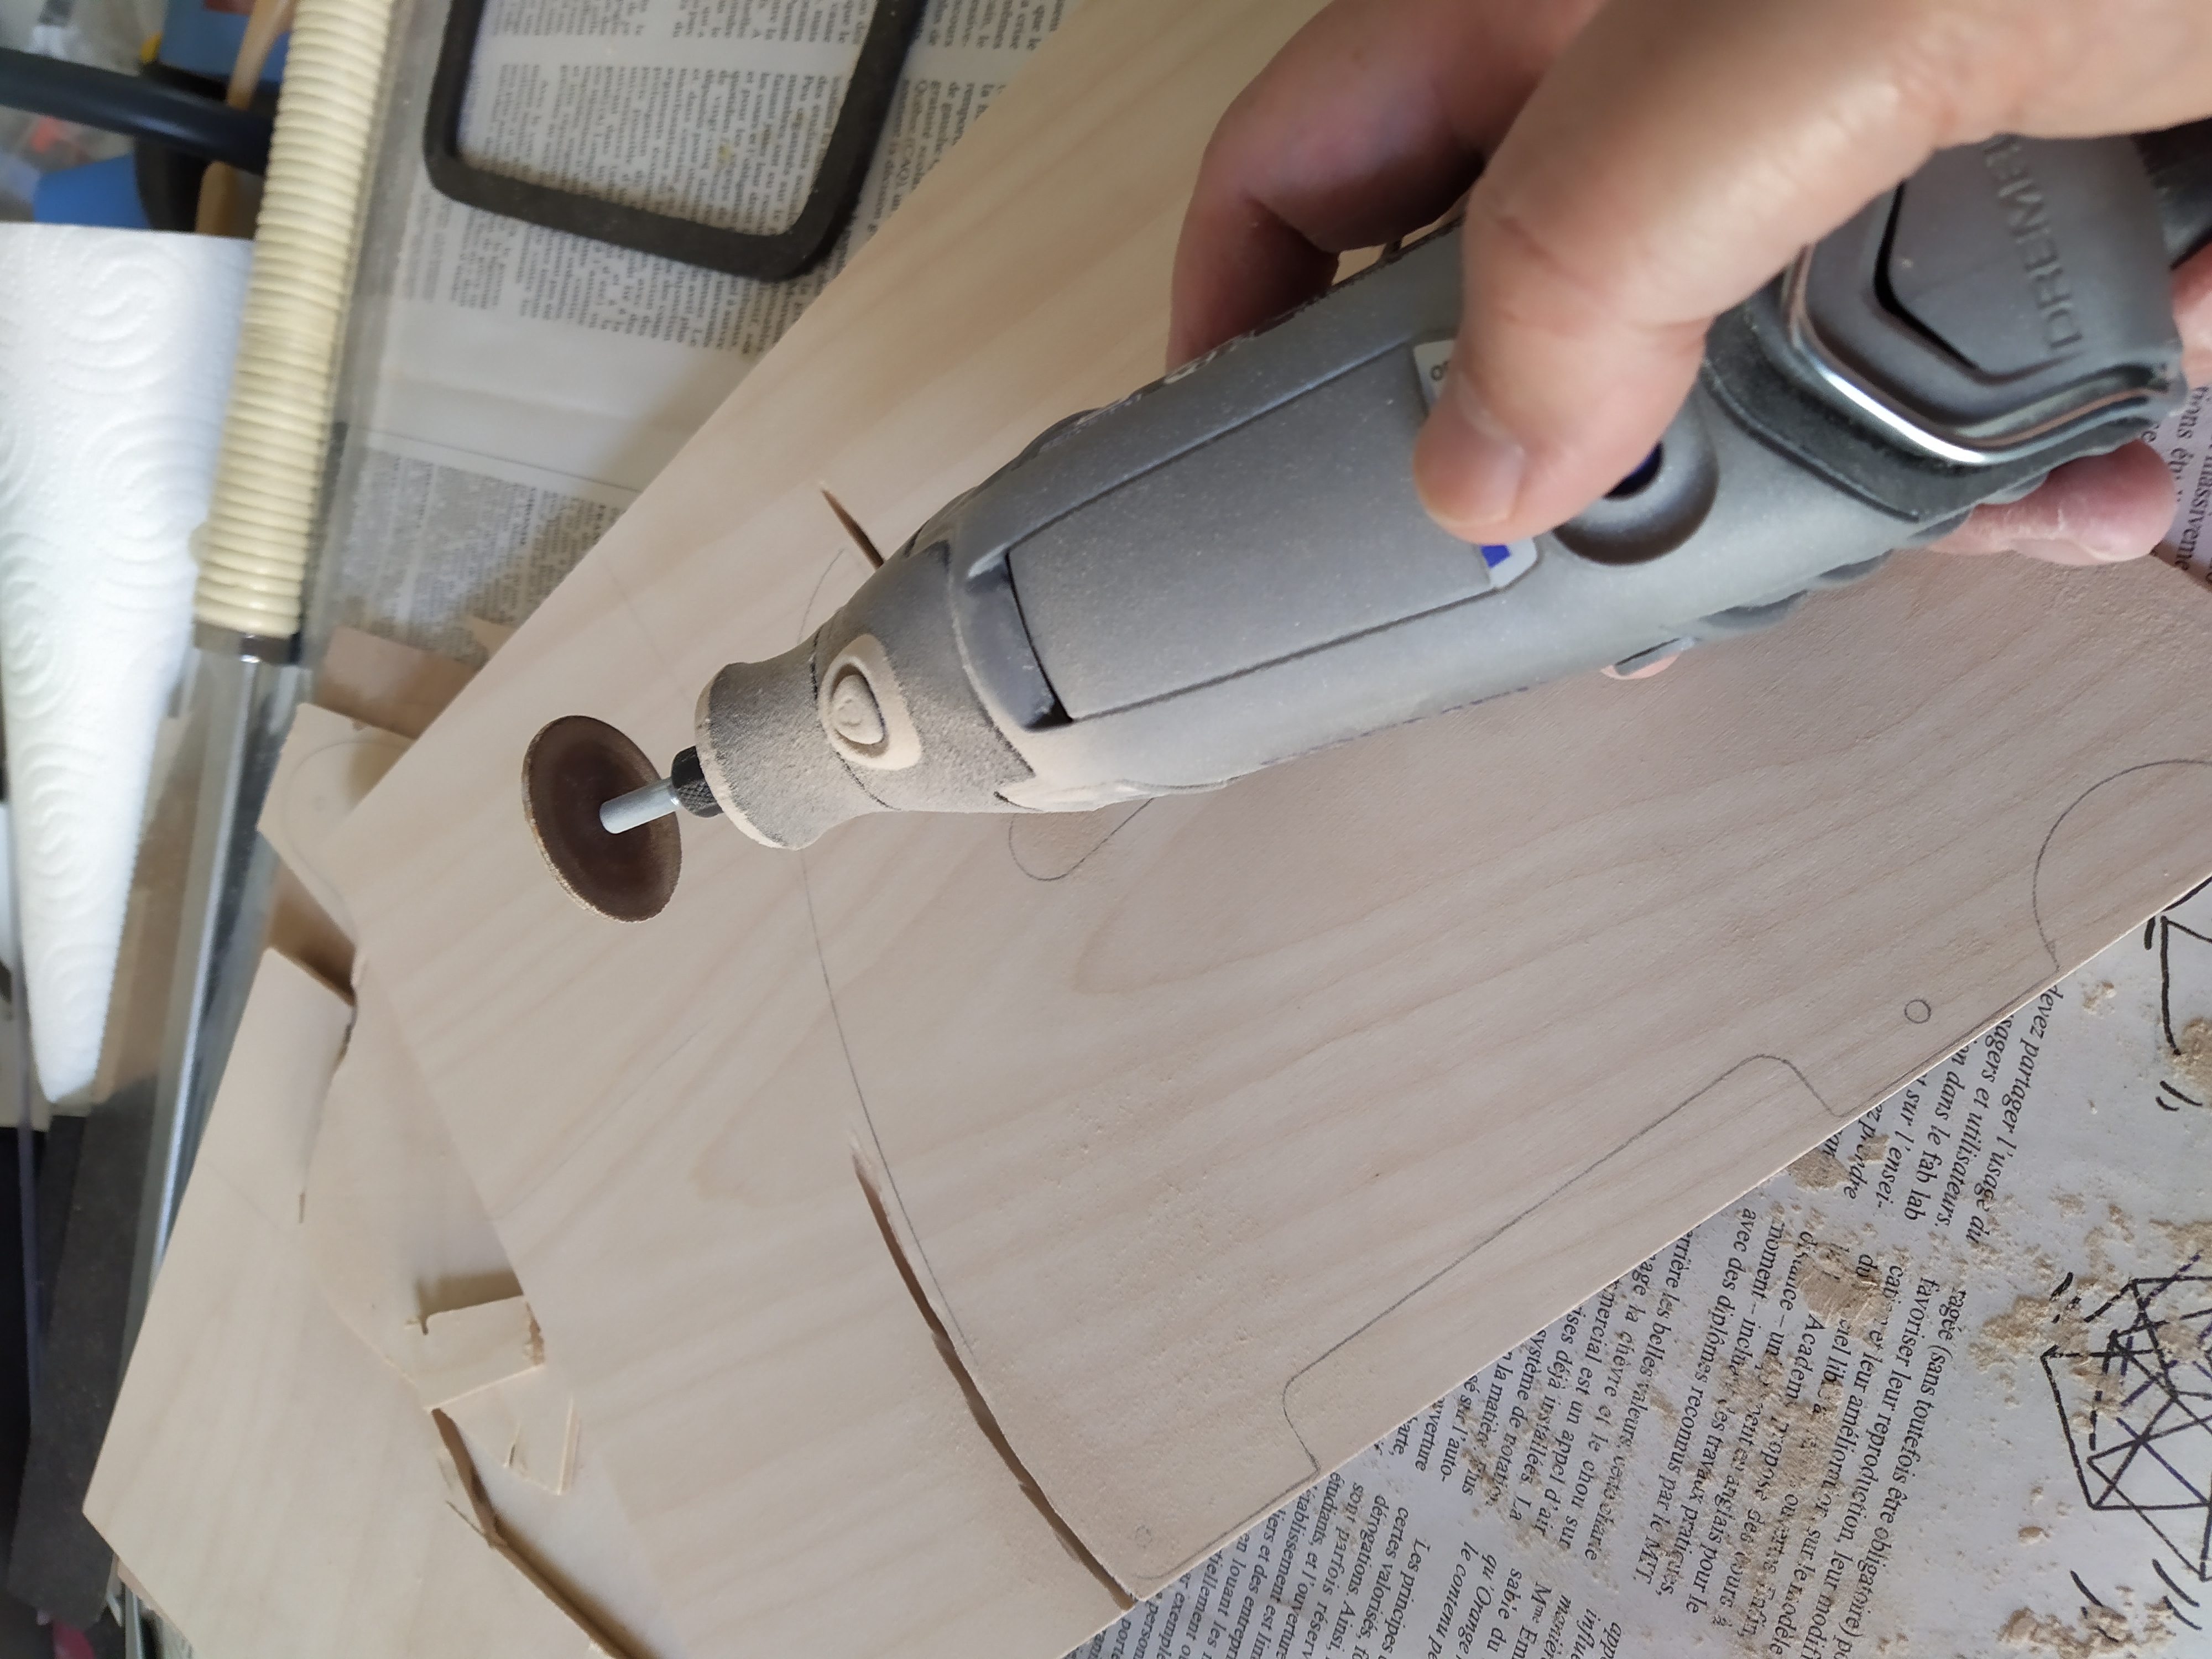
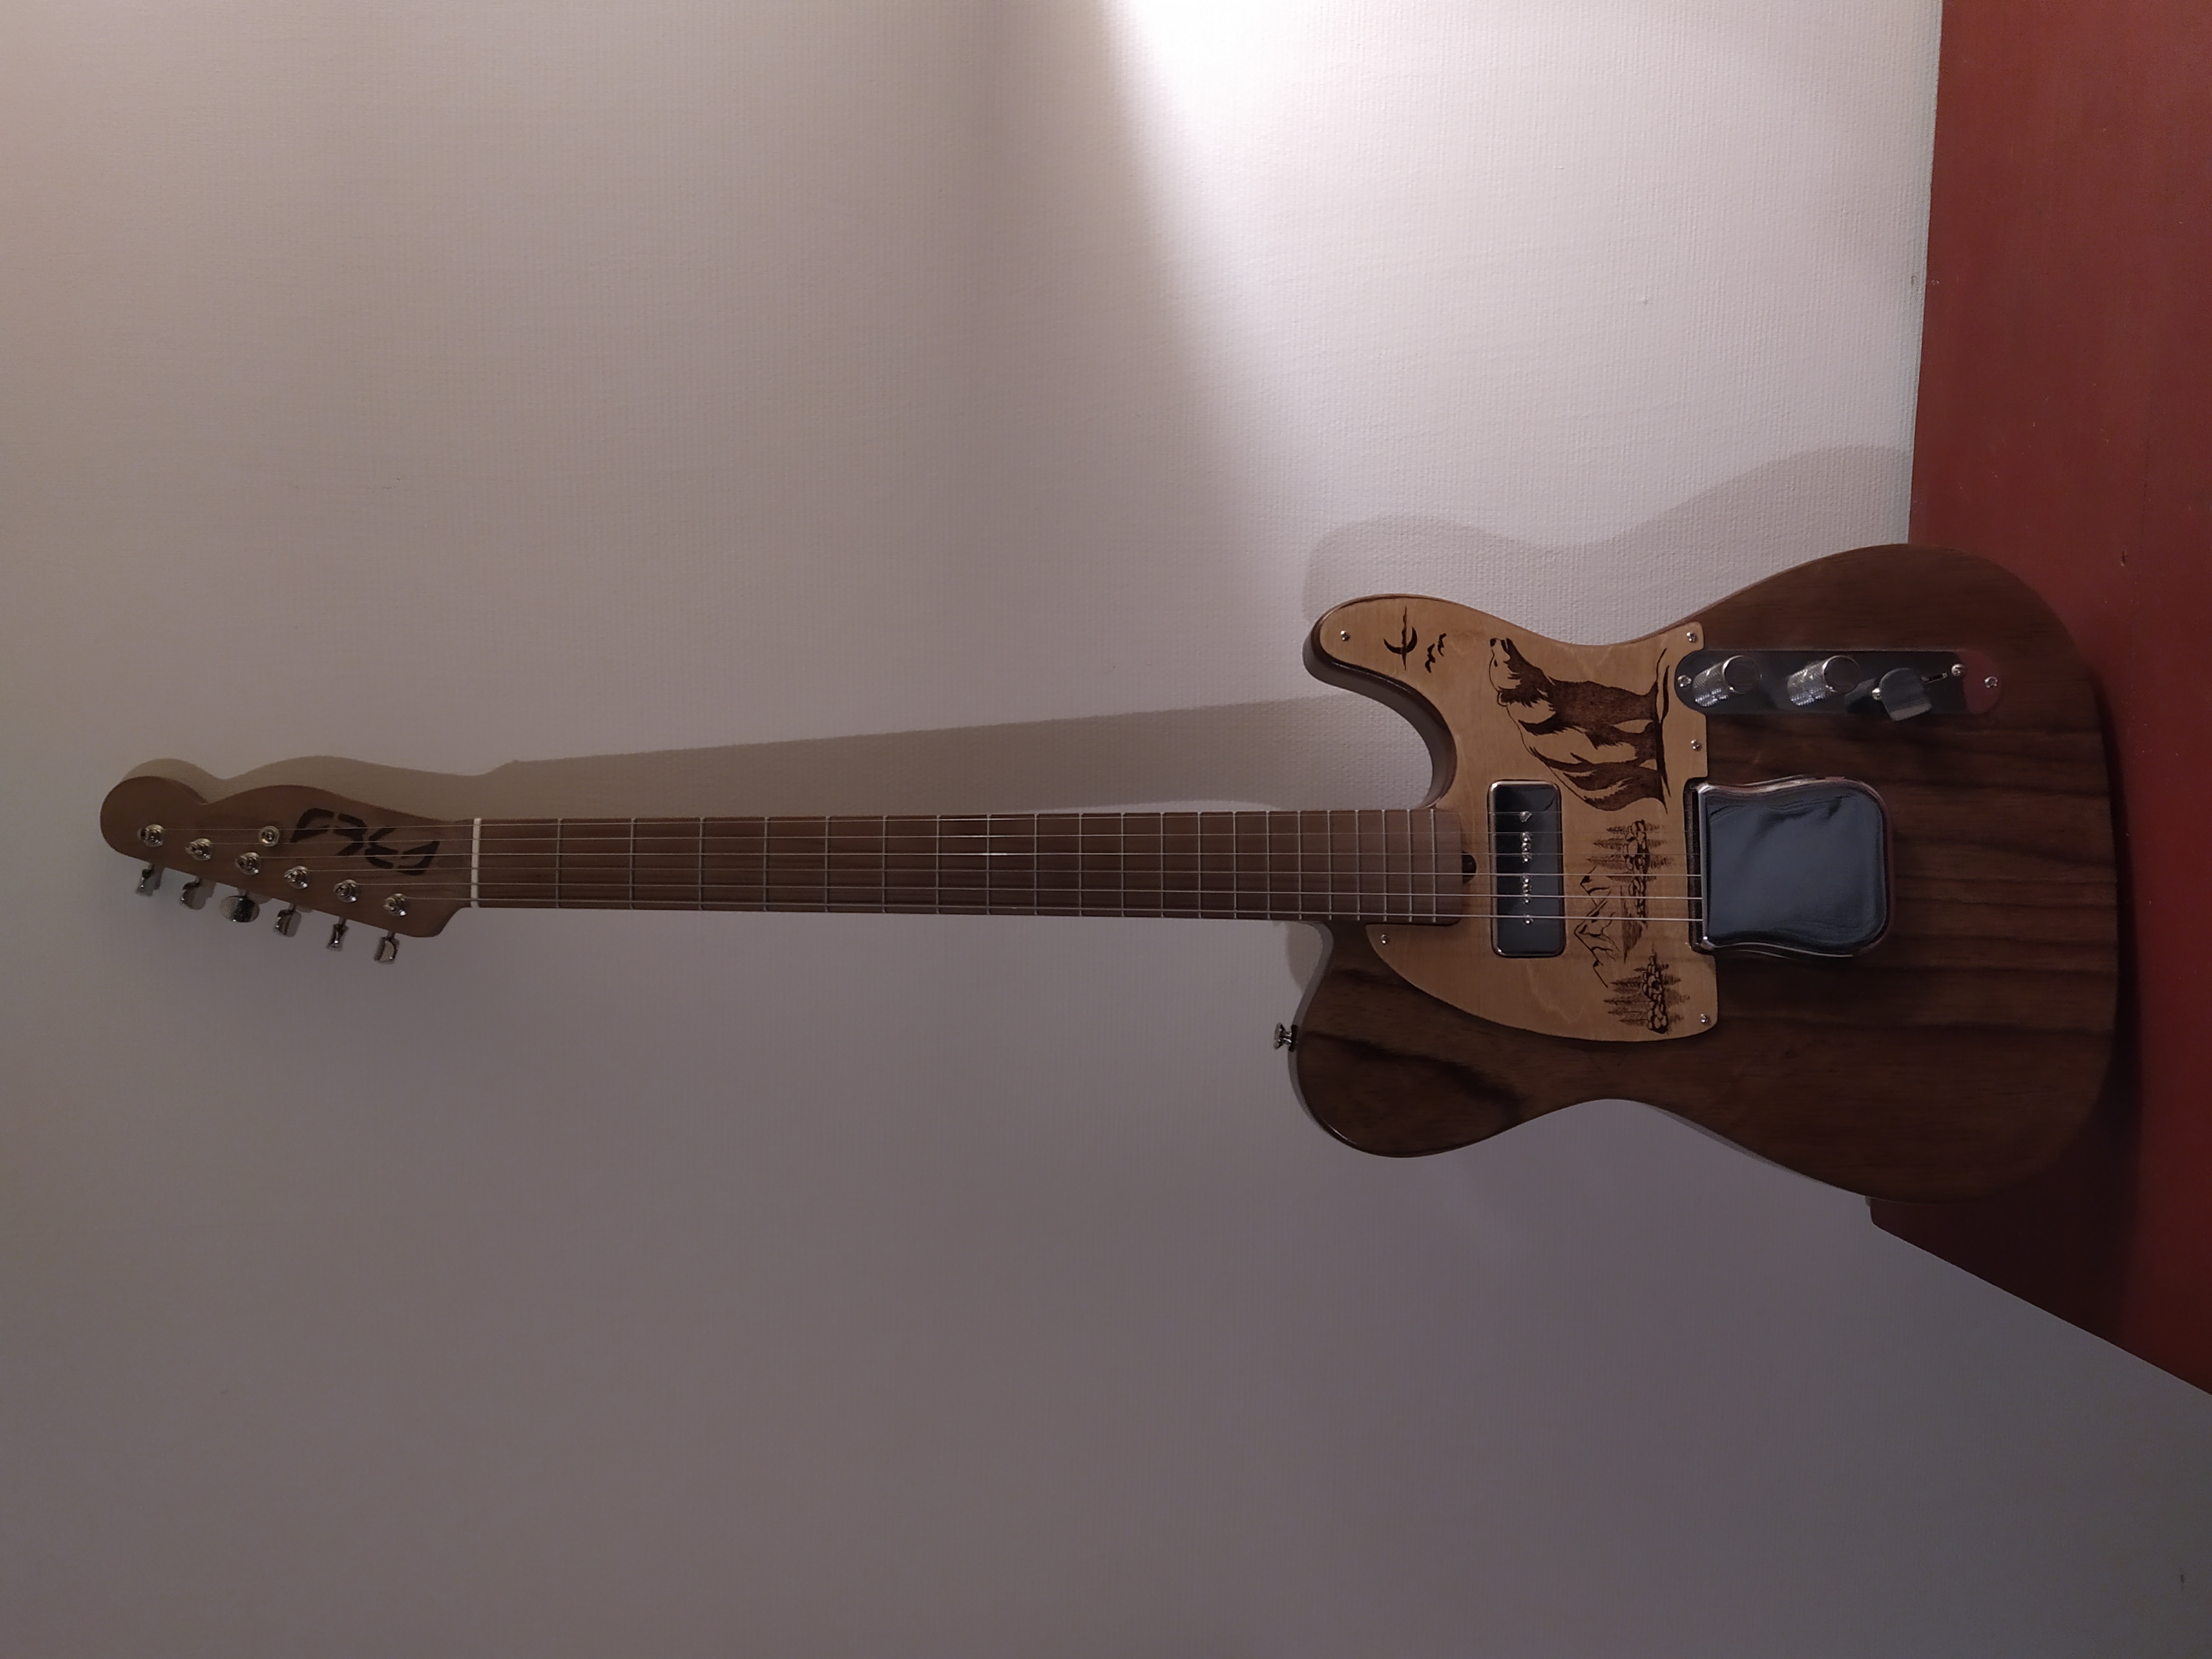
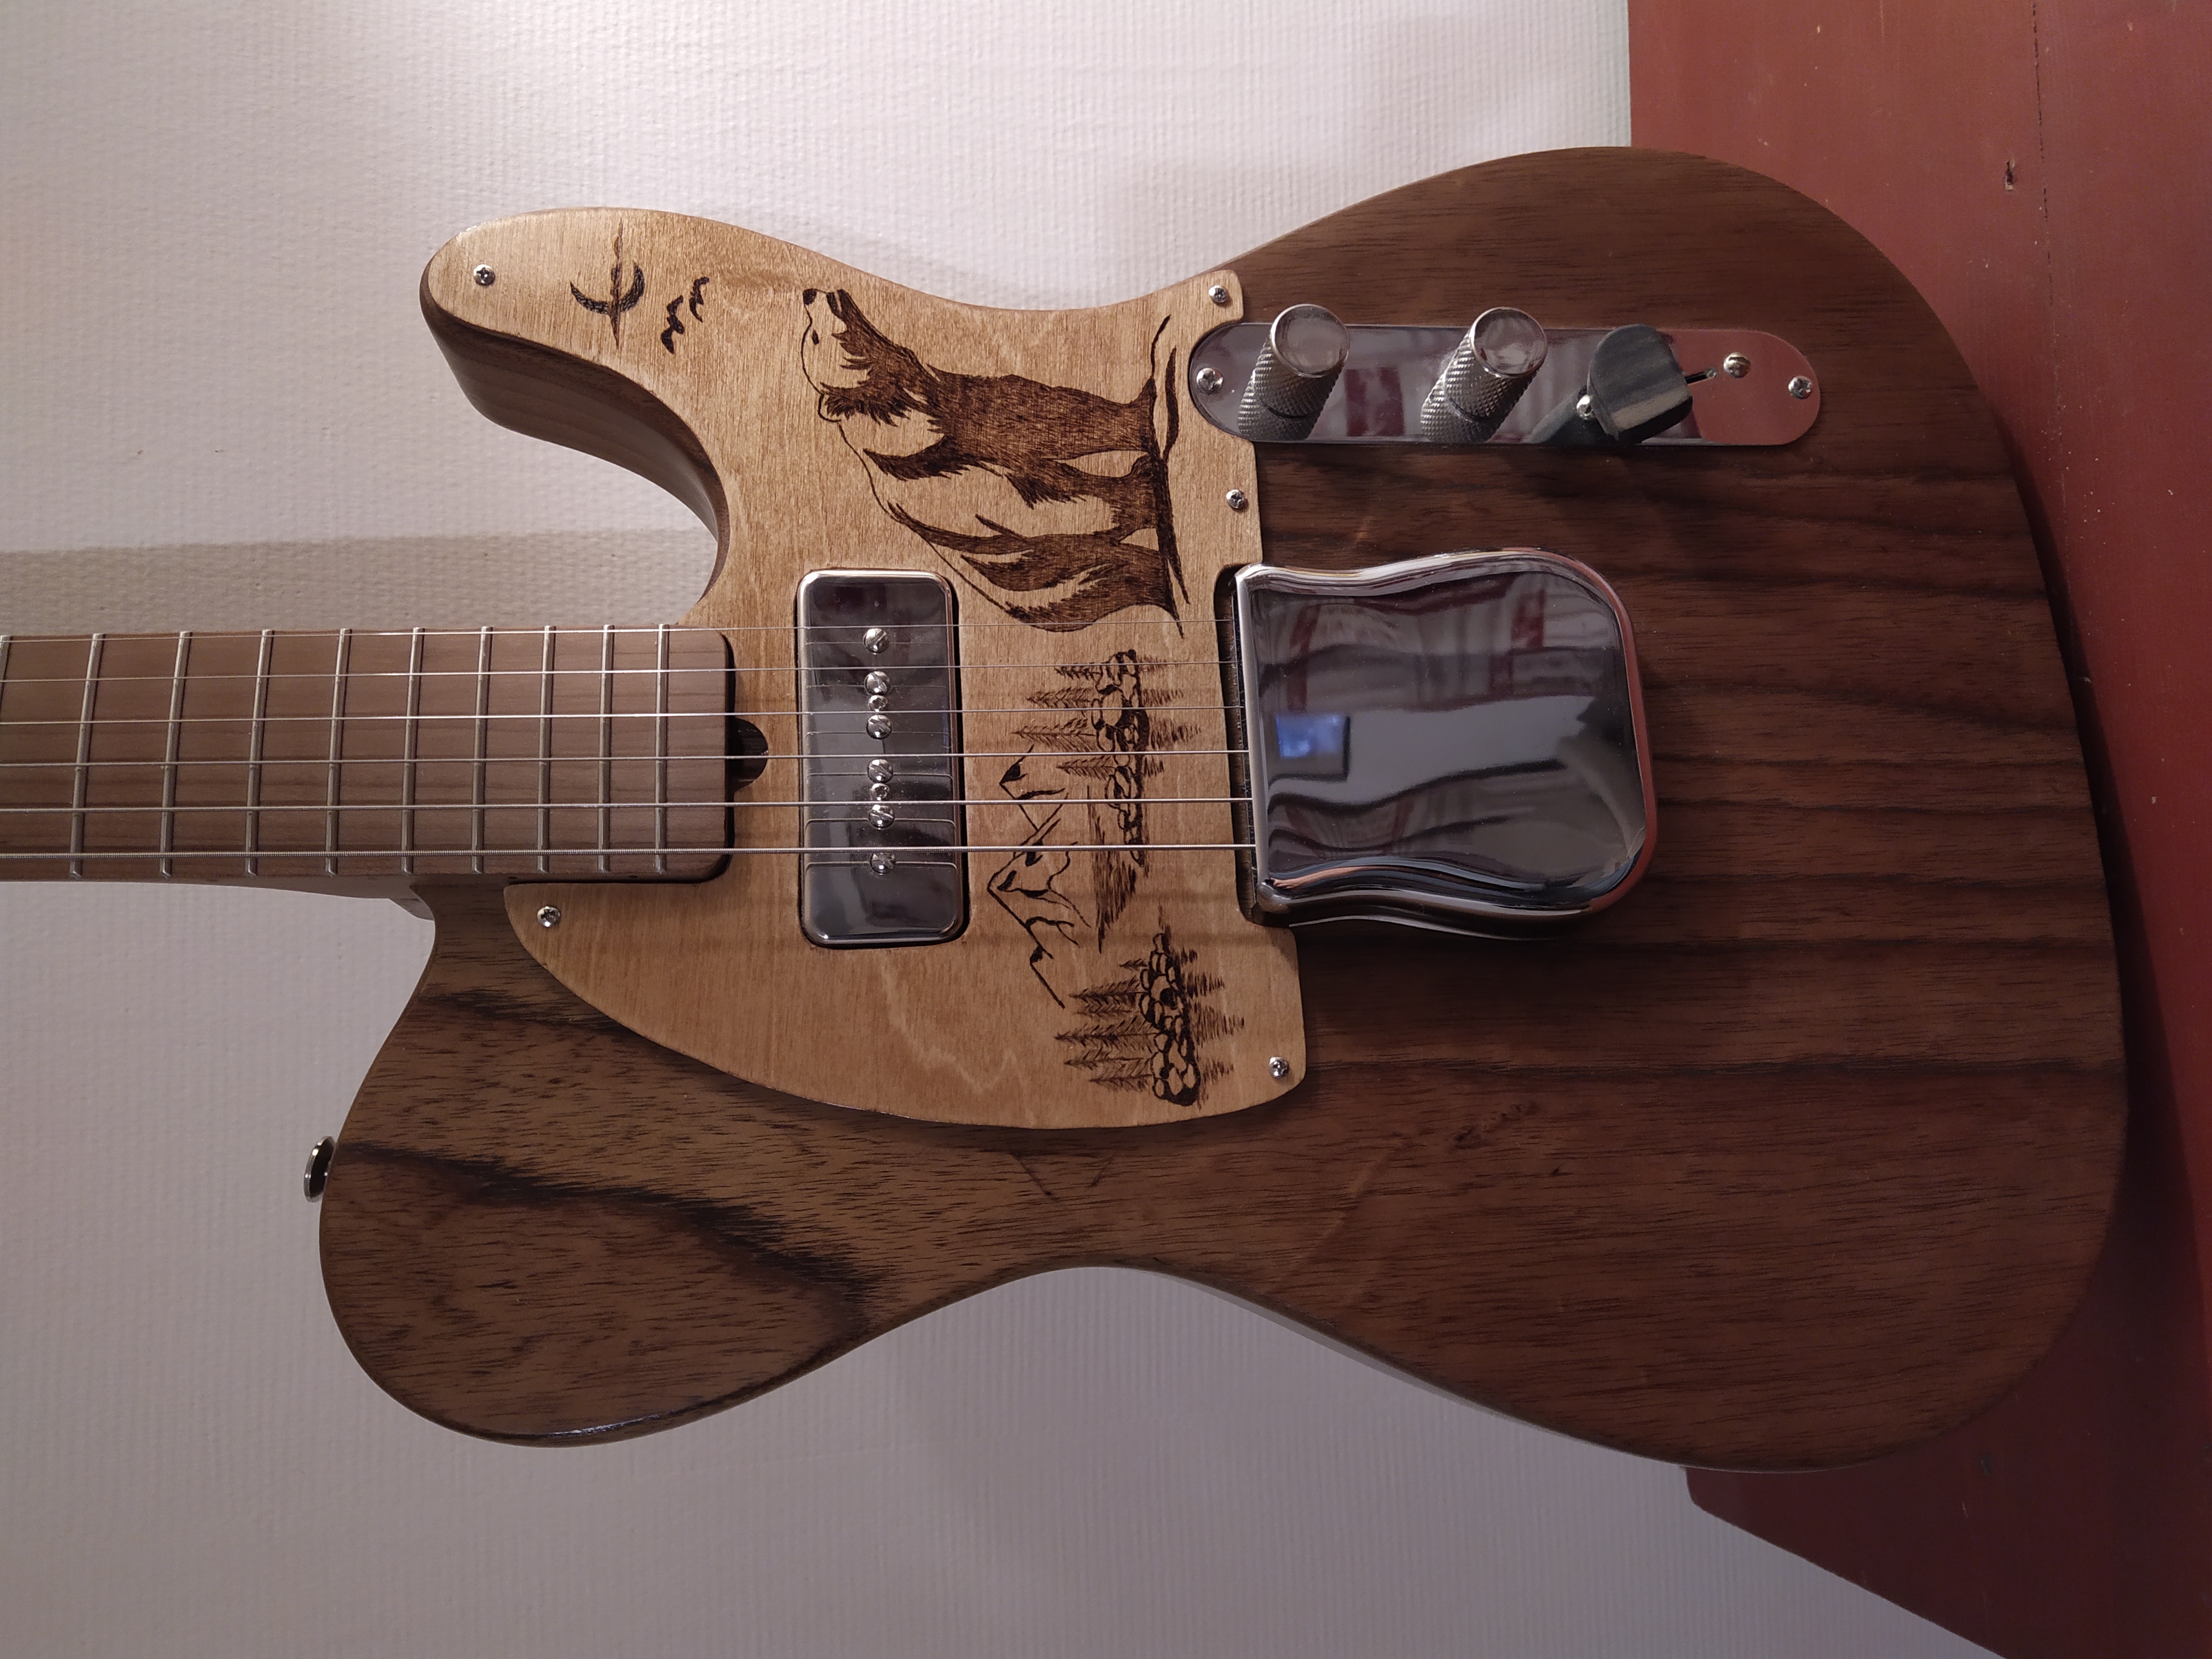
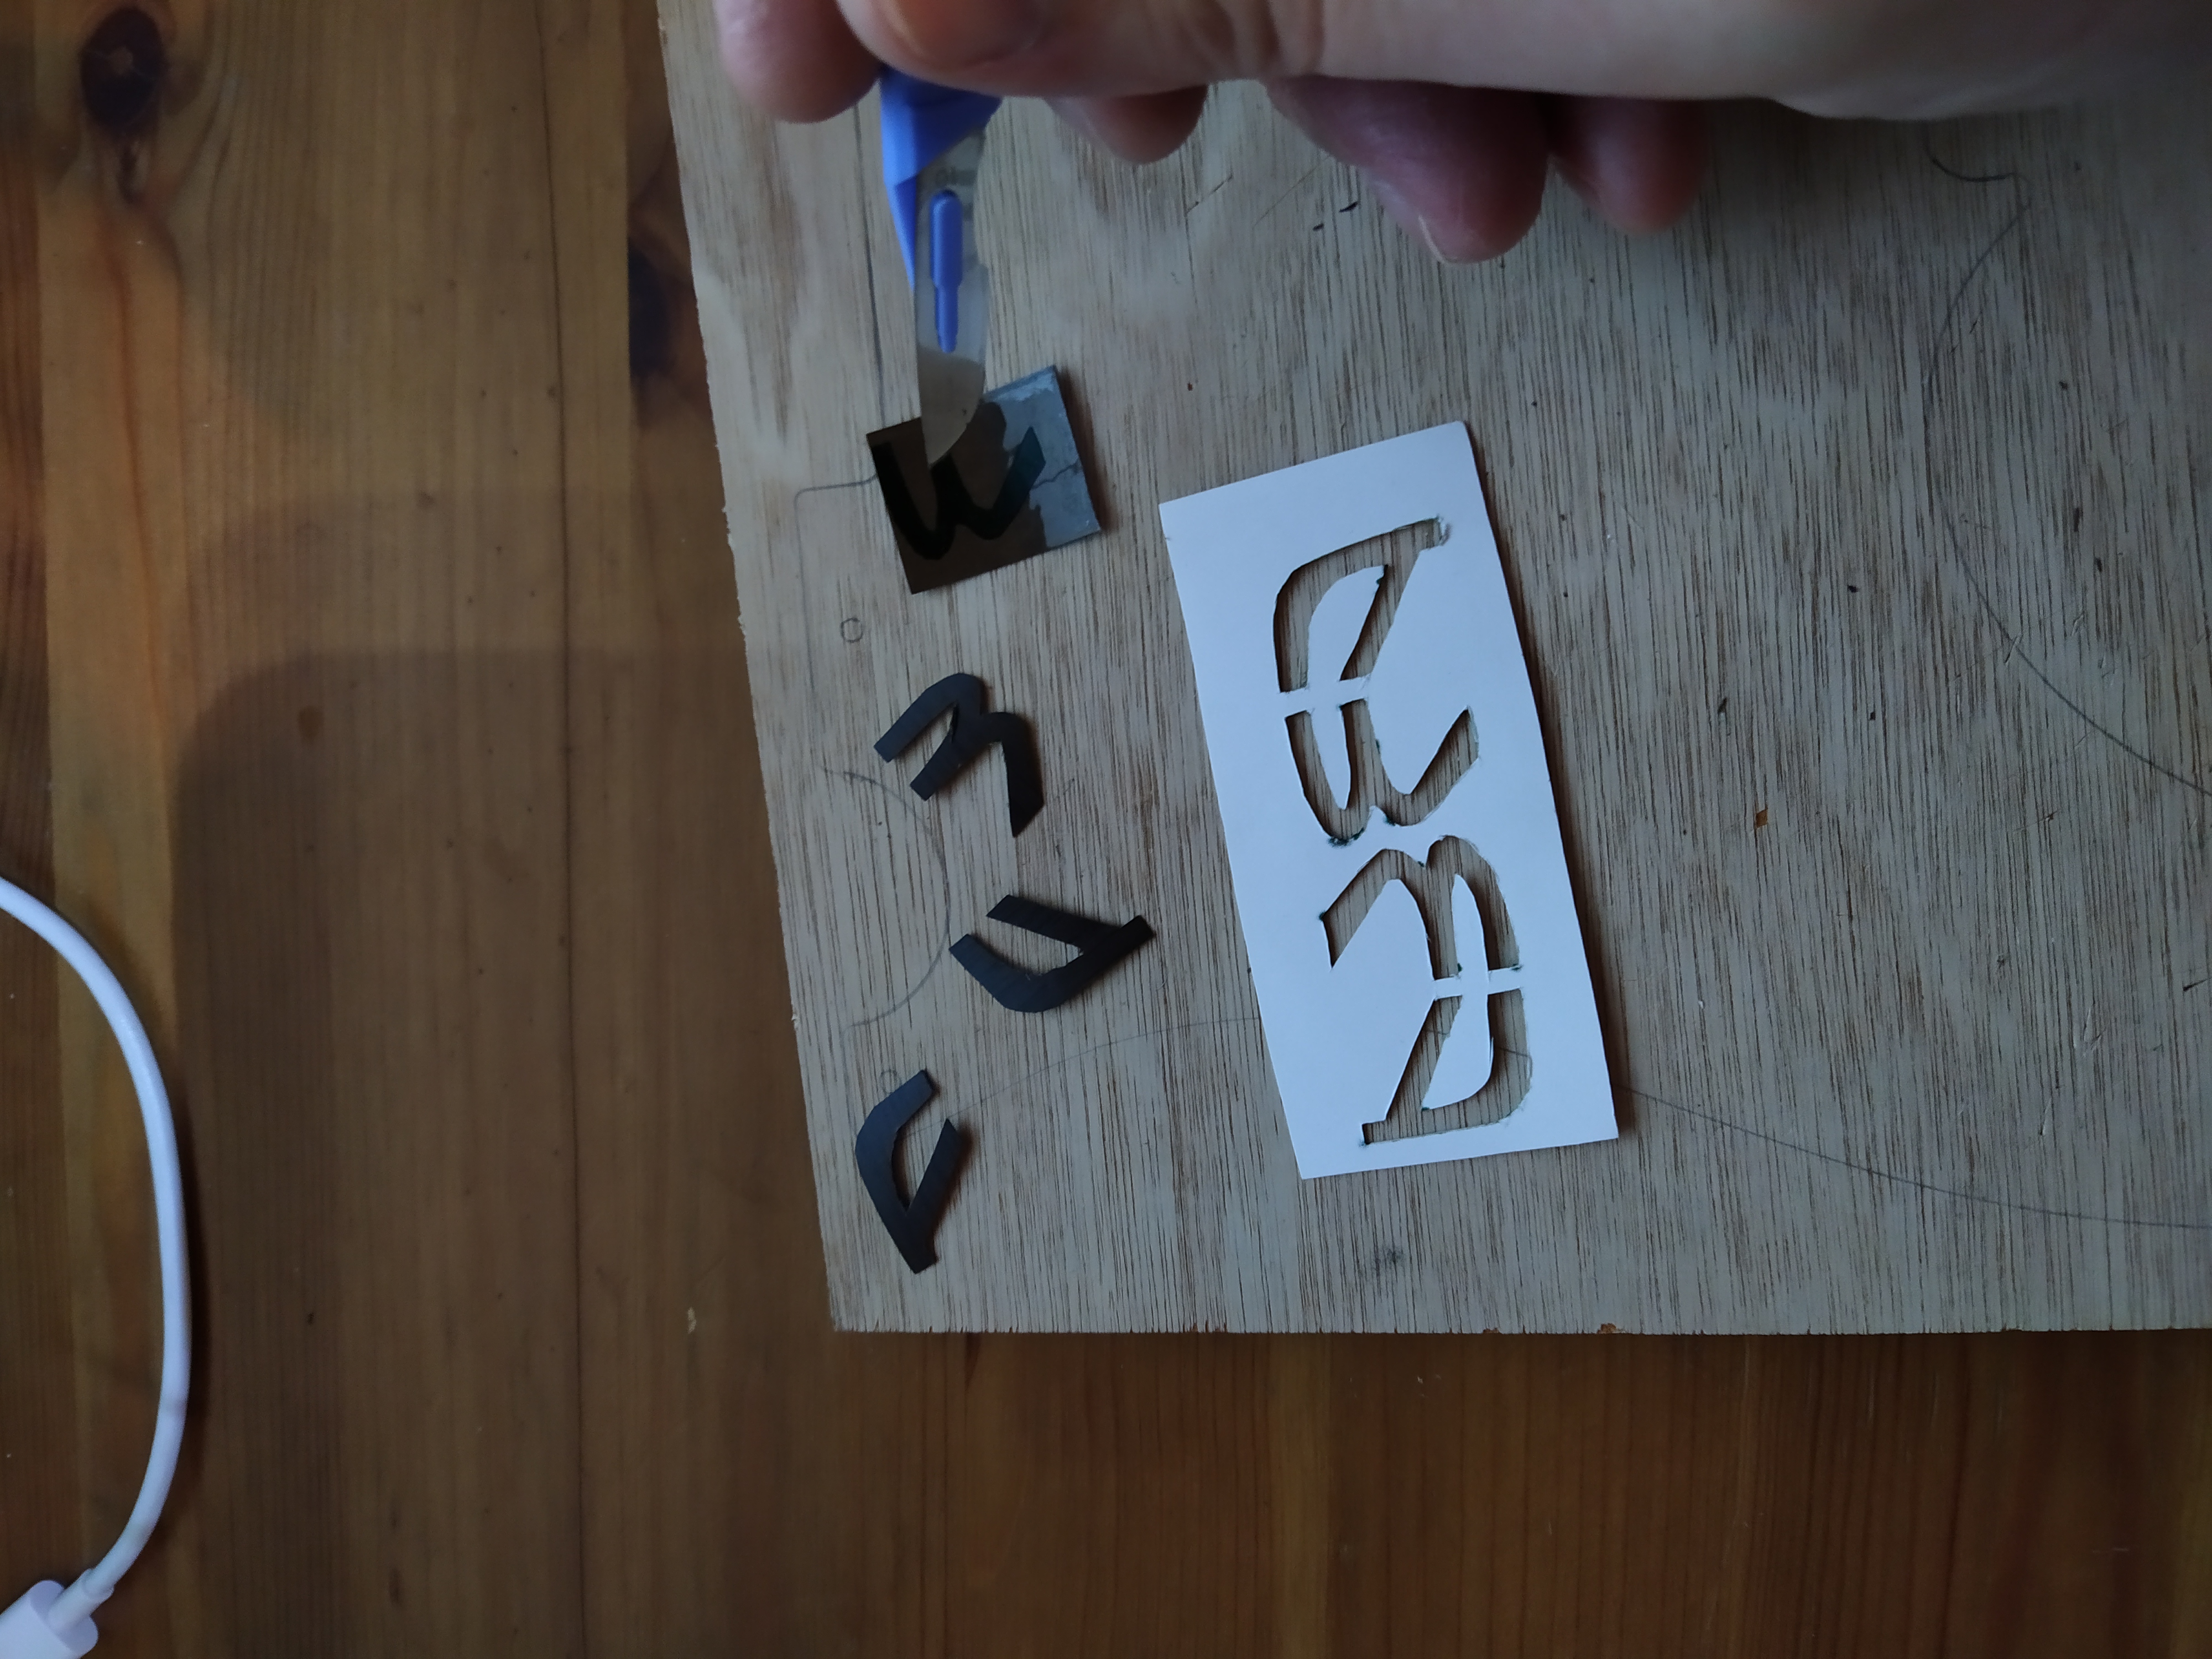
Figure 21: cutting the pickguard. I then woodburned a drawing. I carbon copied the bear drawing and outlined it with a woodburner. I drew the rest myself. I had no prior experience with woodburning. I simply did some tests on scrap wood, as can be seen on Fig. 22.
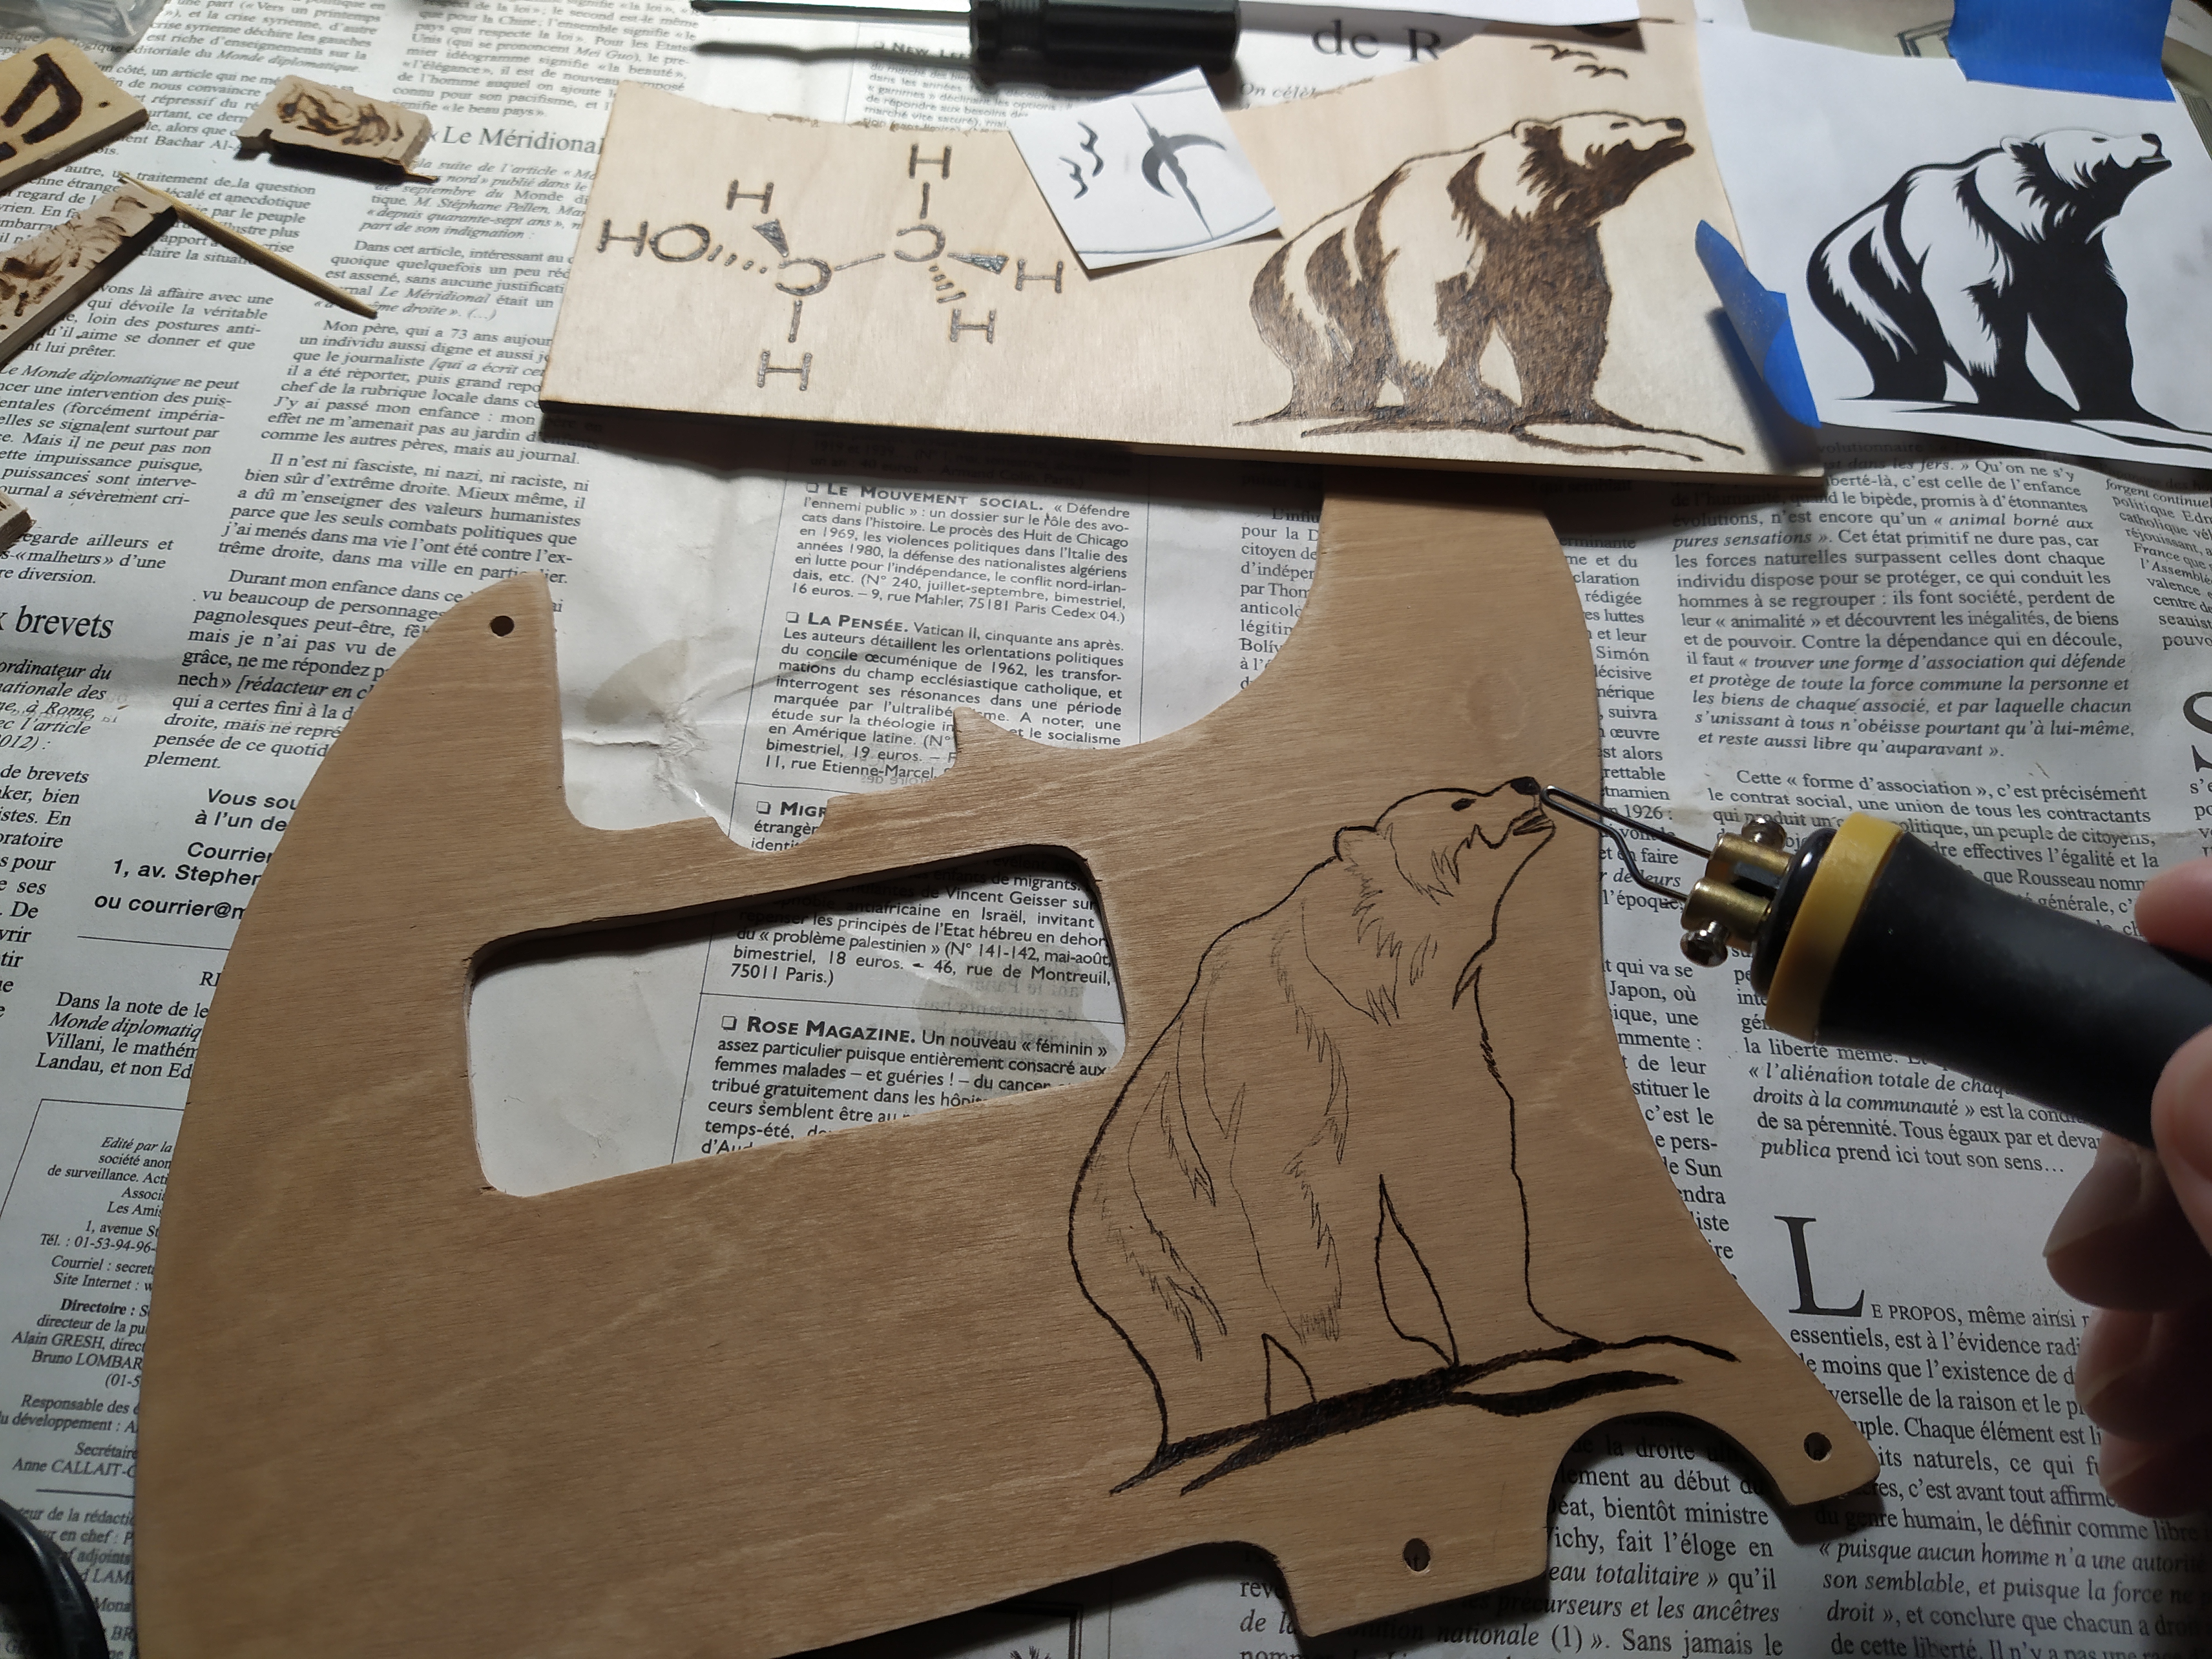
Figure 22: woodburning the pickguard. The pickguard was finished with Tru Oil, using the same recipe as for the body (Fig. 23).
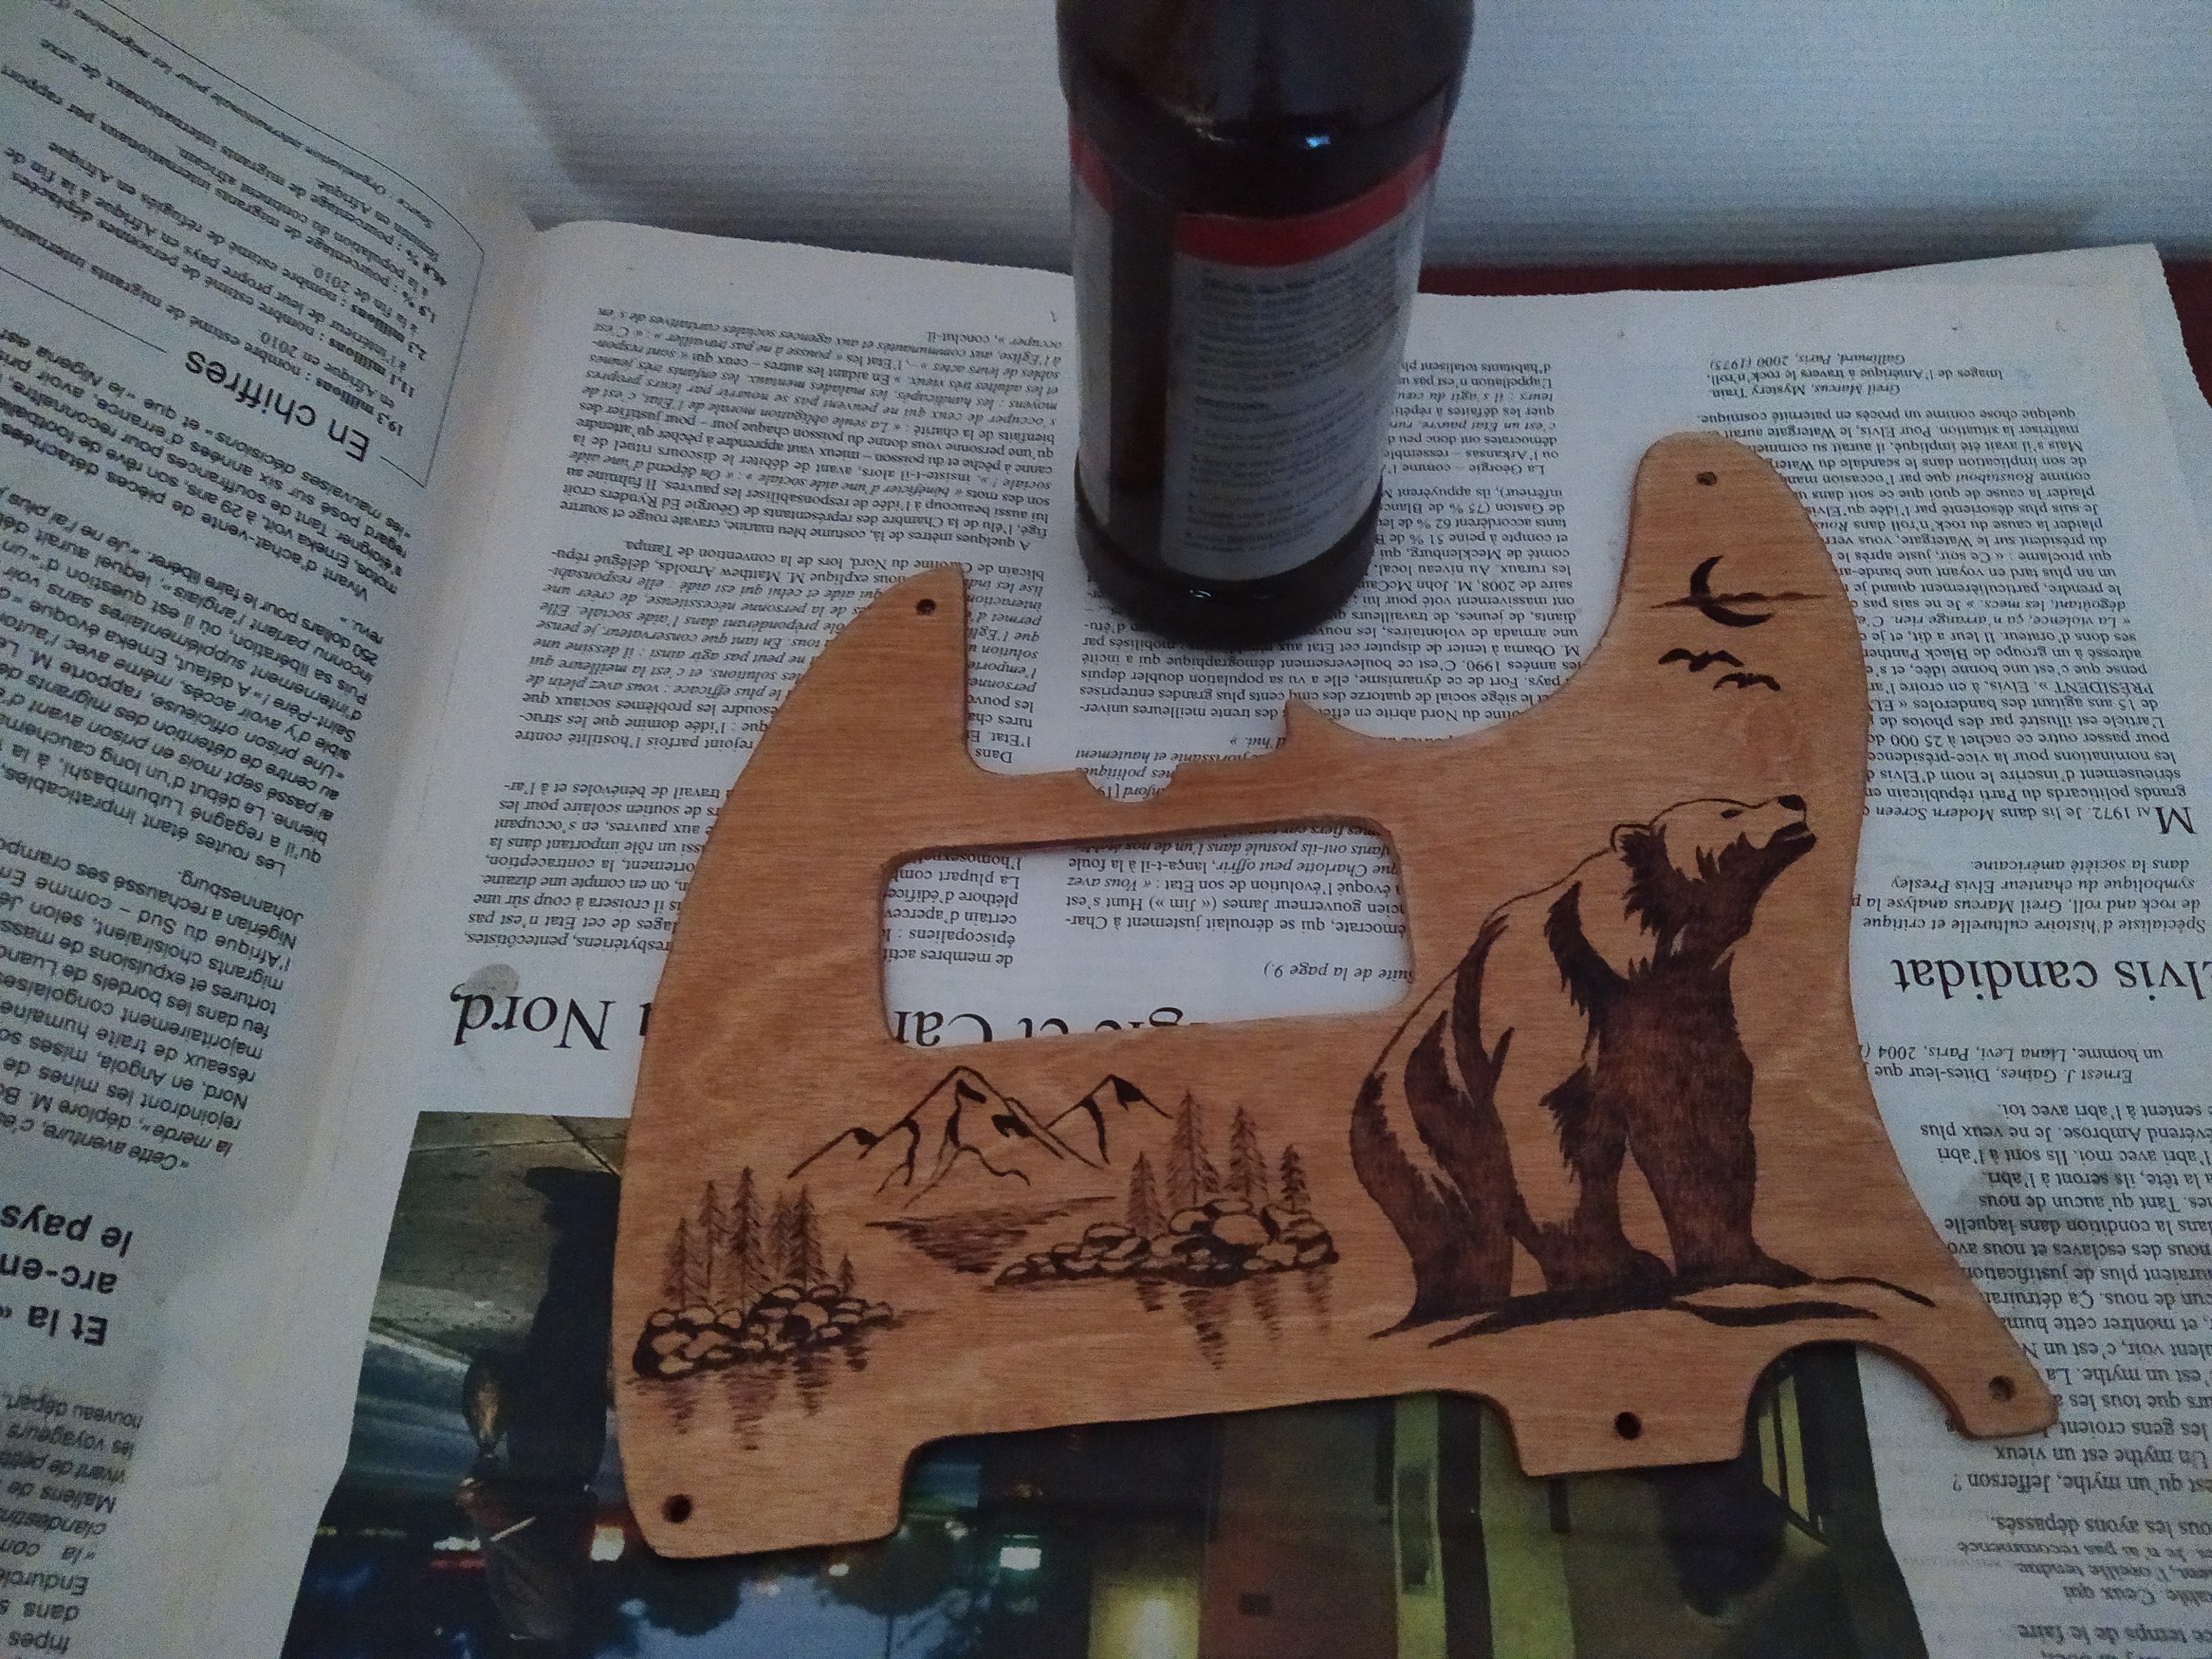
Figure 23: finishing the pickguard.
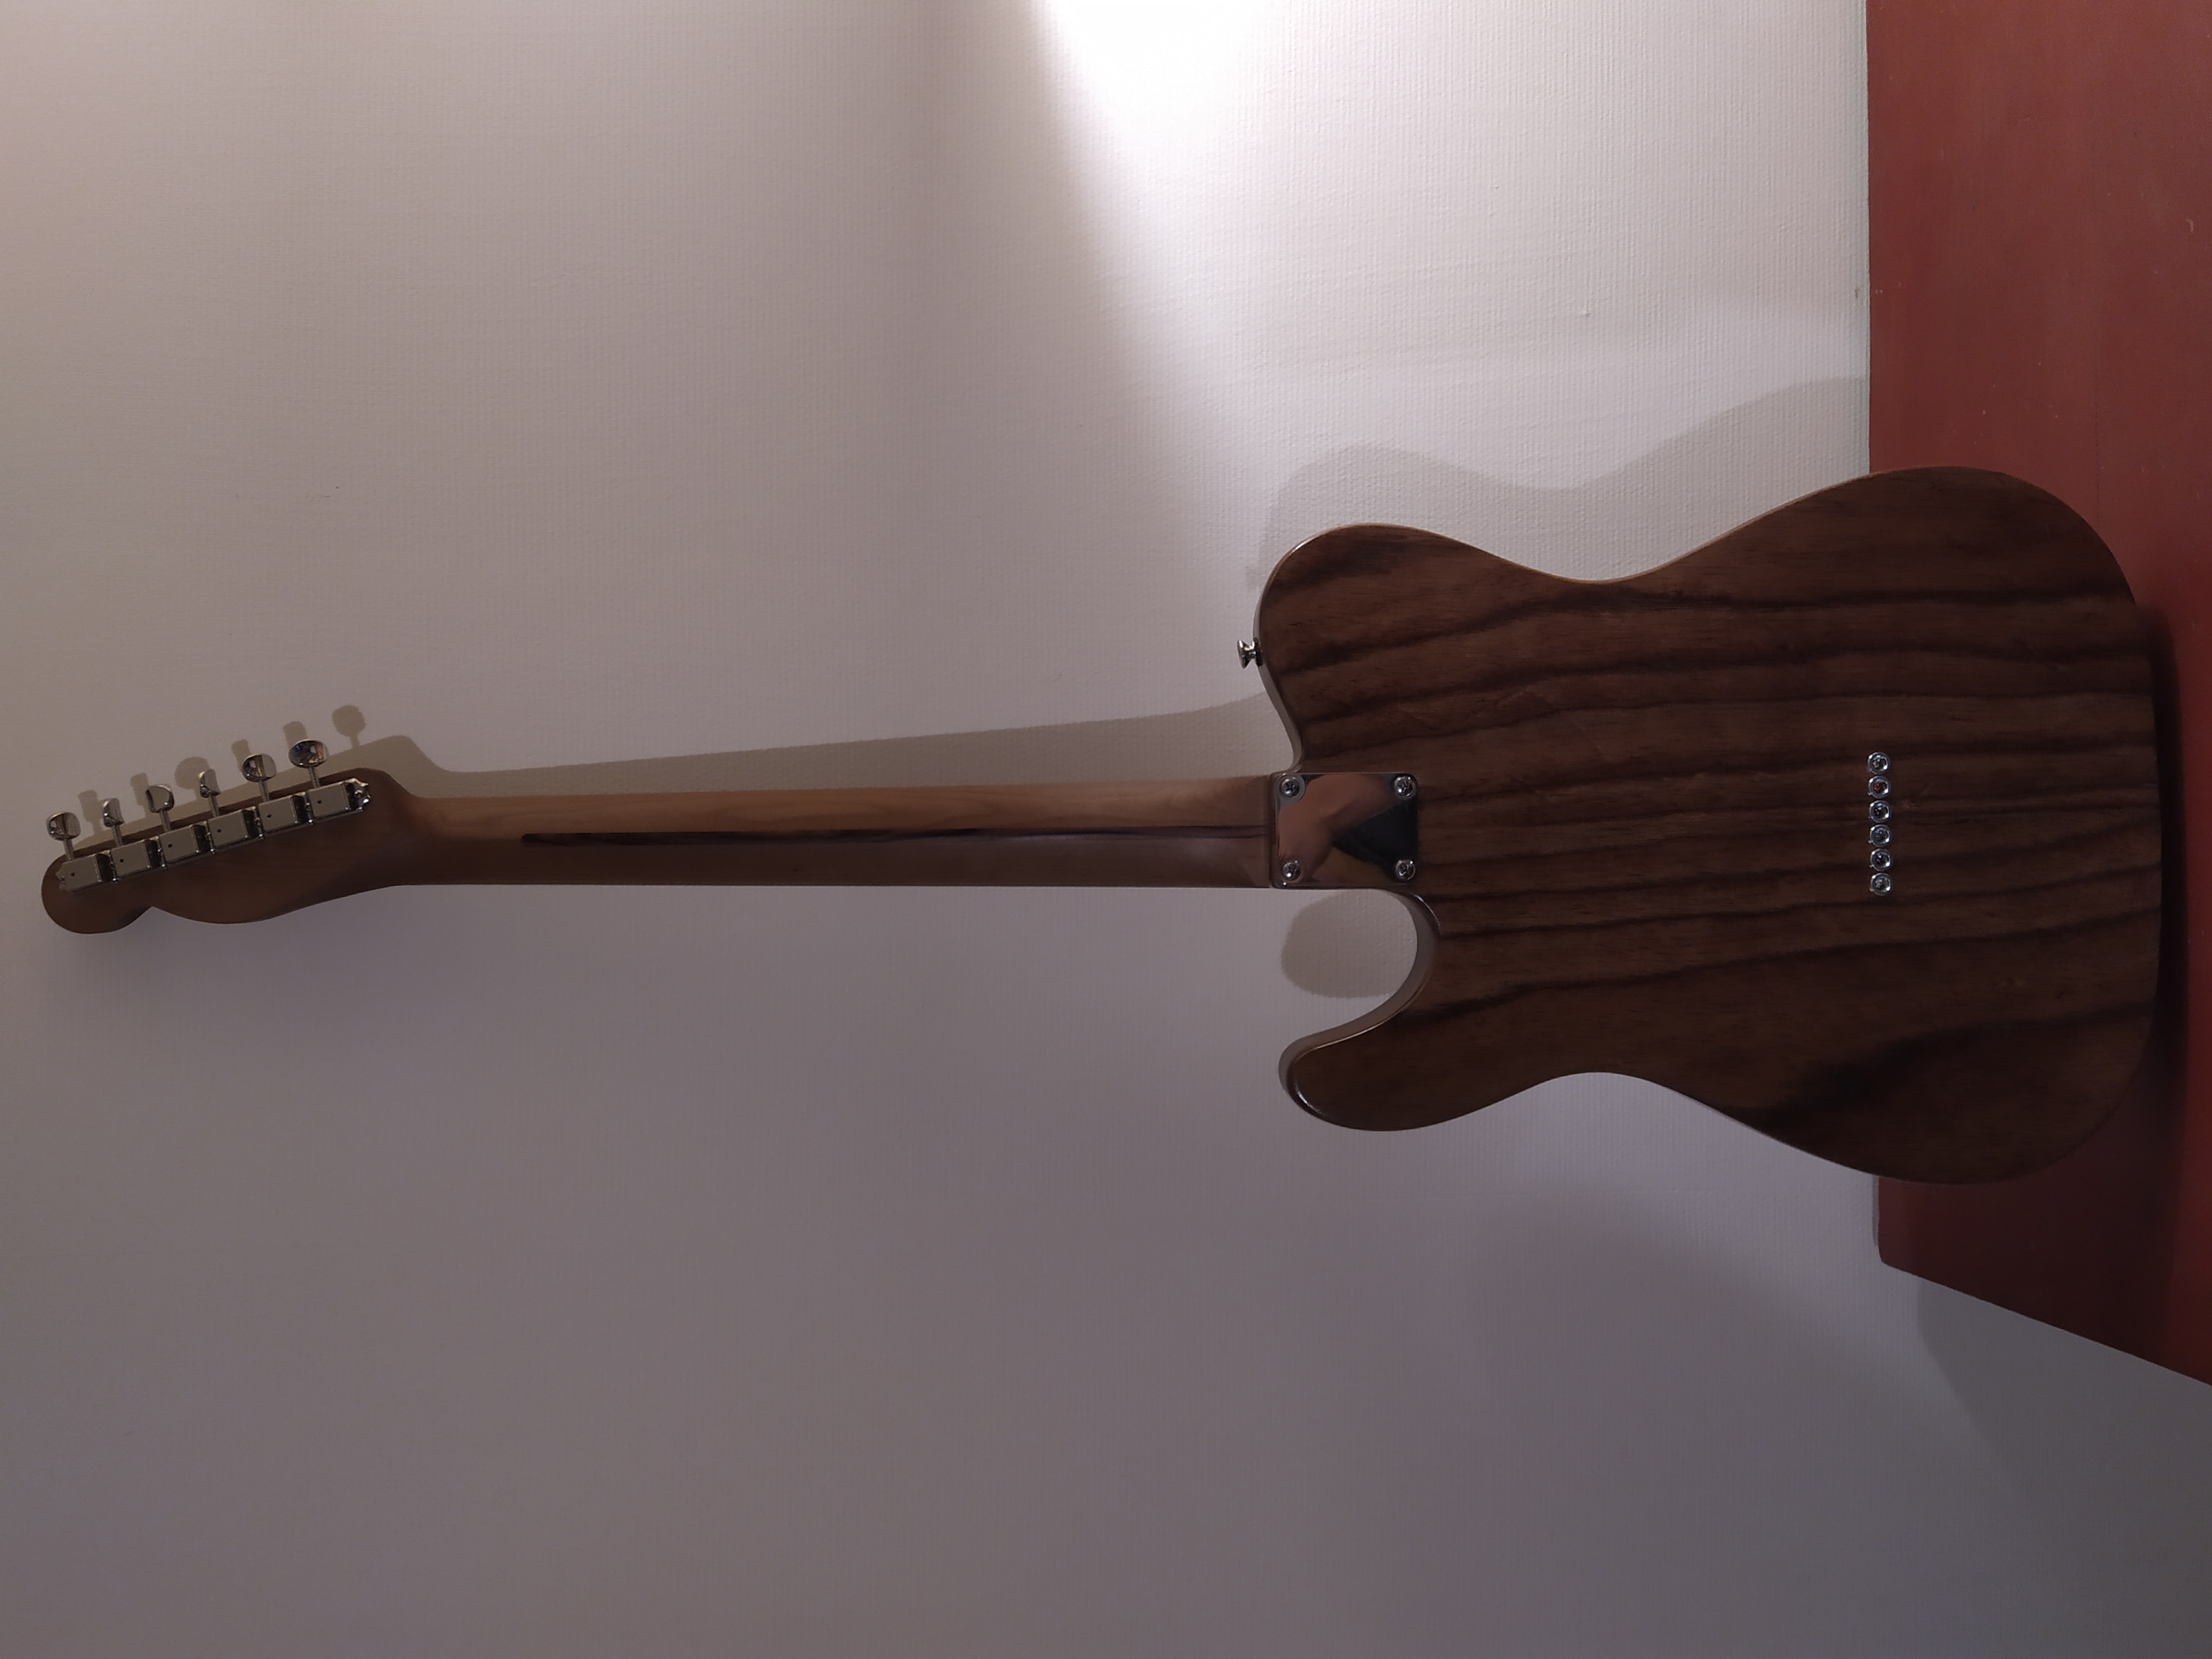
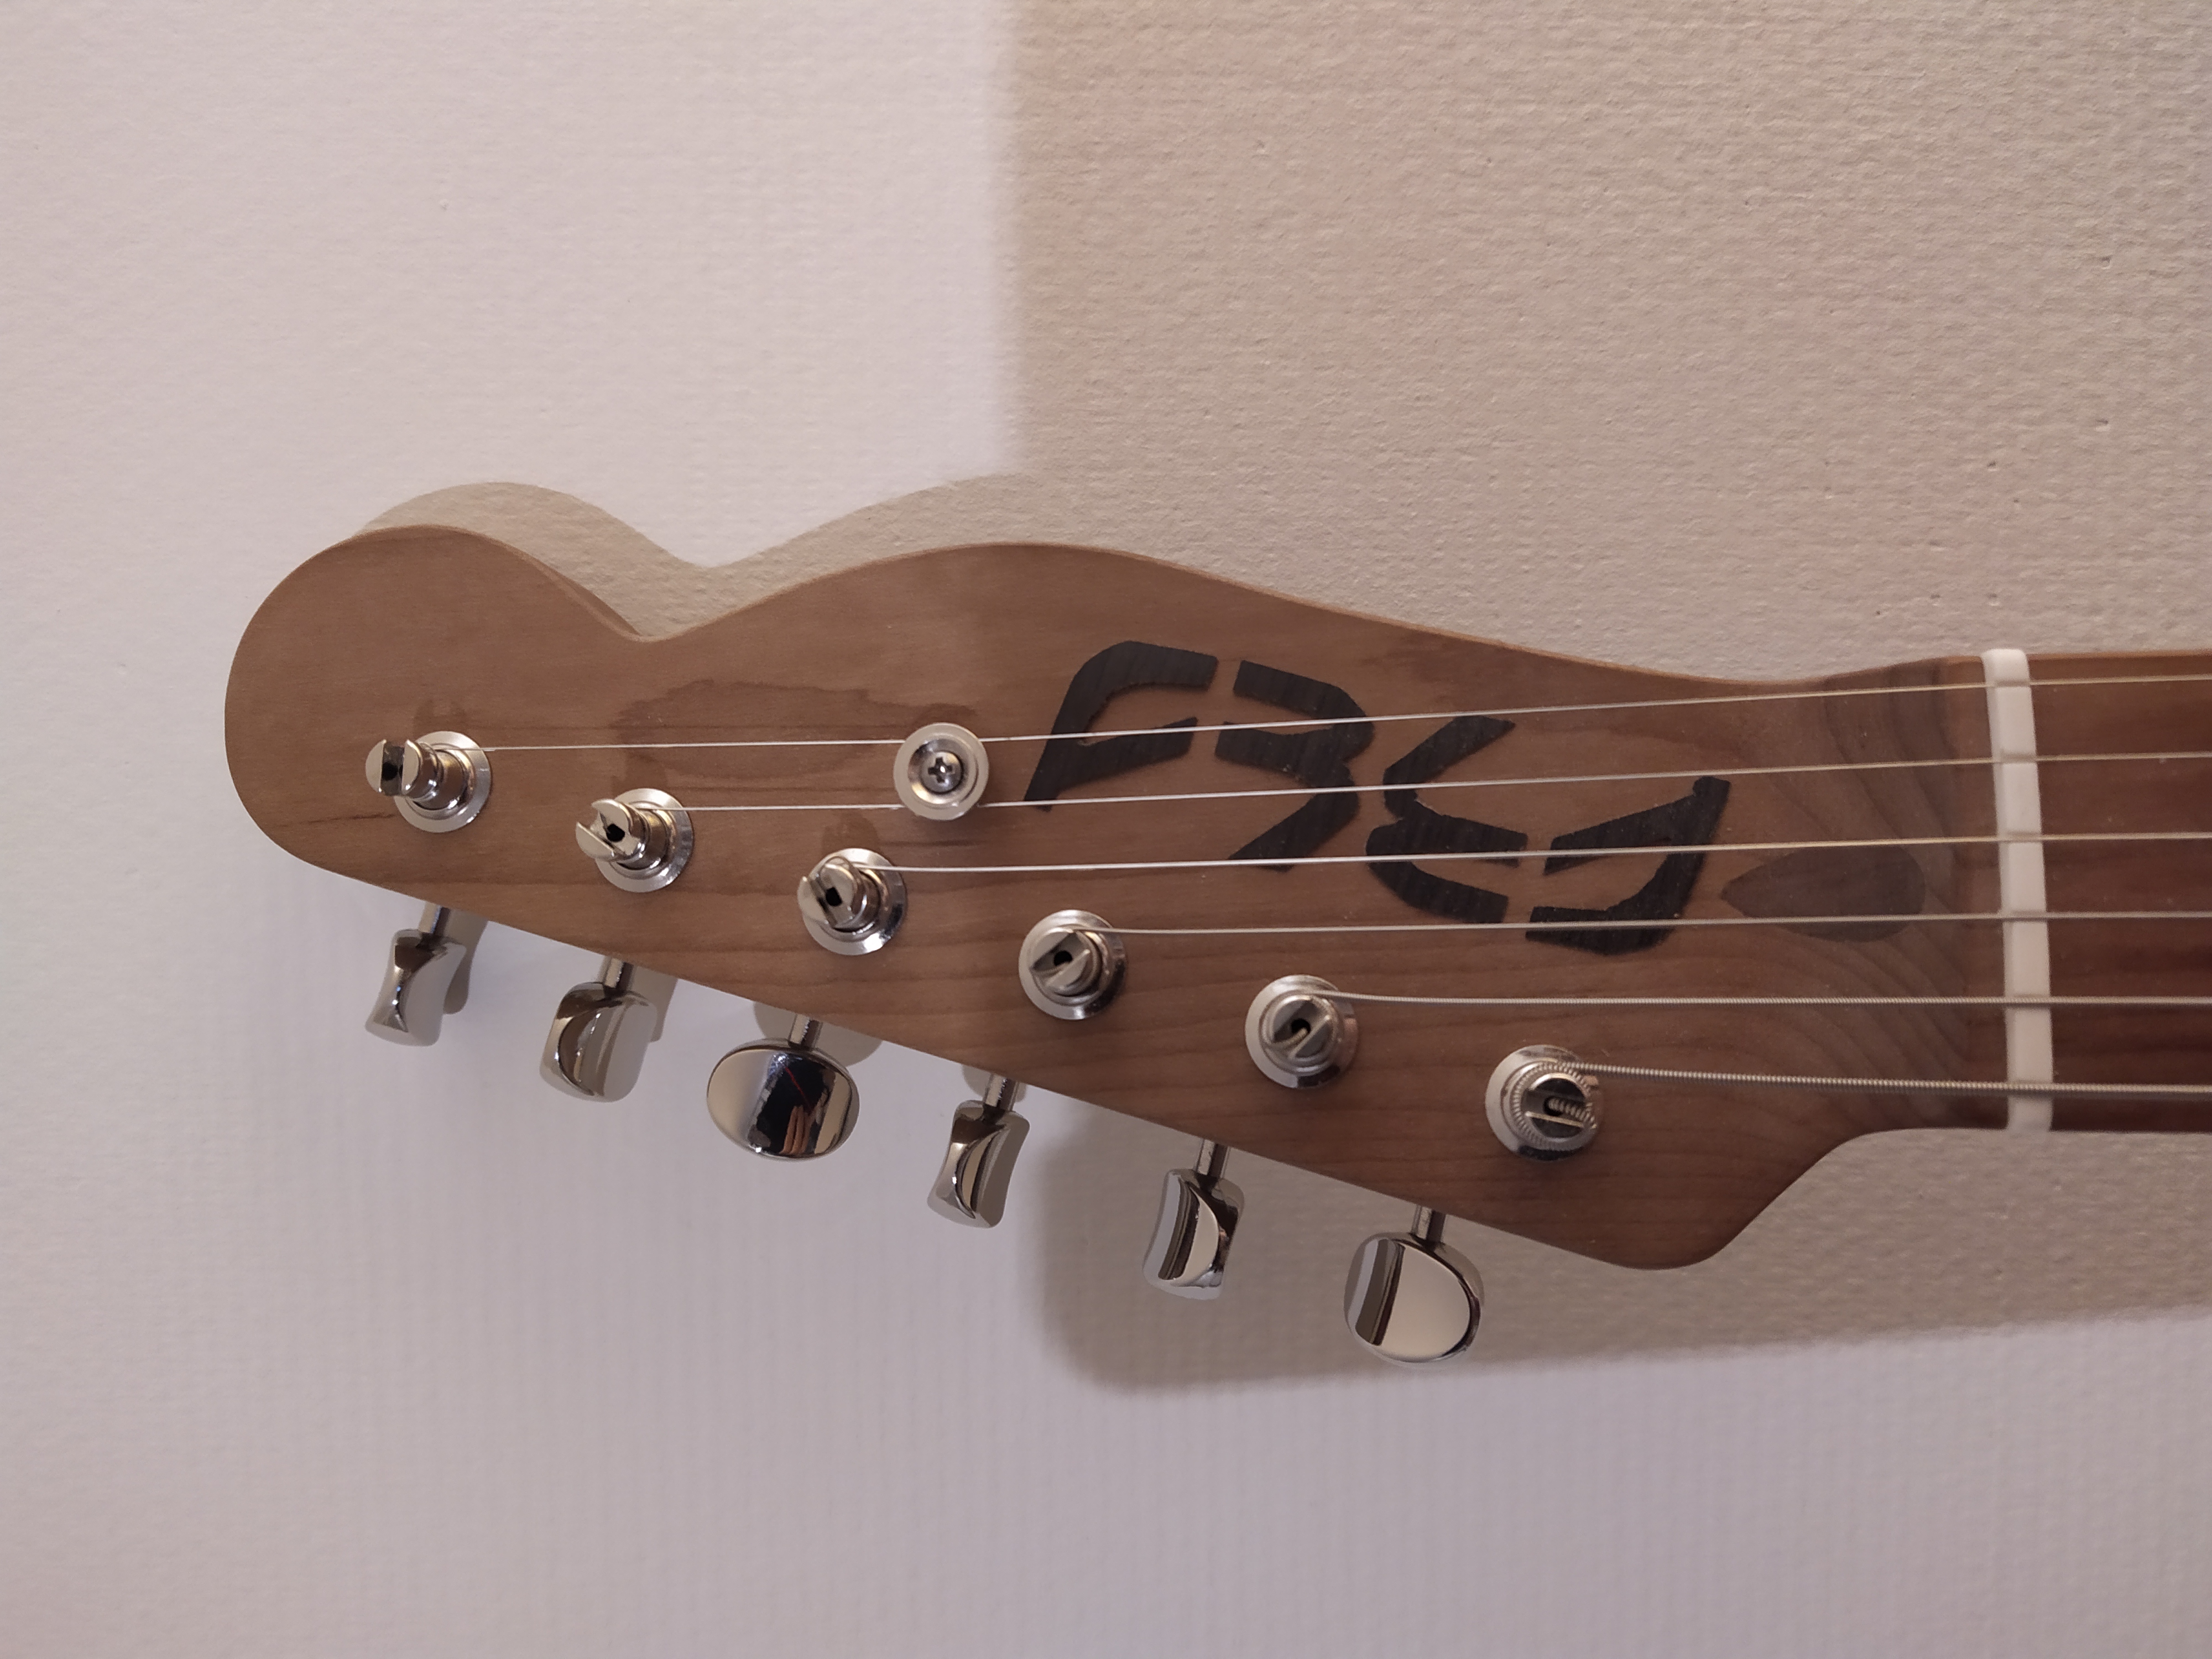
3.4.3 Impressions
Overall, my main goal is achieved. This Bearcaster has been my favorite guitar for already several months, in terms of sound, feel and look. This journey did not feel like a weird experience. It was rather a somehow successful attempt at approaching the ideal guitar. More custom builds will follow, as there is room for improvements, and other cool types of guitars to try. Here are a few shots of the final result.